Secret to Painting Shadows in Watercolor: Tutorial, Tips, Techniques & Colors
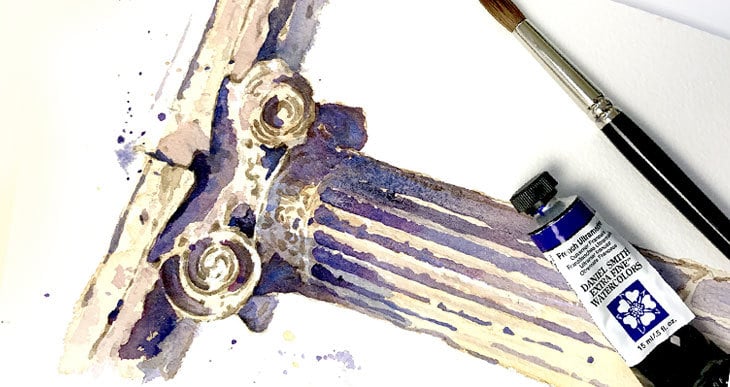
Have you ever tried to paint shadows in watercolor and been disappointed with the result? I remember when I started painting I had problems with shadows. Sometimes the color was totally wrong, the results looked muddy, or they just didn’t look convincing.
So how should you paint shade and shadows in watercolors? Painting lifelike and convincing shadows begins with a good understanding of how light, shade, and shadows work in the real world. Shadows are never just gray, and mixing the correct colors for shadows depends on the colors of the object and its surroundings.
Shadows, and the light that creates them, are what help us to perceive the world around us. Faithfully capturing light and shadow in watercolor painting is an important part of creating believable looking artwork. But don’t worry! Understanding and applying the basic rules about shadows is enough to give an impression of realism and improve your paintings dramatically.
Shadows in Watercolor
Shadows give depth and form to your paintings. Shadow shapes, and the lightness or darkness of the shadows, help provide a convincing sense of three-dimensional form. Shadows are also important for showing the direction of light in a scene.
It’s difficult to talk about shadows without also discussing light. When you paint objects from real life you are interpreting light. If your interpretation of light is convincing your shapes will create realistic looking forms. But in reality you’re just painting two dimensional shapes of color and value which create the illusion of depth and form.
Throughout this article you’ll see me use the terms “tone” and “value”. Just as a reminder, these two things mean the same thing and refer to the level of lightness or darkness of a color.
So when you paint with watercolors you need to be able to analyze where the light is coming from and how it affects the shapes and colors of light, shade and shadow.
The following is an explanation of the basic principles of shadows. It may seem academic and a bit pompous, but once you have a grasp of these ideas, it can really make a difference to how you observe a subject, and break it down into easily identifiable parts.
Shadow Basics
In order to depict realistic looking shadows you need a basic understanding of how light and shadow works in the real world. For this, let’s take the example of a simple sphere lit by a single source of light.
There are two types of shadow in this scene. The first is the cast shadow. This is the shadow projected onto the ground by the sphere. The second is the form shadow which is the shadow projected onto the sphere itself, where the surface of the sphere turns away from the light source.
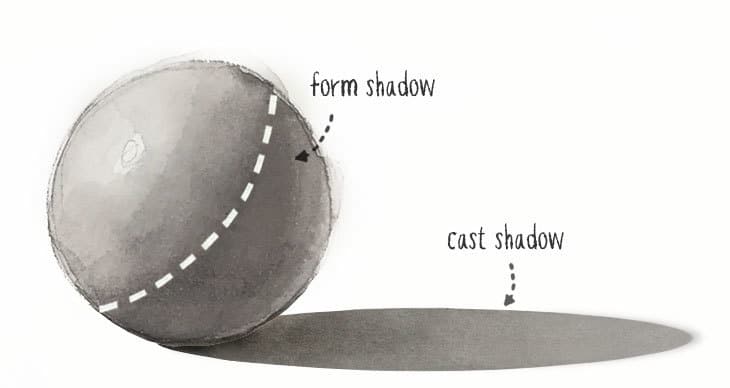
It’s useful to note that the form shadow is also what we refer to as the shaded part of an object. Strictly speaking, shading is when you paint “form shadows”. Artists often refer to “shading” an object. Shading is just another way to say adding shadow.
The shape of shadows depends on the direction of light in the scene. The way a scene is lit can generate interest and dramatic impact. This is often an important element of “good” artwork.
Finally, the color of the shadows you paint is dependent on the colors of the objects and the lighting in the scene. In watercolors, mixing the right colors for good looking shadows can sometimes be tricky. It’s not just a matter of adding gray!
Cast shadows, form shadows (shading), shadow shapes, and colors, are the four basic elements to shadow painting.
There are a few rules that artists use to help determine how to depict each of these shadow elements. Making good use of these rules can bring a new level of interest to your artwork.
Cast Shadows
When an object blocks a source of light it forms a shadow on the surface that it’s sitting on. This is the cast shadow. But in realistic lighting situations the cast shadow isn’t just one continuous block of gray. Cast shadows vary in tone, sharpness and of course color.
All these variations in tone and color of the shadow area occur because of what’s known as ambient or indirect light. Ambient light happens because in real life, light bounces off surrounding surfaces and adds light to the shadows themselves. As a result shadows can be just as interesting as the other shapes in your paintings.
Cast shadows can be broken down into three different parts: The cast shadow itself, the occlusion shadow, and the penumbra.
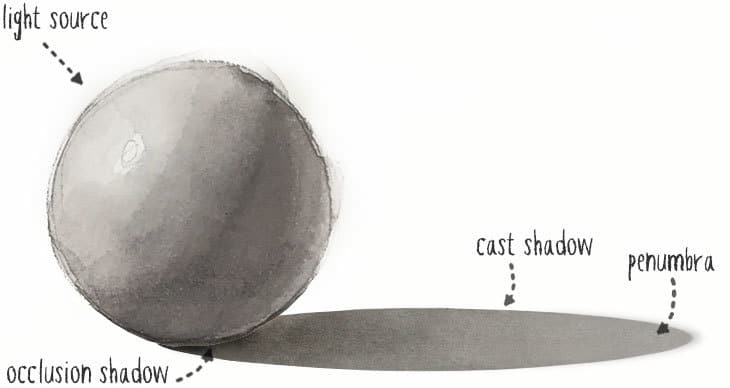
The darkest part is found close to or just underneath the object. This is because of the absence of light in this spot. This is the place where all light sources, even bounced light from the environment, cannot reach. This dark zone is often referred to as the occlusion shadow. Occlusion is just a fancy word for “obstruct” or “block”.
The further away the cast shadow is from the obstructing body, the lighter the value of the shadow. This zone is known as the penumbra. This seems fairly logical when you think about it because this part of the shadow is more open to the surrounding environment and so it’s color and tone are more easily affected by ambient light.
As a general rule, the edges of the cast shadow become softer and more diffuse, the further away they are from the object. In other words, they are sharp and better defined near the occlusion shadow and softer towards the penumbra.
Form Shadows
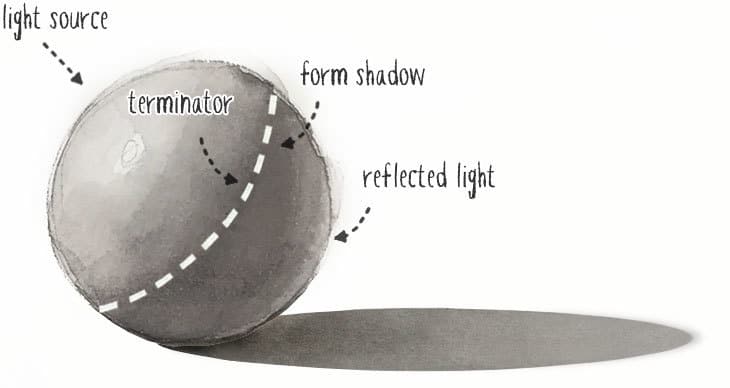
In a similar way to cast shadows, form shadows can be broken down into different parts and tend to vary in intensity and color. On a curved object such as our sphere, form shadows begin at a dividing line known as the terminator. This is the moment on the sphere where the surface begins to turn away from the light source. Because the sphere has a continuous curve, the further away you get from the terminator, the more obstructed and darker the shadow. This tends to give an even transition from light to dark values and a smooth blended edge to the form shadow.
Within the form shadow there is a moment where the surface of the sphere is completely obscured from the light source. This produces the darkest part of the form shadow which is known as the core shadow.
But we’re not quite finished yet! The form shadow changes in tone and color where the sphere is closest to the ground. Remember all that light bouncing around off the surrounding environment? The surface that the sphere is sitting on will reflect light back onto the sphere, and this is most visible where the sphere almost touches the ground surface. This part of the form shadow is commonly known as reflected light.
Note that darker shadows depict stronger light. As a general rule, if your painting has a high level of contrast between light and dark shadows, the lighting in your scene will seem stronger. If the contrast between the light and shadows is low, then the lighting seems weak.

Shadow Shapes
Cast shadows are often the most difficult type to interpret realistically. A simple trick you can use to determine the direction and length of shadows is to use one point perspective.
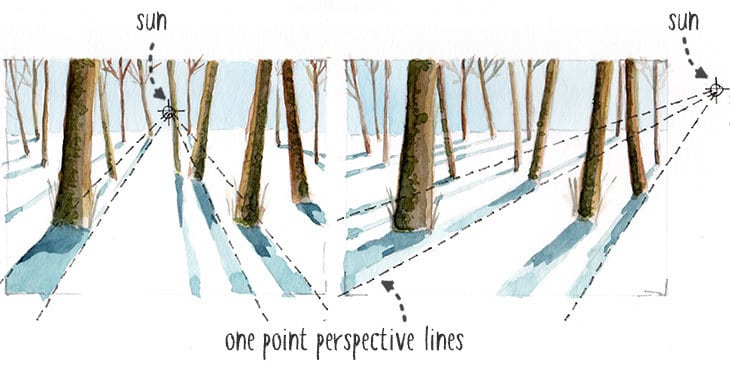
With a soft pencil, place a point somewhere in your scene where you estimate the position of the sun. From this point draw a straight line to the base of your object where it intersects with the ground. Carry this line further beyond the object to represent one edge of the cast shadow. Do the same thing on the other side of the object to project the second shadow edge.
Watercolor Shadow Colors
Okay… I’ve got news for you. Shadows are not just gray! I remember when I started out with watercolor painting I automatically reached for a tube of black whenever I wanted to add shadows. The results were often drab when I tried this. Using just gray for shadows in watercolor is a mistake. I didn’t realize this for a long time.
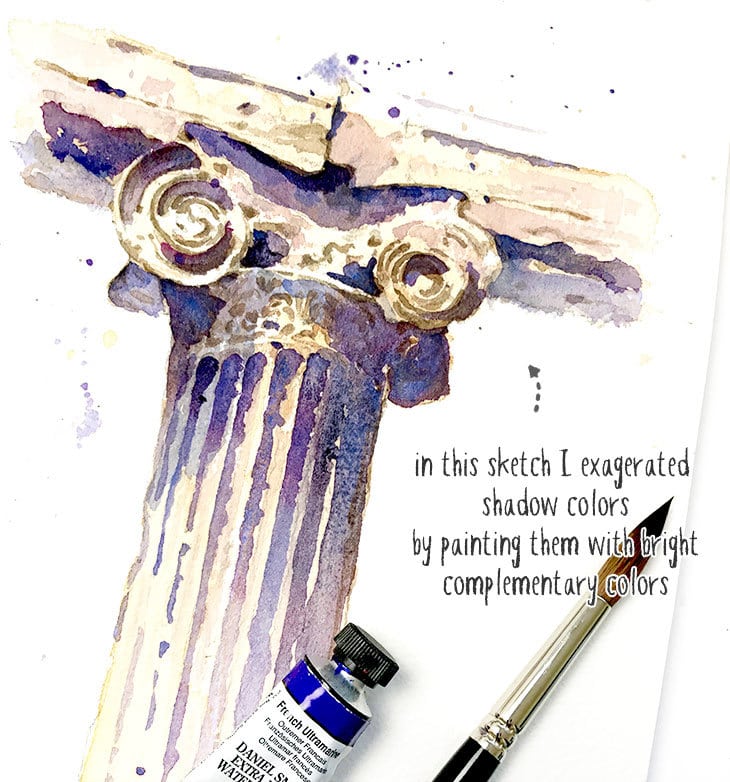
In a natural outdoor scene there are two sources of light – the sun which tends to add warm yellow light, and the sky which contributes cool blue light to a scene. Earlier we discussed the idea of ambient light. The ambient light in a naturally lit scene comes from the sunlight and skylight which has been reflected and bounced around the surrounding environment.
Ambient light from the environment plays an important role in shadow colors. This bounced light interacts with the color and value of the shadows. So ambient light is the reason why we see differences in light and color in shadows.
Take the example of a snowy scene on a sunny day. Rather than seeing dark gray shadows on the ground, the shadows appear blue. This is because the shadows are being modified by the blue skylight, and the white snow let us see this more clearly.
Now let’s look at a few techniques for shading and adding shadows in watercolor painting.
Techniques for Shading & Shadowing Objects in Watercolor
There are a few different methods you can use to add convincing shadows to your artwork.
- Use glazing to increase values
- Increase tone using an analogous color
- Add shade using a complementary color
- Apply a neutral gray.
The first method you can try is to use the same color as the object and use a glazing technique. Glazing simply means painting successive layers of paint on top of each other. With each new layer of color, the values increase and get more intense. This is a good first pass to deepen the tones in a scene but it has its limits. Using the same color group over and over gets boring! And after a while you cannot deepen the tone any further because the color becomes fully saturated. This is particularly the case with bright colors in a scene.
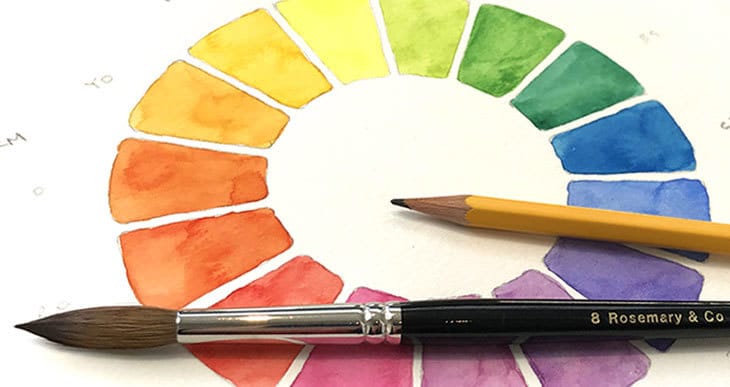
The next option to deepen the tones further is to mix an analogous color to the original color. Analogous colors are those which are next to each other on a color wheel. Add an analogous color which is cooler not warmer. For example red moves towards purple not orange. This helps maintain the intensity and richness of the original color without creating a muddy appearance. In general, mixing a cool analogous color deepens the shade color.
To take things even further you can deepen the tone of your shadows by mixing a complementary color to the first color. Complementary colors are those that are found on the opposite side of the color wheel. So for example the complement of red is green, and the complement of yellow is purple. Complimentary colors are ideal for toning down bright colors, without making them dull.
Alternative you can use neutral tint which is neither warm or cool. The advantage is that is doesn’t add any color bias to the shadows. This works quite well for shading any color but it has its limitations. It works less well with bright colors which tend to look dirty, and dull. So reserve neutral tint for use on desaturated colors. Neutral tint is a good general option, but be careful.
Painting Shadows: Watercolor Lemon Example
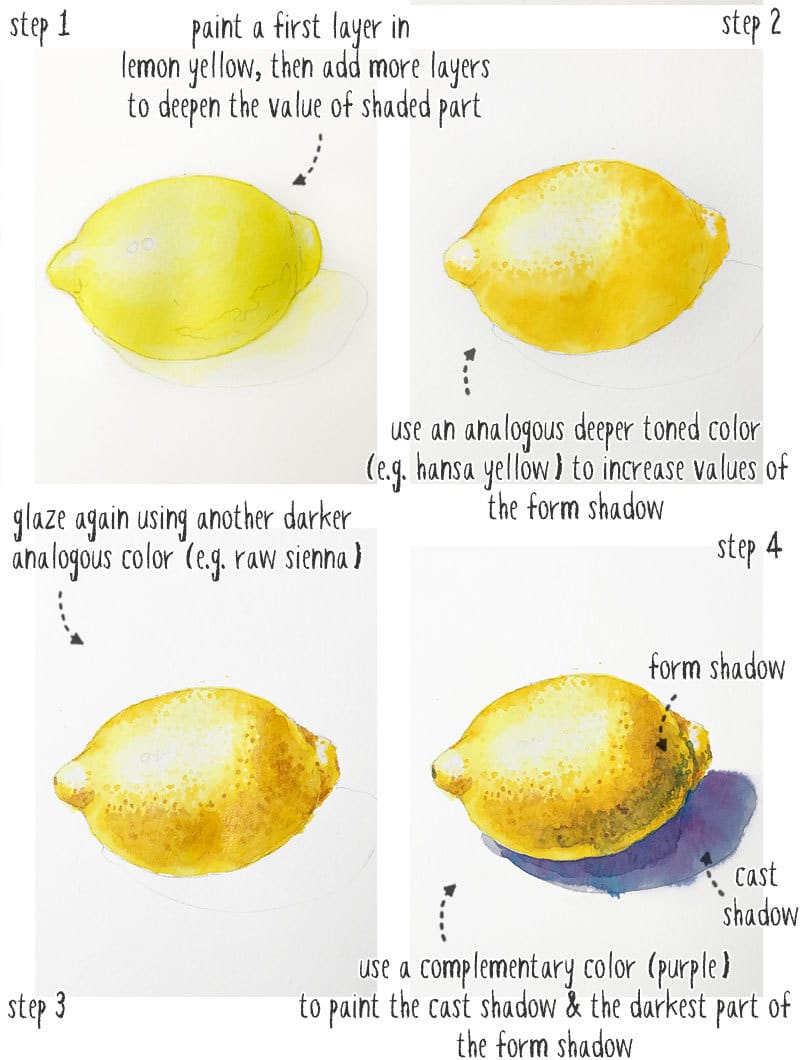
As an example take a look at this painting of a lemon. Yellow is a bright color. I can use a diluted mix of yellow to paint the lighter parts of the lemon, and then keep adding yellow paint to deepen the tones in the shadow areas. This is only useful up to a point. After a while I cannot deepen the shadow areas any more just by adding more yellow.
My next move is to add an analogous color. On my palette I can choose a color which is close to yellow such as quinacridone gold or raw sienna. As you can see this helps to deepen the tones further, but again this doesn’t really create convincing shadow.
Atthis point you have the choice between using neutral tint, or mixing a shadow color using the complement of yellow. To be honest, gray lemons are ugly in watercolor. If i were to use neutral tint the result would just look muddy. I find it much more captivating and convincing to use complementary colors create shadows which add color interest to the painting.
Tips for painting watercolor shadows
To sum up, here are some reminders to help you the next time you pick up up your brush!
- Don’t use black paint. For more realistic shadows either mix a warm or cool black using primary colors, or use Neutral Tint.
- Add shading to an object using deeper toned analogous colors.
- Use a glazing technique to build up layers and increase values for shading.
- Mix bright colors with their complement to make shadow colors.
- Don’t hesitate to Use color in your shadows. Deep toned blues, greens and purples are good options.
- Vary the intensity of your shadows. Make cast shadows dark and sharp near the object, and soft and lighter at their extremity.
- As a general rule of thumb, in natural light objects will appear warmer and shadows appear cooler.
- You can use graded wash on an object to produce soft edged shading


Hi Anthony
I have to first say thank you. I have been struggling to understand how to paint shadows. Your lesson is extremely useful. A rarity .
Happy to help Uma 🙂
I’m studying the color of shadow in relation to the color of the light. Have you written anything about that?
Hi Linda
As a general rule I follow a simple guideline: Natural light (sunlight or daylight) is warm, and produces a cool shadow. On the other hand artificial light (indoors) tends to be cool, and therefore produces a warm shadow.
Hope that helps!
I am afraid of painting shadows.
Your tips and explanations have been very helpful and I will practice these techniques. Thank you.
Have fun Leann 🙂
Anthony: Once again, you absolutely ROCK as the most generous artist in sharing such important tips and knowledge with us newbies! Honestly, I wish I lived nearby and could take lessons frequently!! The web is the next best option, but your style is so easy-going, and you give such useful details! THANK YOU THANK YOU!!
Marcy Thobaben
[email protected]
Very happy to help Marcy!
Glad you’re getting value out of the content 🙂
Thank you Anthony. Love your style of teaching. I’m a beginner and your explanations are very helpful. I hope you can answer my question or direct me to a post where you cover this issue: How to do you make sure that when you paint a shadow by glazing over several colors, they do not blend into each other. For example, a shadow over a multicolored hot air balloon. I assume the underlying colors should be completely dry, but what should the consistency of the shadow color be? If too dry, I won’t be able to paint the shadow in one go. If too wet, I will get mud. What is the secret?
Hi Florence
The answer is speed… You need to apply your brush strokes without repeatedly going over the layers of paint. The more you “fuss” with the surface, the more you will disturb the underlying pigments, causing them to mix together and potentially make “mud”.
Also, you might want to revise the colors you use for your shadows. Shadows are rarely black or gray…
I have a lesson about mixing neutrals and black here…
cheers
Hi Anthony, I have just discovered you and I’m quite impressed with your style of teaching. I have been painting in watercolour for many years and my results do not please me. So much to learn in techniques compared to oil and acrylics and gouache – but I’m determined to master watercolour. Thank you for this free lesson in shadows. Very helpful. Looking forward to receiving more with a view to taking a workshop.
Thanks Brenda
Glad you’re enjoying the site!
Thanks, Anthony. I’ve been struggling with shadows and shading. Your post has been a great help. As you state in your post, Neutral Tint (and by extension Shadow Violet) will only get you so far. Using analogous and complementary colors for shading and shadows greatly expands my toolkit.
I am a nubee at painting. When I first started about a year ago, I jumped right in and did an abstract. That was fun! Then, I kept trying to change it. Shouldn’t have. I love painting. Trying to paint an actual’picture’ is a whole other story. I’m old and my hands are shaky. Straight lines are hard.
Thank you for this article! I finally have a better understanding of shadows.
Happy to help !
Finally!! Ive been looking for an article that would explain how shadows colors work for a long time, and I’ve asked some artists about it, but couldn’t find any good explanation that would give me the tools to make my own decisions when painting shadows. Thank you so much! I’ve never been fond of gray shadows. I am always observing how artists paint their shadows and i knew the object that creates the shadow would reflect its color on it. However I needed to understand how it works and you gave a great explanation. It’s a lot to digest though so i need to read agaIn and again and practice till it becomes second nature.
What a fantastic lesson! This is the single best instruction I have found. Thank you so much! Nancy
thanks Nancy !
Anthony,
I have been stuck on my current picture because the main subject, a gecko seems to be floating in air. This lesson is a gift from you to me. Thank you so much 😊.
Happy to help Jill 🙂
Extremely helpful and thorough. I look forward to reading. seeing more from you. Thank you for this.
You’re welcome Jenni
Have fun with your watercolors !
Hi Anthony,
I’m an artist and graphic designer and have been for a long time, but I have just started watercolours. It is true they are challenging and sometimes slightly unpredictable! I found your site because I was trying to find information on creating shadows. Your lesson has really helped me. I laughed when I read about not getting your tea and paint water mixed up…I recently dunked my biscuit in my paint water…it was pretty horrible!! Thank you for sharing your experience.
Hi Rachel – Keep enjoying your watercolors and be careful with those biscuits !
Thank You! Your tutorials are fantastic. You explain water color techniques and lessons so well. Thanks for sharing your knowledge and talent!
Thanks Kelly
I’m glad you’re enjoying the site !
Thank you very much …this lesson and your website is very helpful.
As we do not use black and white in watercolors so how do you prepare a chart containing hues, tints, shade and tones.
particularly how do you make shades and tones on the color wheel
Hi Kanika – you might find this article useful:
https://www.watercoloraffair.com/the-essential-guide-to-watercolor-mixing/
I loved this and learned so much. I am going to get my color wheel out again and read this all over again. Thanks so much
Glad it was useful Thea !
You are the best. This is the first thing I’ve read on your site and it’s the best explanation I’ve ever seen for this. Wonderful examples. Thank you so much. I can’t wait to explore the rest of your site!
Thanks for making this content accessible.
You’re welcome Tracy – glad you’re enjoying the site !
This is the clearest description of shading I’ve had. Thank you. I intend to share it with my painter friends.
Thank you! I’ve always been confused about definition of different type of shadows, but your explanation (by splitting cast vs form shadow before breaking them down further) really helped me understanding. Will apply this to my next painting, hope all goes alright.
Really glad it helped Sarahi !
This has been so helpful. I’m really really grateful to you for sharing this. Thank you and greetings from way down south in Tasmania, Australia ???
Thanks Anita ! and “G’Day” from France !
Excellent description of light and shadow that I’ve come across. Thank you for being so thorough. This is the best site for learning about watercolor.
Thanks for your kind comments Sandra
Thank you, thank you!! Finding a colour for cast shadow is amazing and you helped so much. My lemon doesn’t look great, still much better than it used to ..
Glad this helped your shadows Luisa !
this was exactly what I needed. I tried to print it for reference but the visuals were not included. I will need to bookmark and refer back a lot to internalize it.
You’e so great at explaining! Thank you!
Thanks for the lesson. Was sitting here trying to figure out how to add shadow to my Venice canal painting. I searched the internet and actually found an artist who has his own line of paints ….one of which is called “shadow”…..no thanks…one-size-fits-all just didn’t feel right.
You answered my question perfectly….and I mean perfectly. Glad I stumbled across this page!
Many thanks!
Thanks Craig – glad to be of help:-)
Good expositions on shadows technicalities and painting them… I liked the blog!
Thanks Amarendra!
This is a great tutorial. Easy to understand and the pictures bring it to life! Thank you for posting.
Glad it helped Dodie!
Thanks so much! I struggle the most with parts of light so this is very helpful.
Good to know this helps Alex – Have fun with your watercolors !
This lesson is so amazing!! Thank you so much for making light and shadow so easier for us. You are the best!
No problem Jaya – happy painting!
I recently found your website and love all the beginner content and just wanted to take the time to say THANK YOU!!!
No Problem Tami !
So clear and consise, I can’t wait to get started. Thank you.
Thanks Shirley – always happy to help…
Wow, best lesson I’ve had in watercolor painting since I’ve started. Your work is amazing!!!
That’s very kind of you Colette, thanks… Enjoy your painting!