Learning Watercolor (A formula for Success)
Painting with watercolors is a tricky skill to learn…
Yep… I said it.
But notice that I used the word “skill”. A skill is something anyone can learn with some good instruction and enough practice.
I say this to dispel the idea that certain people are “talented” while others are not. The only thing that differs between a person who knows how to paint and someone who doesn’t is the amount of focused practice they have put in…
And practice is the path to becoming a better watercolor artist.
Learning Watercolor Painting (is watercolor hard to learn ?)
Imagine you’re looking down at a clean white sheet of watercolor paper. Your loaded brush is poised in mid-air. You say a silent prayer to the gods of watercolor… “please let the paint be kind to me today” !
Does this sound familiar ?

Even today I feel a little moment of hesitation before I drive into a new painting !
Anyone who has experimented with watercolor paints for any length of time will probably tell you the same thing. Watercolors are perhaps the most frustrating and technically challenging painting medium that exists, which makes learning watercolors a challenge.
But at the same time, the characteristics which make watercolors tricky to control are also what make them so darn beautiful ! Watercolor is one of the only paints that allow pigments to flow! Colors can blend and fuse together in a magical spontaneous way.
Watercolor is also a transparent medium, letting the underlying brush strokes show through.
This transparency and the unexpected nature of watercolors are the reasons I love it in the first place !
How to Learn Watercolor Painting
Would you like me to give you a formula for successful watercolor painting?
“It’s quite simple, really.
Double your rate of failure!
You’re thinking of failure as the enemy of success. But it isn’t at all…
You can be discouraged by failure, or you can learn from it. So go ahead and make mistakes. Make all you can. Because, remember that’s where you’ll find success”.
This is a quote from Thomas J Watson, the former president of IBM. And even if his original words didn’t refer to watercolors, this idea is just as true today, and I would say it’s highly applicable to learning watercolor painting.
Basically… If you don’t fail then you can never learn from your mistakes.
Barriers to Learning Watercolors
Because watercolors can be unpredictable, it’s easy to get discouraged by a few failed attempts. It seems to me that the biggest barrier to learning watercolors is emotion. We’re afraid of getting things wrong.
But if you agree with the “formula for success” above, then you can easily see that this is the wrong way to look at things.
I know the capricious nature of watercolors can lead to frustration. But avoiding frustration is mostly a matter of practice.
Practice more… Fail more… Learn from your mistakes… Improve your skills !
So in the following exercises I’d like to invite you to practice… without the fear of making mistakes.
And here’s the trick… If something does go wrong, observe what happens and try to figure out why so you can avoid it next time. At the same time, if something works out well, make a note so you can use it again in the future.
The fun begins when we start to paint!
Easy Watercolor Landscape Exercise
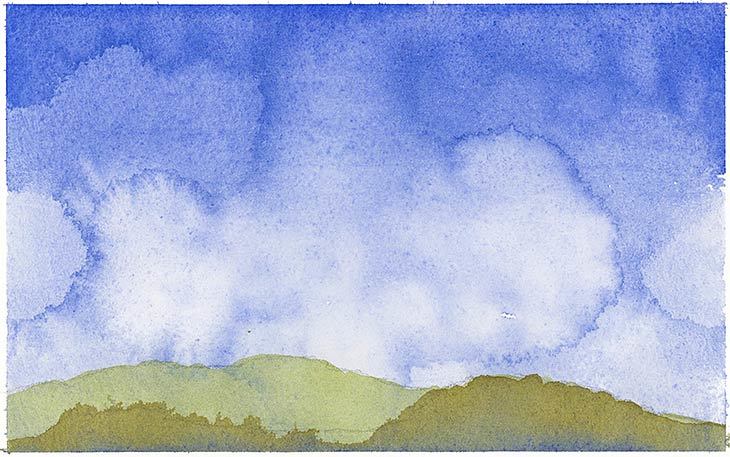
One of the first problems watercolor artists encounter is how to control and also harness the level of wetness of paint on the paper surface. I think loosing control of the wetness is one of the things which often leads to surprising results.
In this practice exercise we’re going to explore some techniques and characteristics of watercolor paints relating to the dampness of the paint.
In particular, this exercise uses:
- The wet-on-wet effect of watercolor blooms
- Glazing (layering paint)
These methods are important things to learn when starting out with watercolors.
Blooms (also known as blossoms) happen as a result of TOO MUCH WETNESS.
Blooms are a spidery textured appearance, sometimes also referred to as cauliflowers. These are often considered a mistake, because they can appear unexpectedly when you lack control of the paint.
They happen when an excess of moisture flows into a previously painted wash of color. When the underlying color starts to settle and dry, the excess of moisture will flood the surface and cause a feathery textured appearance.
This is a bloom.
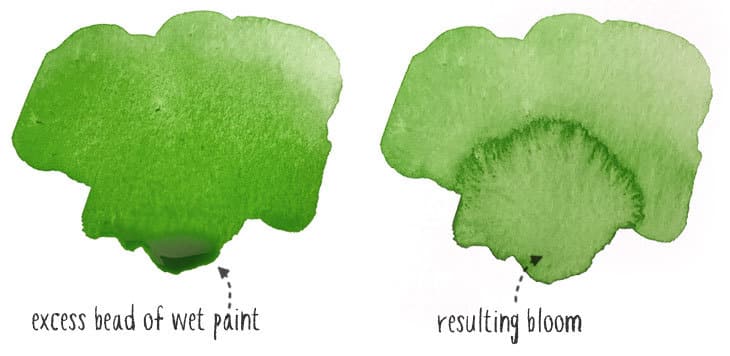
If you accidentally add too much water or a very wet brush stroke to the surface of your painting as it starts to dry, you can end up with blooms.
In this exercise I’m going to show you how to create blooms on purpose and use them in a creative way to add a textured appearance to represent the clouds of the landscape painting.
Knowing how and when a bloom will occur goes a long way to help avoiding them – that is, of course, if you’re not doing it on purpose !
Glazing is a fancy term for layering washes of color on top of each other.
This is a DRY technique.
Each successive layer of paint has to be applied when the underlying wash is completely dry. (otherwise you could end up with… Yes you guessed it… Blooms or other unintended blotches!)
This landscape exercise uses only three paint colors:
- Lemon Yellow
- Hansa Yellow Deep
- French Ultramarine
(By the way these paint names refer to Daniel Smith Artist quality watercolors).
Tips & Tricks: Another good tip when you’re learning watercolors is to stick to a limited palette of colors. Don’t be tempted by the huge range of paint colors available. At first you only need a small number of paints to achieve a good range of colors. I’ll talk more about colors below…
Step 1:
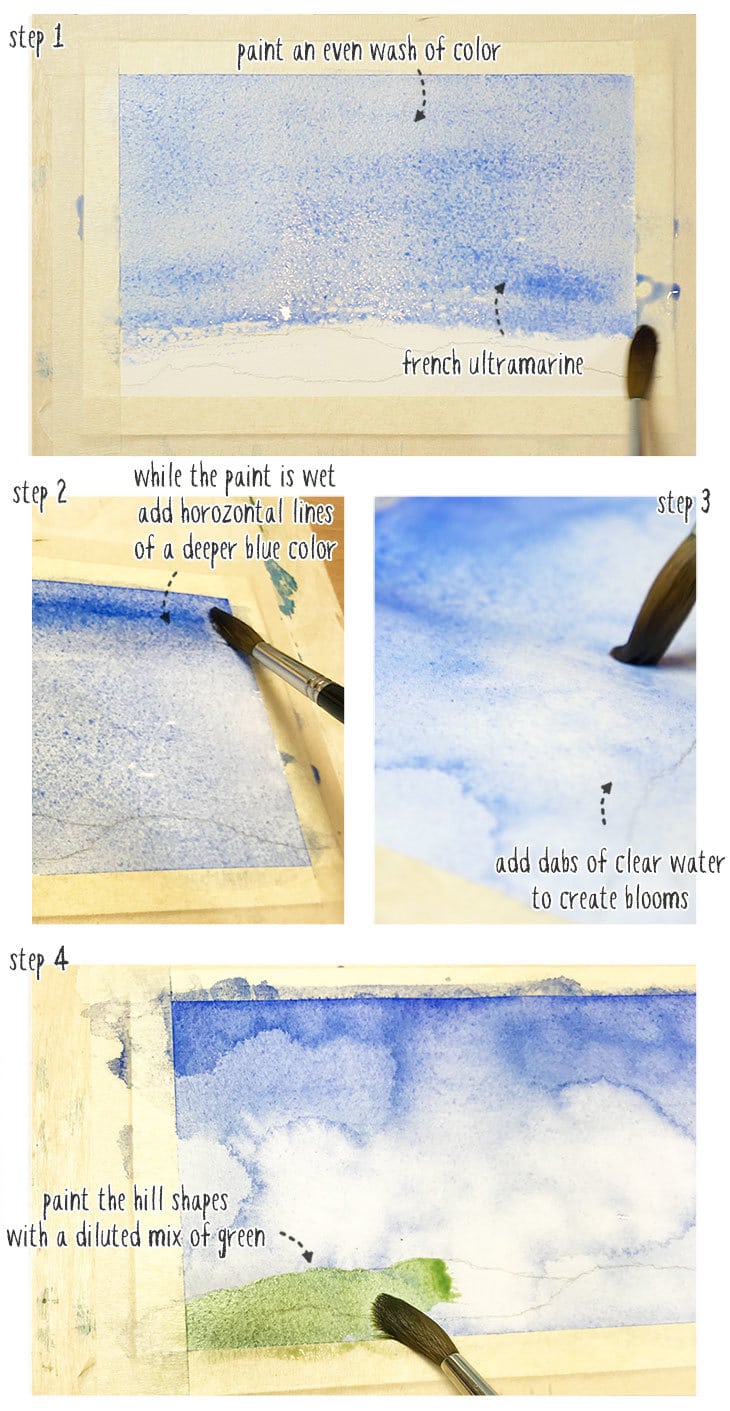
Begin by taping down a small sheet of watercolor paper to a board so that it doesn’t move around. Sketch a few lines at the bottom of the sheet using a soft pencil to represent some hills. Make sure you have at least two sets of hills, in the foreground and the background (use my painting as a guide if you want).Next mix up a fairly diluted puddle of French ultramarine and paint an even wash of color over the whole of the sheet.
Step 2:
While the paper is still wet, add some more paint to your mixture to make it stronger, then paint some horizontal brush strokes into the top of the painting to make a deeper blue near the top (this produces the effect of a slightly graduated wash, darker at the top and lighter at the bottom).
Step 3:
You need to continue painting while this fist layer of paint is still damp. Rinse your brush and load it with clear water. Use your brush to dab spots of clear water into the bottom part of the wash.
You will see that the spots of clear water spread out into the colored wash. At the same time they push the colored pigments outwards creating a spots which have a feathery texture at the edges.
You are deliberately using the water to create blooms.
Continue doing this for a few minutes. Don’t flood the surface too much or the effect will be very uncontrolled. In fact, this technique works better if you let the underlying wash dry slightly. When there is a bigger difference in wetness between the paper and the water drops, the movement of the pigments is greater, because the water carries further into the dryer surface.
(You can also drop in some stronger blue color into the top of the painting. The idea is to get a stronger graduated effect with darker blue at the top and lighter blue at the bottom, to help simulate what happens with a real sky).
When you’re happy with the cloudy textures you’ve created, or the paper is too dry to work on, leave the surface to dry completely before moving on.
Step 4:
Next mix up a green color using French ultramarine and Lemon yellow. Add plenty of water so that the paint is well diluted.
Now paint over all of the hill shapes with this green mixture. Because the paper is dry, your brush marks have a nice crisp edge. This is typical of painting with a wet-on-dry technique in watercolors, in other words, adding wet paint to a dry surface.
Step 5:
Leave the hill shape to dry completely. Remember this is a glazing technique, so the first color needs to dry completely.Now mix up a new puddle of green using French ultramarine and Hansa yellow. Paint the foreground hills, leaving the background hills a lighter color.
Step 6:
If you want, you can also dab in some French ultramarine into the very bottom of this new hill shape to represent shading at the base of the hills.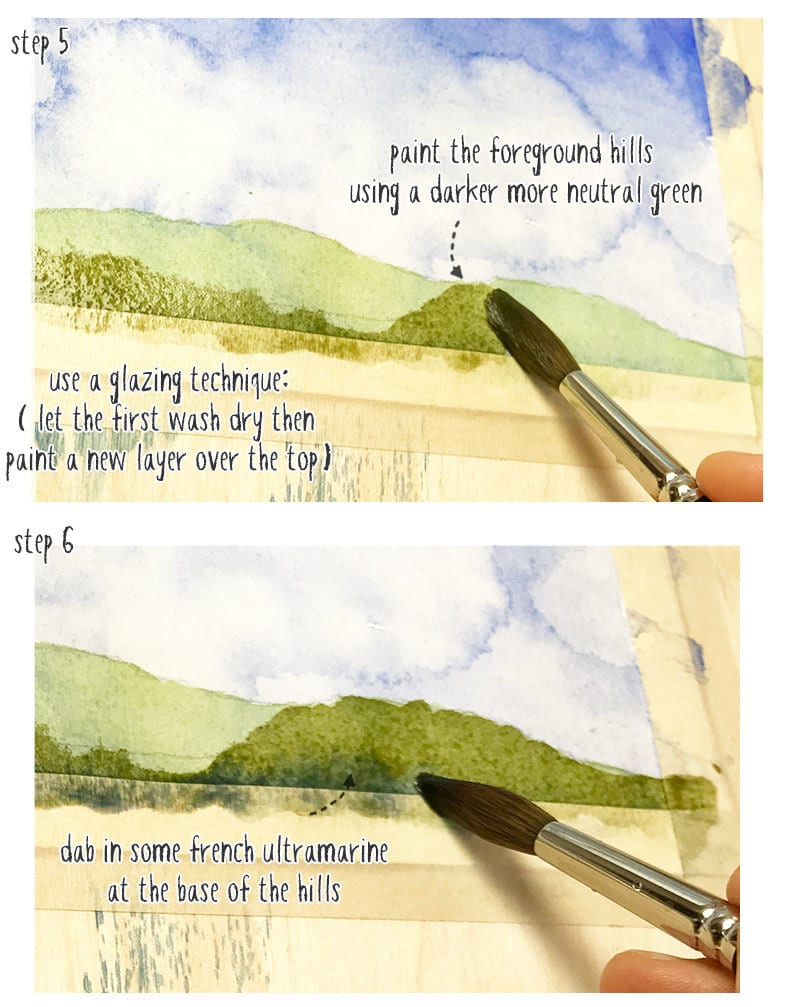
Step by Step Watercolor Stripes
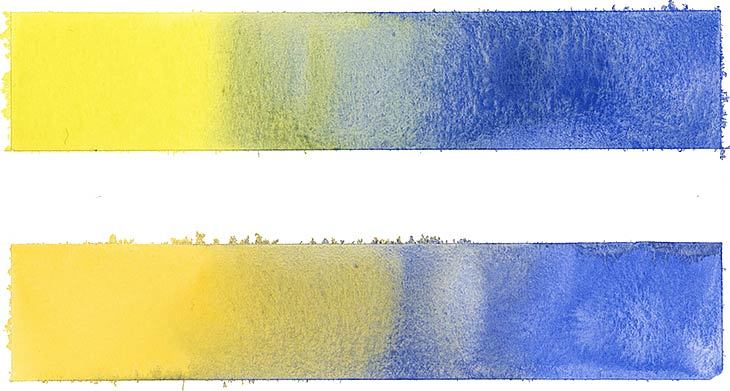
In this next exercise we’re going to blend the same three colors from the previous painting and use a wet-on-wet technique. I chose just three paint colors for this demonstration to show you the differences in mixing results using just a few colors:
This exercise is also a simple way of observing several watercolor painting techniques and characteristics, such as:
- Variegated washes
- Wet-on-wet painting
- Color mixing
- Granulation
Step 1:
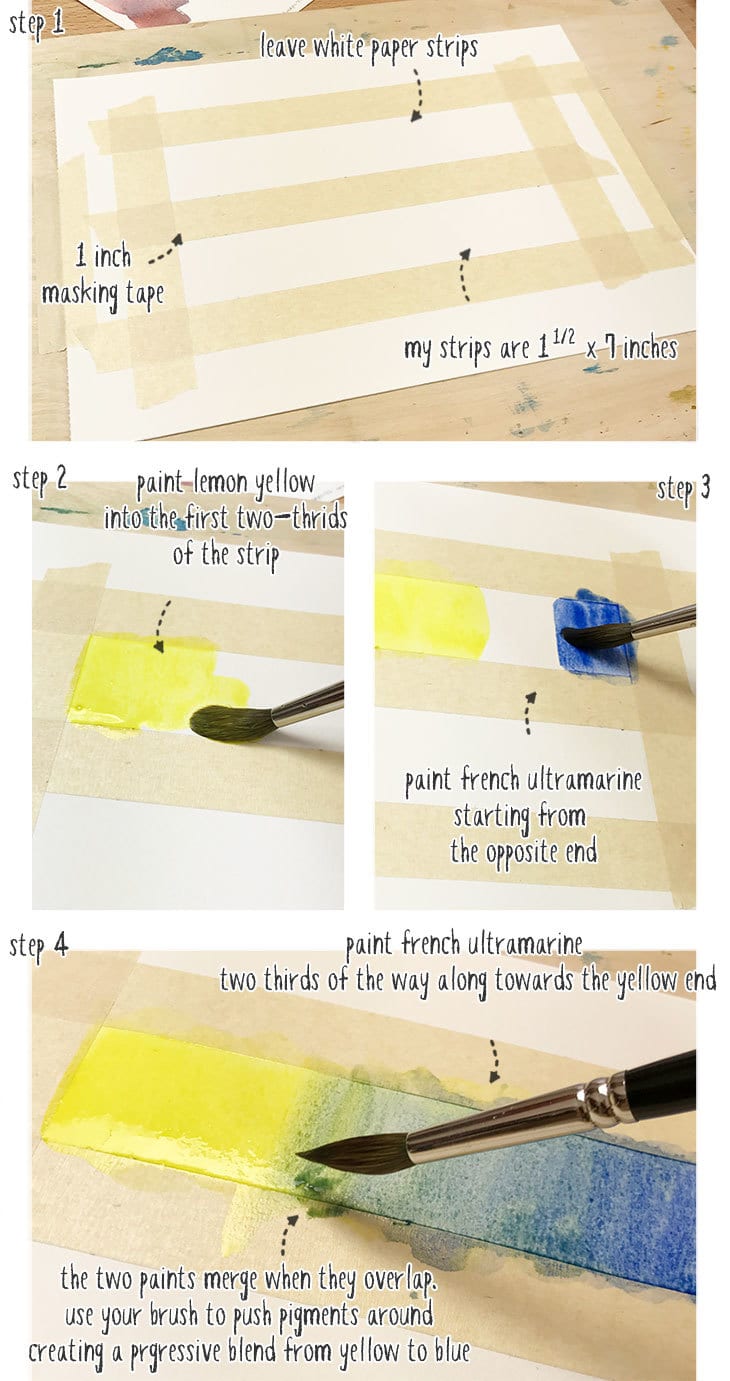
Start by fixing down a sheet of watercolor paper to a board so it doesn’t move around. Then use a few lengths of masking tape to delimit two long strips of white paper (make sure the masking is well stuck down).
Step 2:
Begin by mixing a puddle of Lemon yellow then paint into the first two thirds of the first strip.
Step 3:
Next mix up some French ultramarine and before the yellow paint has time to dry, begin painting from the opposite end.
Step 4:
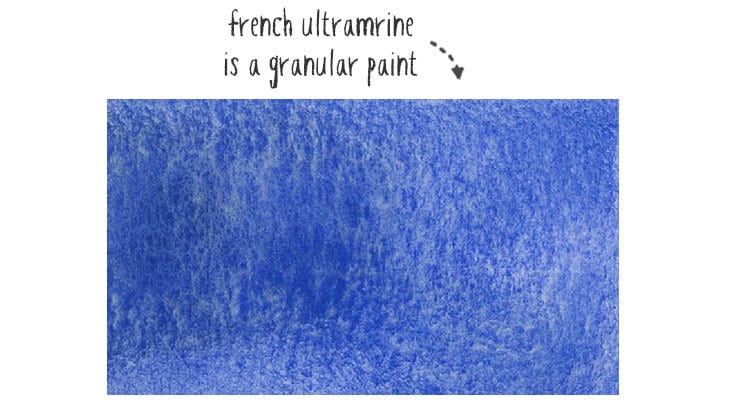
When your brush starts to overlap with the yellow paint, the two colors begin to mix together on the paper to produce a green hue. Notice how the colored pigments fuse together in the wet puddle. Adding wet paint into another wet paint like this is essentially a wet-on-wet technique.Keep painting until you reach approximately two thirds of the way along towards the yellow end of the strip.Use your brush to move back and forth within the overlapping paint to push the pigments around and try to create a progressive blend of color from yellow to blue.
Step 5:
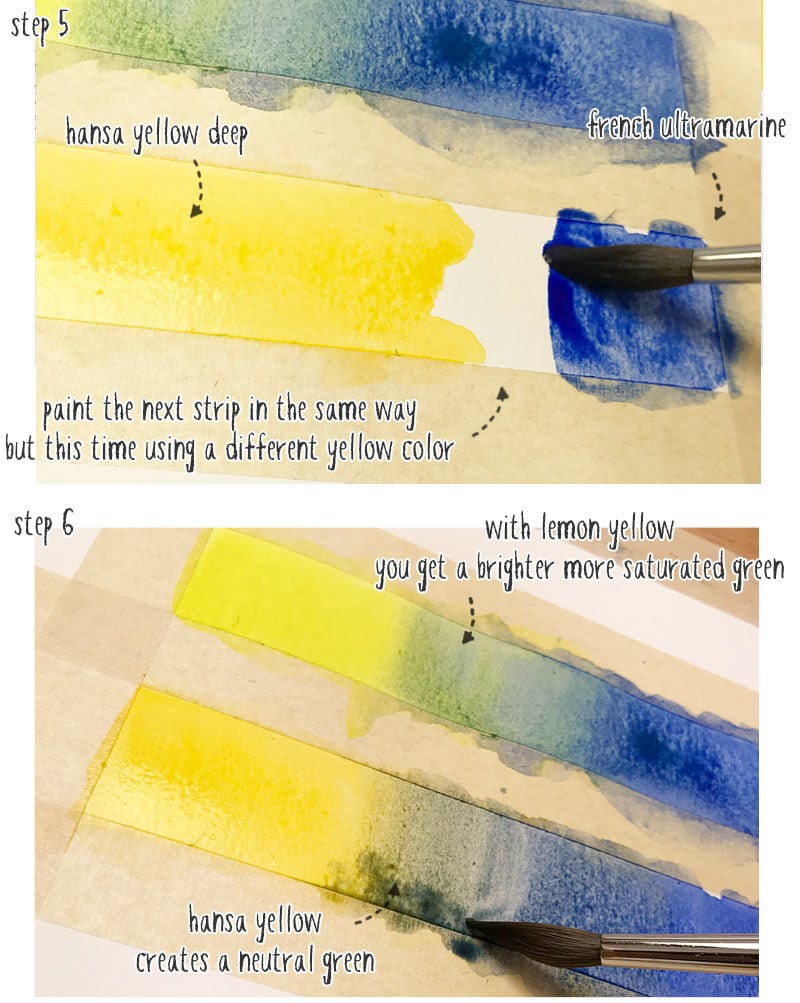
While you leave this strip to dry move onto the next. This time mix up a puddle of Hansa yellow and once again start painting from left to right over about two thirds of the distance.
Step 6:
Now use your puddle of French ultramarine to paint from the opposite end towards the wet yellow painted surface. Stop before you reach two thirds along the strip. Use the same method as before and try to mix the paints together on the paper and produce an even graduation of color from yellow to blue.
Let both paints dry and observe the results.
The two strips should look like they change in color progressively from one end to the other. In watercolors, painting like this is what’s called a variegated wash.
Now… Basic color mixing theory tells us that when you combine yellow and blue you get green.
But notice how different the two green colors appear. Mixing greens is a common frustration for artists who are new to watercolors. As you can see, even though we’re using the same blue paint, simply changing the yellow has a dramatic effect on the results.
Tips & Tricks: The color appearance of paints comes from the pigments used in their ingredients. The difference in the color appearance of our green mixtures is due to the color bias of the pigments in the yellow paints.
Lemon yellow is a cool yellow in other words it has a cool color bias. Whereas Hansa yellow deep is a warm yellow.
So simply by using paints with a different color bias you can create a wonderful range of color appearances.
This is why it’s a good idea to have at least one cool and one warm version of each primary color in your palette to get a bigger range of mixing possibilities (The daniel Smith Essentials Set gives you exactly this kind of setup – links to Amazon)
The combination of Lemon yellow and french ultramarine gives us a fairly saturated, bright looking green.
Whereas the mixture of Hansa yellow and french ultramarine results in a neutral darker looking green.
Both of these green mixtures are excellent for painting vegetation for example.
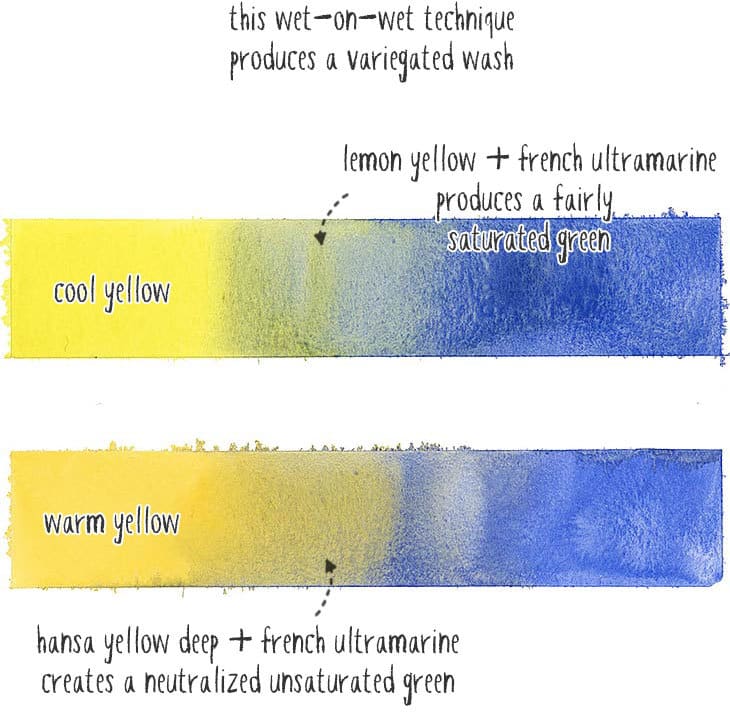
Notice also the grainy texture of the dried blue paint. This is because french ultramarine is what’s known as a granular paint. Granularity varies from one type of pigment to another, and this broken textured appearance is very appreciated by a lot of watercolor artists. It can add a certain richness to watercolor paintings.
Variegated washes, color mixing, wet-on-wet painting techniques, and granulation are all part of the multitude of amazing things to learn about watercolors.
And that’s just the tip of the iceberg !
Tips to Keep Learning
These two examples are only a small part of everything there is to learn about watercolor painting. But I hope you can see how the fluid nature of watercolors has a big influence on the way the watercolor paint behaves.
I used to paint a lot with watercolors when I was young, but then life kind of got in the way… I decided to come back to watercolor painting later in life, and it’s one of the best decisions I ever made!
To keep on learning with watercolors here are a few tips:
- Paint regularly (find a way to keep you motivated to paint regularly – it’s one of the best ways to make progress).
- Learn from example(let yourself be guided by someone who has learned over time and knows how to steer you in the right direction).
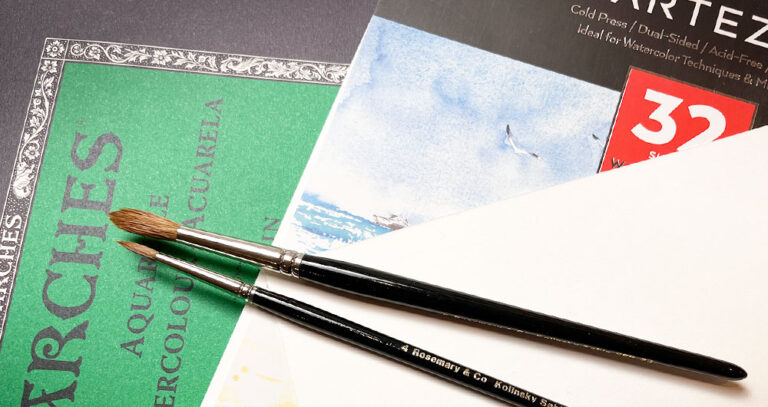
- Learn how to choose your watercolor supplies (a lot of artists don’t realize the importance of choosing the right supplies. I’ve seen artists struggling with their paintings and blame their technique when in fact they were using the wrong material).
- Learn in a structured way(don’t be hard on yourself and take on projects that are too ambitious – use a structured course to build up your skills and confidence little by little).
- Start with the basics (learn the fundamental techniques so you can utilize them during your own projects).
- Understand the characteristics of watercolors (this will help you to better control the outcomes of your paintings)


Hi Anthony,
this was a fabulous lesson, I read every word and and understood all the tips.
I do paint everyday , my daughter is amazed how I”ve improved. Thank you .
Warm regards
Peggy.
Hi Peggy
So glad to hear you’re seeing improvements 🙂
Have fun with your paintings!
Excellently structured couple of quick lessons about the essential basics of watercolour painting. Great for both beginners and as a reminder for those with some experience. Thank you.
Glad you found them useful Dave!
So much great info. You are a great teacher. Thank you for your expertise. I saved this so i won’t forget it and i’ll be able to take my time and practice looking at your instructions.
Thanks Bonnie
Have fun with your watercolors!
Thank you Anthony, the landscape was fun to do! You explain the “how to be successful” very well. I really like the way my sky came out.
Clearly explained and very helpful for a beginner
Thank you for all your tips and techniques.
Mary.
Ireland 🇮🇪
thank you, thank you for sharing your knowledge with us
Anthony
Love your articles-very helpful
Thank You so much
Pat
Thanks Pat !
I am very impressed and grateful that I have found your course online. I want to paint every day with your guidance. I could start only today because of the festivities. Thank you.
Hi Gabriella
Happy to hear you’re setting aside some time for your painting !
Have fun!
These little snippets are really helpful. I’m just starting out and you are creating a valuable pathway. One of my concerns is choosing the right brushes and paints to get started.
I love this! Thank you!
Hi Anthony,
Love your tutorials — EXCELLENT.
i have a query. Would blooms be used to paint a Cauliflowe. Thanks. What colour would one use.
Who is the cute little guy in the photograph?
Hi Lydia
the term “blooms” refers to the feathery textures that appear when wet areas run back into a settling wash of color… They can be used deliberately to create texture effects but they can also appear in unwanted places if you don’t control the levels of wetness on the surface of your paper.
You can read more about blooms here:
“watercolor blooms-turning mistakes into success”
Oh, and the cute guy must be me of course 🙂
I have been painting with watercolors on and off for many years, and I often struggled. Establishing a good palette and mixing colors was very time consuming for me. Your tutorials on the subject are excellent and I wish I had had them when I first started. Thanks for sharing.
Hi Helga
Happy to know the site is proving useful !
Enjoy your watercolors !
Excellent advice Anthony, thanks. Before I attempt a “big painting” I do very quick and very small colour sketches to warm up, with an egg timer. These loose and energetic sketches are confidence-building.
Hi Peter – yes great idea. it’s also a good way to refine composition ideas and study values… Happy painting !
Perfect timing on this letter–I just did the graduated color lesson in your Master Class this morning! Tricky, but fun. Now I’ll make another pass using the lessons above! Thanks!
Have fun Teresa 🙂
Anthony, I’m glad I found you. You explain everything in an easy way, and you have given me reasons to try to paint in water colors, hopefully I don’t disappoint myself and continue trying to paint guided by you and your instructions. Thank you very much, I really appreciate what you are doing. Maggie
Hi Maggie ! I’m really happy you’re finding the site useful. Anyone can learn watercolors with some regular practice. Above all.. remember to have fun !