Watercolor Blooms – Turning Mistakes into Success
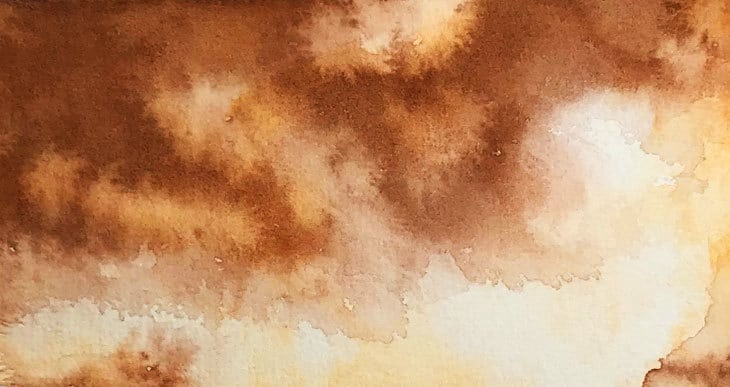
When you’re a beginner you make mistakes. And mistakes are good because you can learn from them. One of the things watercolor artists sometimes see as a problem is “watercolor blooms”. You’ve probably already seen these unexpected blotches that seem to appear out of nowhere… Right?
When I was starting out with watercolors I would get really frustrated with these blotchy marks. I didn’t understand why they happened and these blemishes weren’t the result I was looking for. But over time I learned to control my paint a little better, and I started to enjoy the various textures you can produce with watercolor blooming effects. Now I just consider these as another beautiful outcome of watercolor painting. The trick is knowing why they occur, and how to use them to your advantage.
I’m going to show you how to control blooms, and how to have fun using them in your watercolor paintings.
What Causes Watercolor Blooms
Ok… Just to make things clear, I’m not talking about painting flowers! A bloom is a flow mark created when liquid is added to an already drying wash. These unpredictable textures are also known as blossoms, backruns, or even cauliflowers. These terms all refer to the same thing.
They occur because water always seeks a state of equilibrium. An area of very wet paint will always flow towards an area of less wet paint.
This rule is true for any wet in wet watercolor technique. But blooms happen when there is a significant difference in wetness between two surfaces. If you add wet paint to a wet surface you get a normal wet in wet diffusion of pigments.
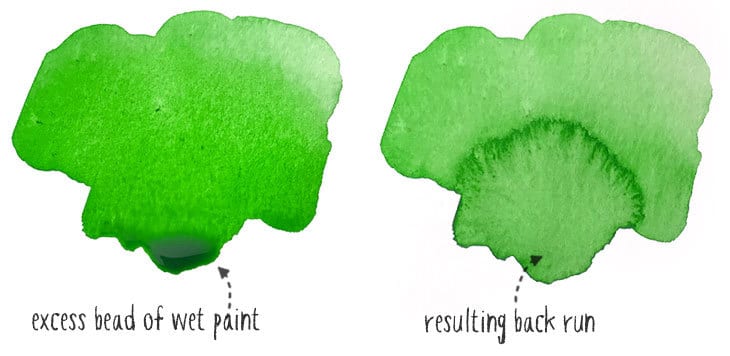
For example, blooms often happen when you try to paint a flat wash and you don’t carefully control the level of moisture. A flat wash is a technique for painting a smooth, even shape of color, and at first this method can be tricky to pull off. When you’ve finished painting a flat wash you usually end up with excess moisture at the bottom (this remaining moisture is known as a bead). This results in a standing puddle of liquid in one area while the rest of the wash begins to dry. As the paint dries the excess moisture of the bead runs back into the damp wash, creating the flow marks which we call blooms.
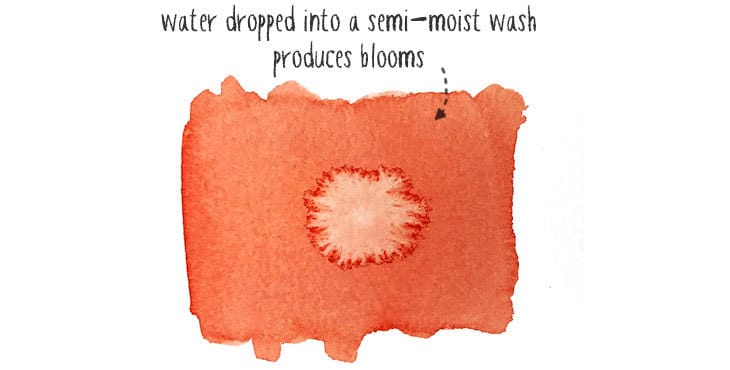
Blooms will also occur if you drip wet paint or clean water into a semi-moist area of paint. As the drip settles into the damp paper it has the effect of pushing the pigment already on the paper (this results in a pattern similar to a flower – hence the name of this effect).
How to avoid Watercolor Blooms
Controlling these texture effects means knowing how to make them, but also how to avoid them.
The best way to avoid blooms is to observe the level of moisture of your paint, both on the paper and your brush. This takes some practice, but since watercolor painting is all about the flow of paint, it’s worth the effort to observe what’s going on.
Blooms will happen if the surface of the paper dries unevenly, or when you add more paint to an area, thus creating an uneven distribution of moisture. It’s these kinds of differences in paper wetness that you need to observe.
If your paint is no longer sufficiently wet, then stop working and wait for it to dry before applying more pigment. This may imply that you need to improve the speed of your painting technique. Beginners often take their time to paint shapes, which gives washes time to start drying. If you continue to add wet paint into a drying wash, you risk creating blooms.
To reduce blooms, work on a completely dry or completely wet surface. Any excess moisture or beads should be removed. You can lift off beads of moisture with a paper towel or a blotted brush.
How to make Watercolor Blooms
Now that you understand why blooms occur you can use this to enhance your watercolor blooming effects. For a start, it’s usually better to work on a flat surface. For best results you need to wait for the paper surface to be damp but not too wet.
If the paint is too wet you will essentially be working wet in wet, which produces normal diffusion and a more even transition between colors and values, rather than the feathery textured edges of blooming.
You might want to practice on a spare sheet before trying the projects below. Paint a wash of color, then wait for the surface to begin drying. When it looks moist, try adding a dab of clean water with your brush. Clean your brush then add some more water. The clean water pushes the colored pigments aside and produces a bloom. You can increase the effect slightly by using water with a small amount of liquid soap mixed in. The soap acts as a dispersant and has the effect of pushing the pigments more vigorously. When compared to water, soapy water gives slightly amplified results.
The appearance of blooms also depends on the quality of the paper you use. You still get these textured blotches on good quality paper, but the diffusion will seem more consistent, and the blooms don’t have such hard edges. You might say that good quality paper produces “better” blooms!
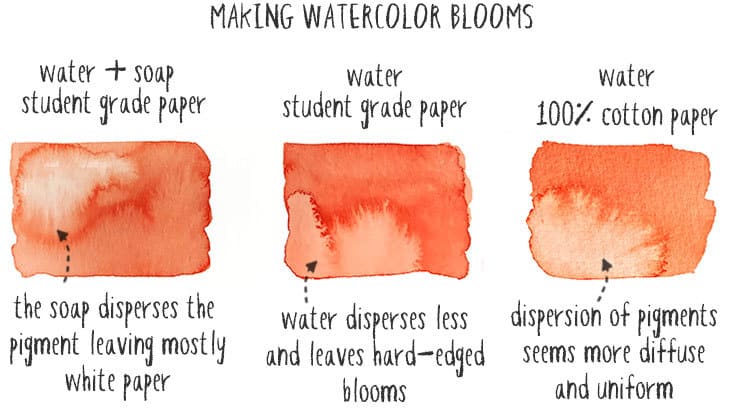
The distribution of paint on the surface of good quality watercolor paper is always smoother. When you use 100% cotton watercolor paper it’s easier to move the paint around, you get more time to play with the paint, and the results are usually more uniform. At least that’s always been my experience. When I’m not sketching I use Arches 100% cold-press watercolor paper – you can read the reviews for yourself on Amazon.
Watercolor Bloom Technique – Step by Step Tutorials
The best way to learn a technique is to try it out for yourself. At some point you’ll probably find that blooms and blossoms will happen by accident. But by intentionally pushing the paint to produce these spidery textures you’ll gain a lot of insight into paint control.
Watercolor Pebbles with Bloom Textures
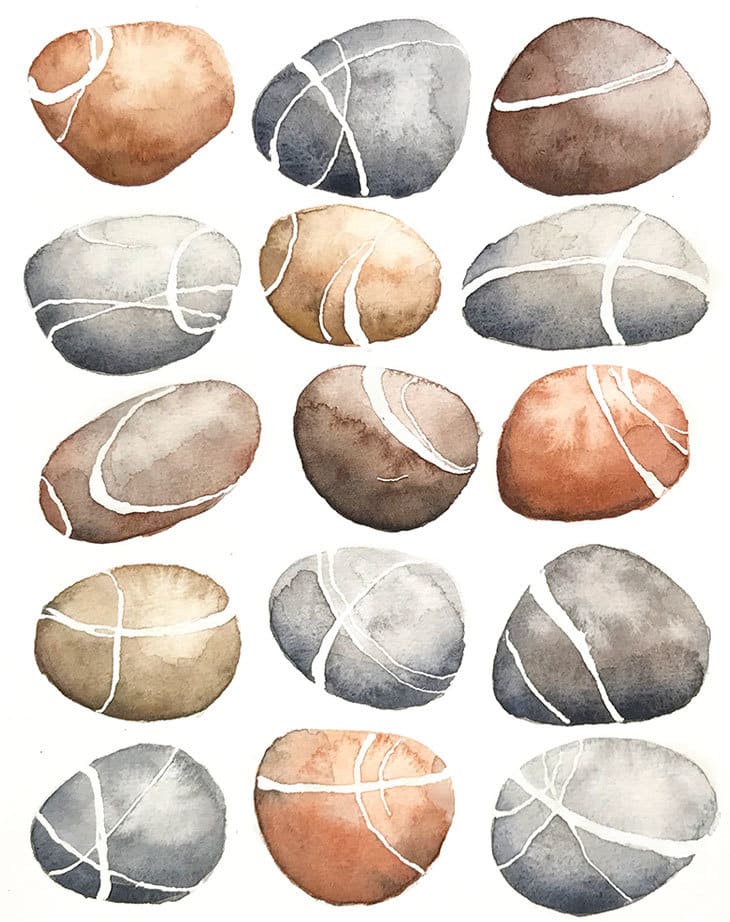
When I go to the beach I love to go hunting for pebbles. Every single one is unique, and you’ll find a wealth of different colors and textures. Can you see where I’m going with this?
Yep… I can see you nodding your head… Pebbles are a great subject for watercolor painting because those beautiful textures can be simulated using a bloom effect.
You can do this exercise yourself by downloading my sketch template and following the step by step demo below.
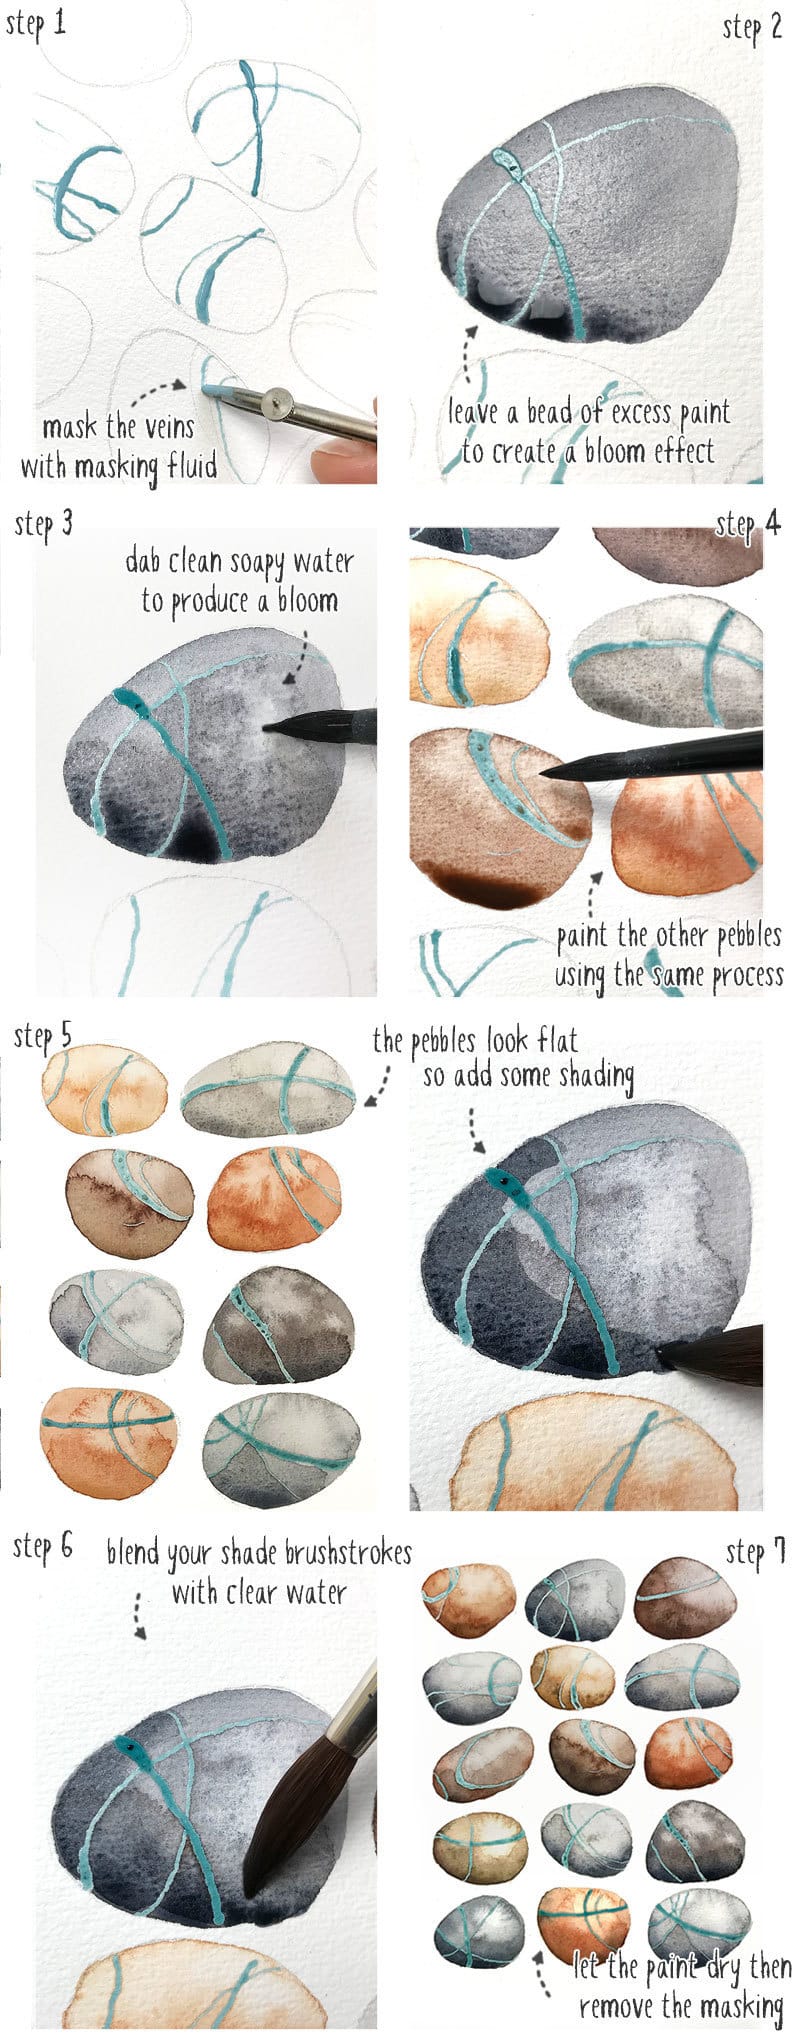
Pebbles often have veins running through them. So for the purposes of this painting I started by masking the white veins with masking fluid (Pebeo drawing gum is great for this, plus a fantastic little tool called a “ruling pen”. This thing is now my favorite tool for applying masking fluid because it’s so accurate).
Now you can start painting the pebbles. I used various grays and browns in this painting by mixing Transparent Pyrrol Orange with Phthalo Blue (GS) (mixed together they make a great chocolate brown hue), plus some Yellow Ochre and Payne’s Gray.
Paint one of the pebbles and tilt your board so that a bead of excess liquid forms at the bottom edge of the shape (you can prop your board up slightly so that the bead stays in place while the paint dries). By deliberately leaving a bead, a bloom pattern will form when the wash begins to dry.
Using a brush dipped in soapy water, dab some fluid into the moist paint near the upper edges of the pebble shape. The soap and clean water will disperse the pigments around them, creating another bloom texture.
Keep repeating this process with different colors for all of the pebbles.
The pebbles look a bit flat at the moment so next I added some shading. When you shade each shape, try to use a darker value of each pebbles color. For example, some of my pebbles are an orange-brown. For the shade color I used the same orange-brown mixture, but with more Phthalo Blue in the mix to darken the value. If you use gray for shading the final appearance looks dull and muddy.
Working on the basis that the pebbles are lit from the top, I’m adding shading to the bottom edges of each stone. As soon as you’ve finished your brush stroke, rinse your brush and blot it to remove some of the moisture. Use your damp brush to blend the upper edge of your paint stroke. The wet paint will diffuse into the clear water and make a smooth transition. If you think there’s too much shading, use your soapy brush to push some of the pigment away from the center of the pebble.
Repeat for all the pebble shapes then leave your painting to dry completely. When the watercolor is dry you can remove the masking film using a kneaded eraser.
Now you can admire all those nice “blooming” textures!
Watercolor Iced Coffee with Blooming Shapes
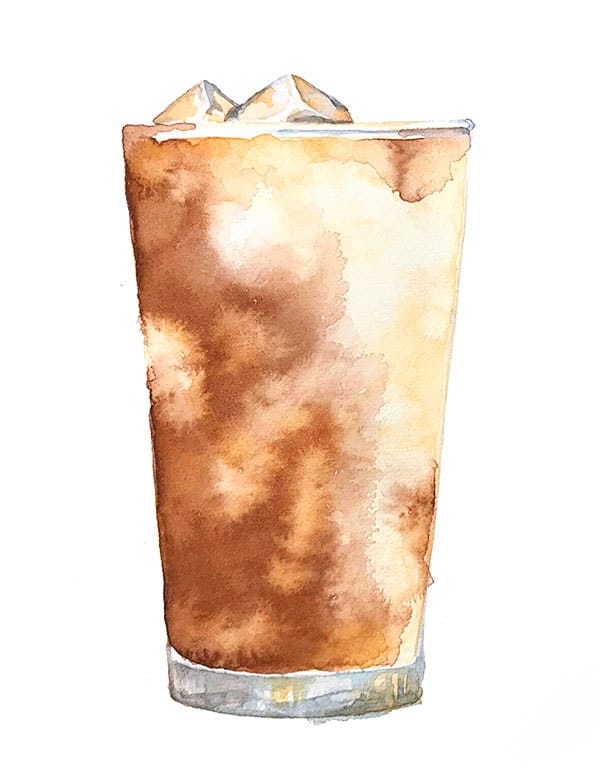
I’m no good in the morning without coffee! This time I’m using a watercolor bloom technique to create the impression of clouds of liquid in a glass of iced coffee.
If you want to give this a go yourself then download the sketch template and transfer it to watercolor paper.
I used the same colors as the previous exercise to produce the creamy coffee and dark chocolate colors.
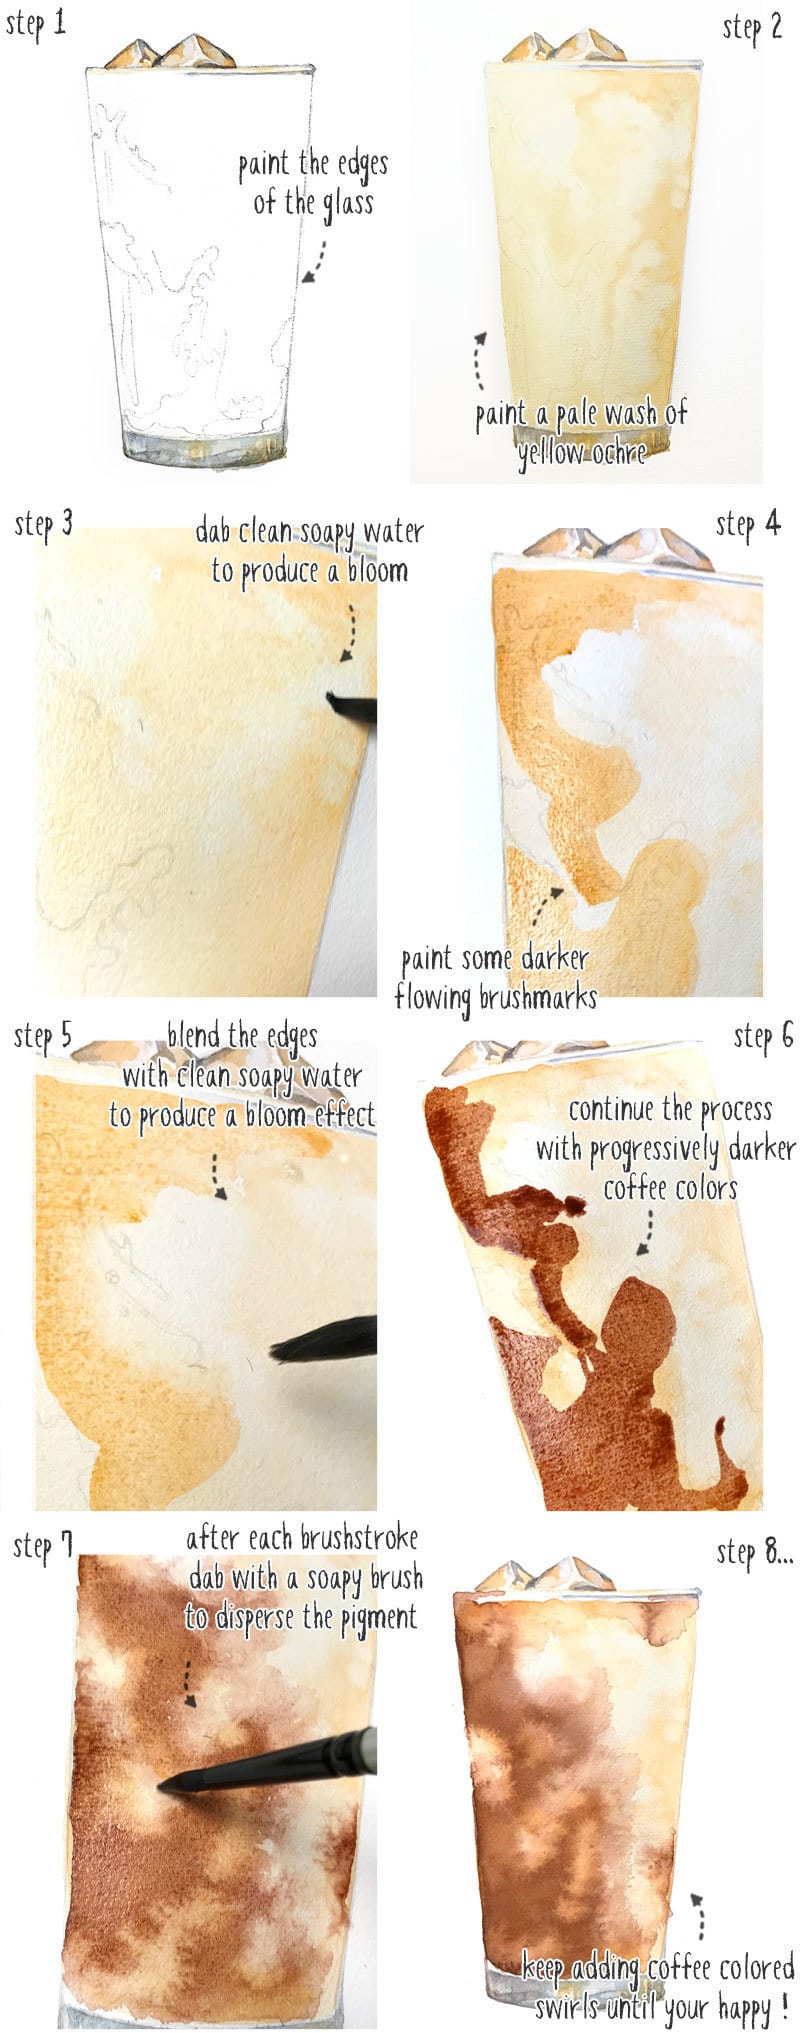
Start by defining the edges of the glass and the ice cubes at the top.
Next, paint the interior of the glass with a diluted mix of Yellow Ochre. Before the paint has time to completely dry, use a brush loaded with clean soapy water to drip and dab into the colored wash. I concentrated on the right hand side. Wait for the paint to dry between each new layer of color.
Now make a slightly stronger mix of Yellow Ochre. Paint some wet flowing brush marks on the left hand side of the glass. Then start blending the edges with your soap water brush. The soap disperses and pushes the colored pigment and creates a feathery edge.
The next step is a repeat of the same process, only this time I used a darker brown hue. Paint some flowing shapes on the left and blend the edges as before.
Keep doing this until you’re happy with the result !
Voila!
I hope you had a blooming good time !


Really. I’ve been mostly reading about watercolor until walking away a few years back. Your templates are informative and beautiful. Thanks!
I’ve been painting 16 years and this is most comprehensive explanation I’ve ever read or heard about blooms. Can’t wait to make my glass of iced coffee!
Thanks Kathryn !
Have fun with your watercolors !
This is an absolutely beautiful tutorial 🙂 I love blooms and all of it because I love the texture and messy quality it gives so whether a happy accident or on purpose it’s great. Though I know there are times when its not right for the look as well.
But that glass of coffee….I am in LOVE with that….just gorgeous!!
I was wanting to paint some stacked stones in different tones off deep green, with a bit of maybe dark purple or blue and orangey colors as they are her favorite and have a note about balance as we both deal with chronic pain and chronic health issues and finding that balance of getting things done while being sure to take time out to rest your body and mind can be so hard. So this was fun to go over for some inspiration since its been a couples months since I’ve been able to use my hands well enough to paint or anything, so thanks so much!!
I’m glad to hear you’re using your watercolors when you can Jade 🙂
In it’s own way, art can be very therapeutic !
These lessons are just what I have been looking for to acquire the basic knowledge and confidence for watercolour painting. Invaluable. Thank you, Anthony.
You’re very welcome Bernard 🙂
Thank you for making this valuable tutorial! And i love the conversational way you write. Can’t wait to sit down with my paints.
Thanks Mary
Glad you’re having fun with your watercolors !
even experienced painters learn from your tutorials!
Thanks you Lorraine – very kind of you…
Thank you Anthony. I’m new to watercolor and learning a lot!
You’re welcome Carmen – enjoy your watercolors !
Thanks! This was very useful. I’m wanting to learn to better control and use blooms. i have switched to 100% cotton paper and was having a harder time producing dramatic runs.
Just plain great! So useful. Thanks.
Happy to help Anne !
Enjoy your watercolors
Thank you Anthony for sharing these. They look so good I can’t wait to try them. I’m new to watercolour and I would never have thought of making use of ‘blooms’ in this way.
Cheers,
Arthur.
Thanks Arthur – blooms and backruns can add really interesting textures to watercolors, and they’re so unique to this medium !