How to Paint a Pear in Watercolor – A Beginners Tutorial
I know what you’re thinking.
Just another watercolor pear painting… Right ? Overused and not very original !
But pears, like many other fruit and vegetables, are really useful forms for studying some of the fundamentals of watercolor painting. They generally have a very simple shape, so even if your outline sketch isn’t accurate you’ll still end up with a satisfying result ! I love still life paintings like this, and I think they provide a great opportunity to practice watercolor techniques and some general principles that can help us to paint better !
So how do you paint a pear in watercolor?
Simply follow the steps I used to create this painting: 1. Create a value study (this part is optional but it’s worthwhile if you have the time). 2. Plan your colors 3. Draw an outline sketch on watercolor paper 4. Identify the brightest and darkest parts of the painting. Build up the watercolor using a glazing technique, increasing the intensity gradually from light to dark and using the value study as a guide. 6. Add some final details.
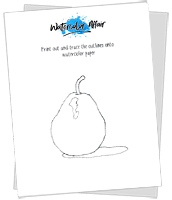
Sometimes getting started is the hardest part of a painting. So the aim of this little tutorial is to help you begin painting and get over that first obstacle. You can even download the template for this project so that you can easily draw a sketch outline like the one I did.
Before you begin, here’s a summary of the techniques and theory which I’ll go over in detail below, and everything you need to complete the project.
Painting a Pear in Watercolor
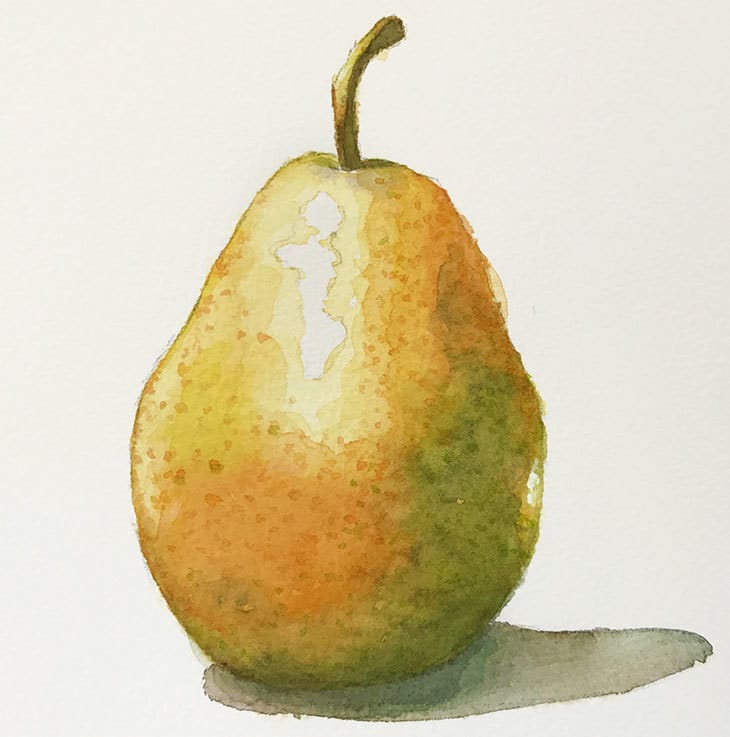
The supplies I used:
- Brush: Silver Black Velvet number 8
- Paper: Arches Cold Press 300 gsm / 140 lb
- Paint: Daniel Smith watercolor – Lemon Yellow – Phthalo Blue (GS) – Phthalo Green (BS) – Transparent Pyrrol Orange
The things you’ll learn:
- Understanding values and tone
- Understanding light, shading, and shadows
- Glazing technique and layering.
Download the outline sketch:
As well as the step by step process I used to paint this still life, I’d also like to explain a couple of watercolor basics which you may find useful. Personally I try to keep these rules in mind when painting this kind of simple still life subject. You can apply the same approach to any kind of composition you like.
Give it a try!
Make a value study of the Pear
Value, or tone, refers to the levels of lightness or darkness in a painting. For example, white is the lightest value and black is the darkest.
When I first started watercolor painting I didn’t really understand the importance of values. I was more interested in trying to portray a realistic outline of the objects in a scene. But I now realize that if you can get the relative values of a painting right, then you can depict a more realistic sense of light, space, and depth.
What is a watercolor value study?
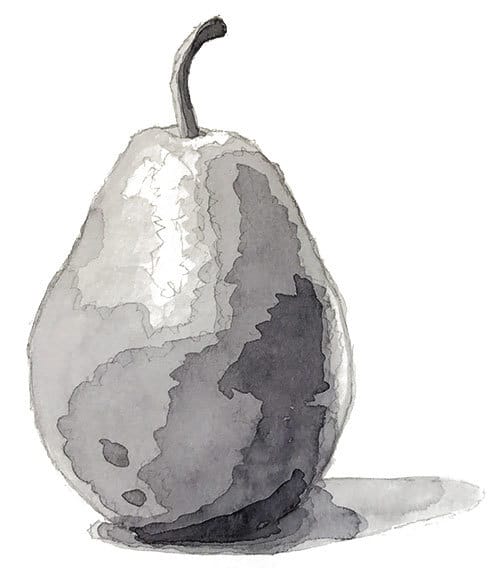
A value study or a tonal study is an incredibly handy tool. It usually takes the form of a monochrome painting and is used to analyze the degree of lightness or darkness of the different parts of your subject. The aim is to simplify the light and dark relationships between the various shapes of a composition. It’s not meant to be a finished painting with any fussy detail.
It can be quite difficult to judge the values of a subject in color correctly, especially if the object has a bright color such as yellow or orange (as is the case with this pear painting). This is why painting a grayscale version of your subject beforehand can help when you paint the final piece. It simplifies the tonal values into a small number of steps ranging from white to black and takes the guesswork out of the painting process when you paint in color.
Value studies may seem pointless, but from experience I find they’re nevertheless important. A painting with realistic values is much more convincing, and has better contrast and visual interest. Which is why I encourage you to try this practice for yourself ! They should be painted quickly. If they take too long then you’re probably trying to paint too much detail.
Watercolor pears – light, shading, and shadows
Pears are pretty much spherical forms. Spheres are a simple geometrical object which make an excellent subject for practicing shading and shadow painting.
As you can see from this simple study of a sphere, the proper use of values helps us express shapes in three dimensions.
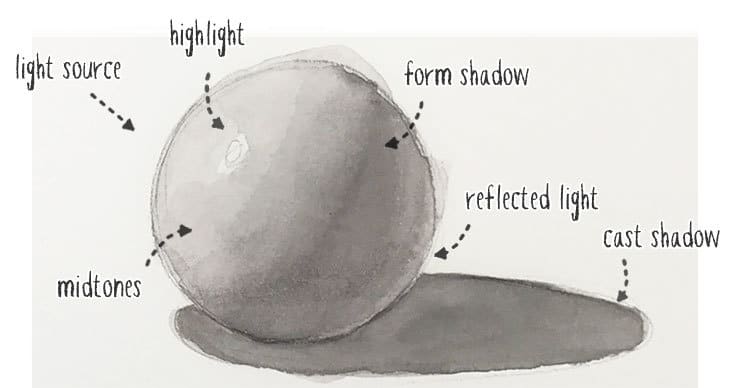
Five distinct things are visible when you cast light onto an object. To begin with you get a highlight where the light source is being reflected off the object. The midtones are found on the side of the sphere which is being lit by the light source. The form shadow shows the point at which the sphere transitions from light to shadow. On the shadow side of the sphere you often get reflected light where light is bouncing off the surface on which the object sits. Finally, the sphere casts a shadow on the surface that it sits on.
We need to keep these five rules in mind to paint a realistic three dimensional version of a pear.
Painting a value study in layers – Glazing
Thanks to the transparency of watercolors, paintings can be built up in layers with each new layer of paint adding more depth and tone to the painting.
You start with a thin diluted wash of color and paint the lightest tones. Each wash of paint must be left to dry. Every new layer of paint combines with the underlying color, making it darker and increasing the value.
Layering paint in this way is known as glazing, and it’s a traditional approach to working with watercolors.
As you can see in the demonstration below this is the technique I used to paint the watercolor value study for the pear.
After sketching the outline and trying to define the different zones of value, I start with a light wash of grey. I’m not concerned about blending the paint, I’m just trying to paint shapes of different tone. Don’t forget to leave white paper to represent the highlights on the pear (In watercolor painting white is normally provided by the white of the paper).
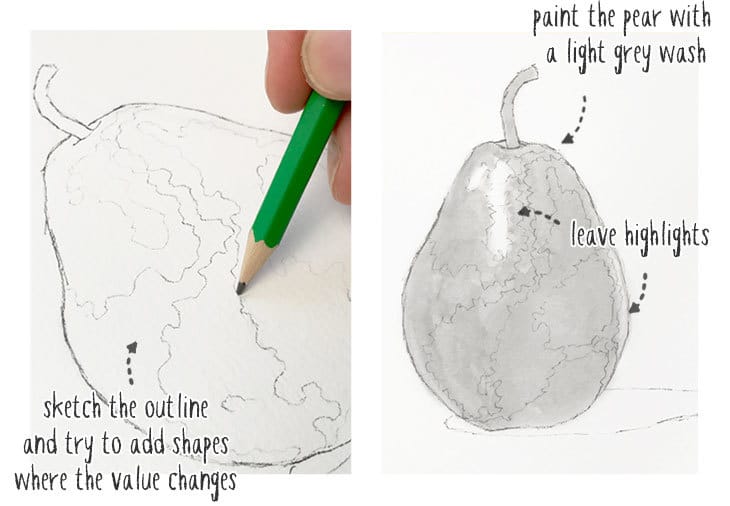
Leave your paint to dry before painting the next layer. If you paint into a wet wash then your colors will bleed in an uncontrolled way. Little by little add glazes of gray(I’m using neutral tint). Use a fairly diluted gray color. If your paint is too think then the glazing effect will be lost.
Notice how each new glaze increases the darkness of the area being painted. The aim is to paint shapes representing the different lightness values with easily perceptible steps of gray. For example, when you analyse your subject try to find the shapes which are white, light, midvalue, dark, and black.
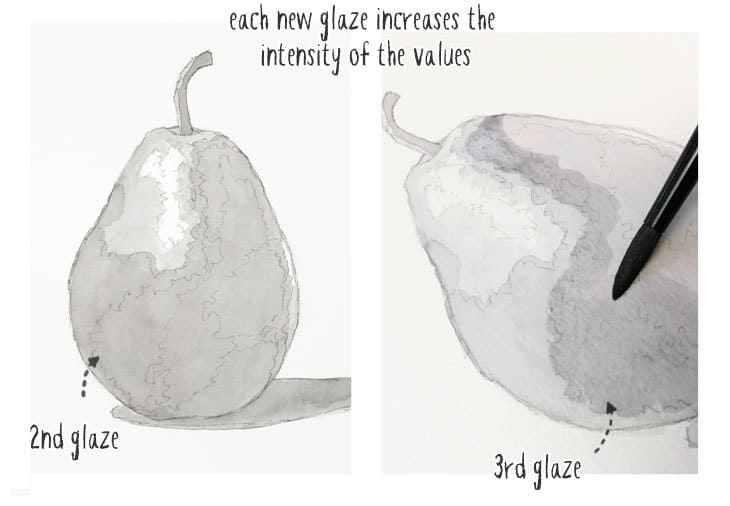
You’ll notice when the paint dries that it appears paler than when it was wet. If you think a shape is too pale, then just add another glaze of thin paint to strengthen the value. This is the advantage of working in thin, transparent glazes. You can easily add more darkness, but it is much more difficult to make a painting lighter.
Towards the end I only painted brush strokes to the areas which I consider to have the darkest values. Do the same process with the cast shadow, adding more paint immediately underneath the pear (known as the occlusion shadow).
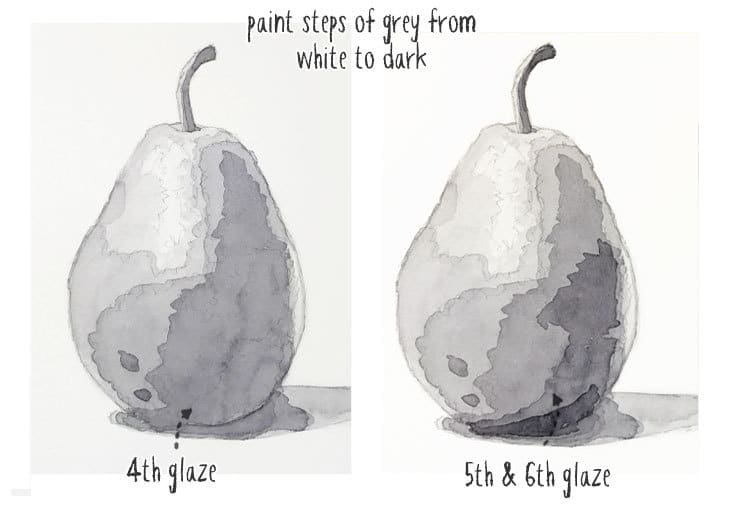
If you don’t want to do your own value study then just use mine as a guide.
Plan your colors – What color is a pear?
Whether you paint from real life or a reference photo it can be very useful to plan your colors a little before you start painting. Pears are generally yellow or green. But if you look closely at any subject how many colors can you actually see ?
The surface of my pear has a range of colors varying from yellow to green, and orange, with varying degrees of lightness and darkness.
I want the main colors to be bright and vivid which is why I choose Lemon Yellow and Phthalo Blue (GS). Both of these paints are cool hues and when mixed they produce a vibrant green. At the same time, lemon yellow plus Phthalo Green (BS) result in a nice bright turquoise green. Transparent Pyrrol Orange is one of my favorite hues and has an incredibly rich orange color. I also used a small amount of Raw Sienna for the stalk.
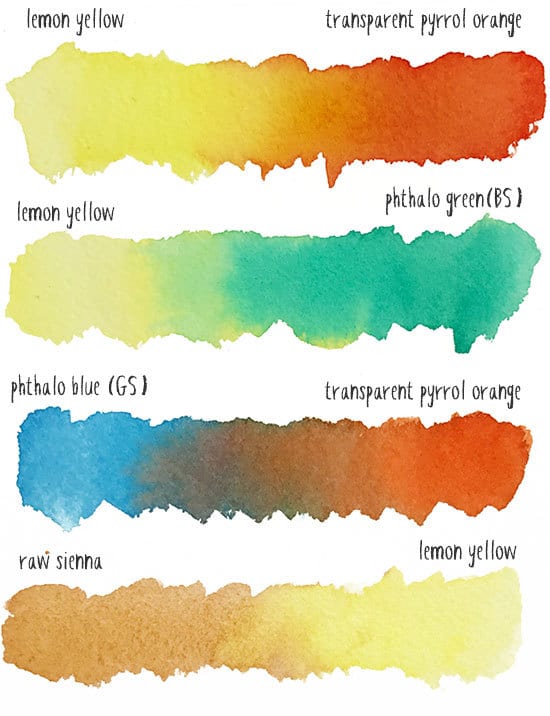
Glazing all of these colors together will help produce an interesting range of hues for the pear painting without muddying the final color appearance. These colors are also close together on the color wheel (known as analogous colors), which results in a harmonious gradient of color.
How to Paint a Pear in Watercolor Step by Step
Draw a faint outline sketch of the pear with a soft pencil. I like to include a shape for the highlight. Remember that once you paint over the pencil with watercolors you can’t erase the lines. Personally I don’t mind leaving traces of pencil. I think it adds interest to the final piece.
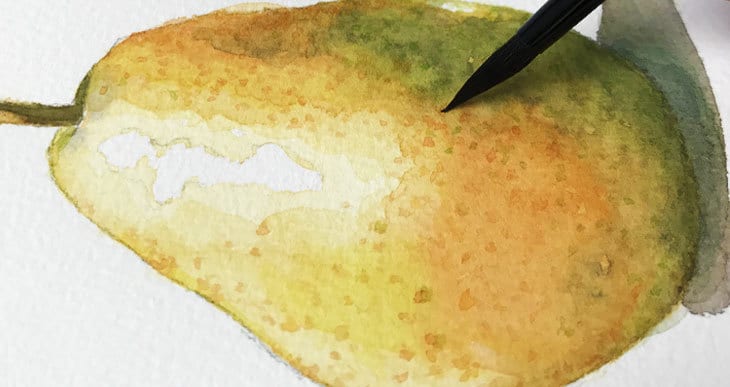
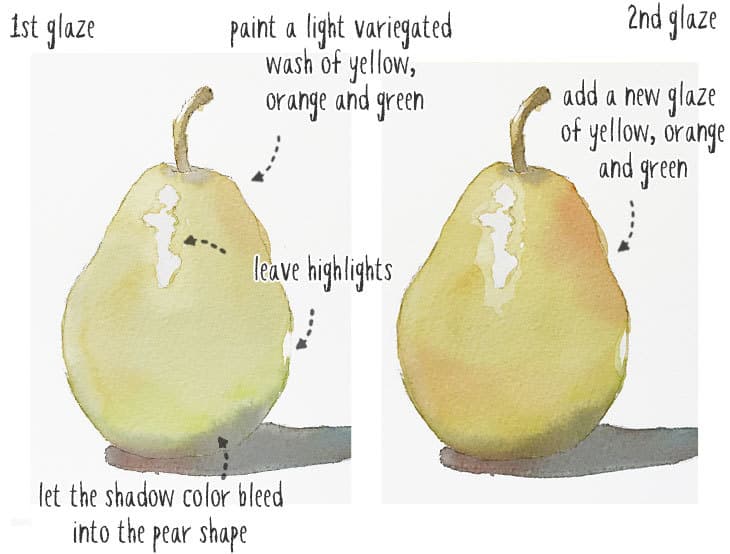
Start by filling out the silhouette of the pear shape with a pale wash of lemon yellow mixed with a very small amount of orange. Don’t forget to leave some white for the highlights. I’m also leaving some white on the shaded side to take into account the reflected light on the side of the pear. While this first wash is still wet I drop in some extra orange and green colors (this is a watercolor technique known as charging). I made a blue-grey mix to paint the shadow with Pyrrol Orange and Phthalo Blue. If you can paint the shadow quickly you’ll get some of the shaded color bleeding into the silhouette of the pear which will begin to add value to the shadow side of the pear.
The differences in hue are very subtle, but as you build up glazes of color this all adds interest and texture to the final result.
Paint the stalk with a light wash, then add some shade color when the first layer is dry.
Add a second and a third glaze in a similar way to the first wash. Each time I painted a variegated wash of three colors with yellow, orange and green. Each new glaze produces an area of darker tone, so I’m using my value study to help me judge the areas where i lay each new wash, and which areas should be left with a pale wash of color.
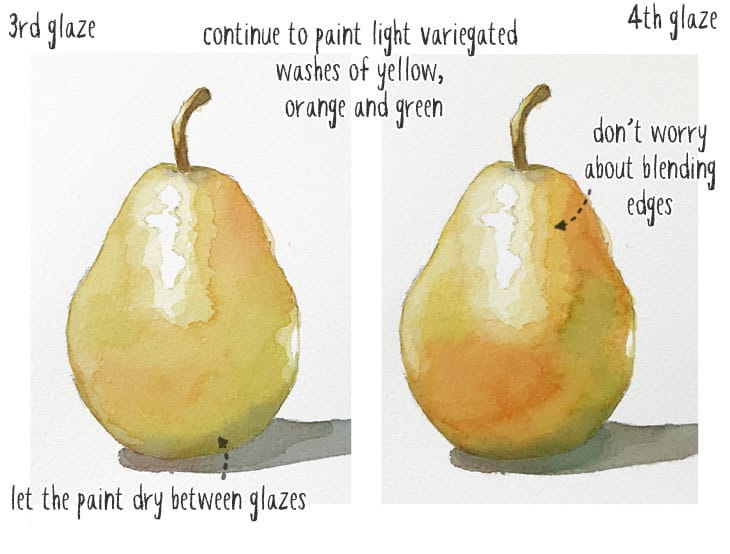
Apply a fourth and a fifth glaze in exactly the same way. Vary your colors between yellow, orange and green. Don’t worry too much about blending the edges of your washes. Personally i don’t mind seeing the hard dry edges between subsequent glazes of color, it’s one of the distinctive features of watercolor painting. Keep adding value to the cast shadow and the and the stalk.
The final glaze is what I consider to be the darkest tone on the pear shape. I used my value study to deduce the shape of this shadow side of the pear. This shadow area appears dark green which helps reinforce the analogous color harmony of the painting. In watercolor painting it is rare to paint shadows and shading using black paint. You can produce so many interesting variants of grey by mixing two or three colors together. In this instance I mixed a very blue gray color which when glazed over the yellow pear shows up as green.
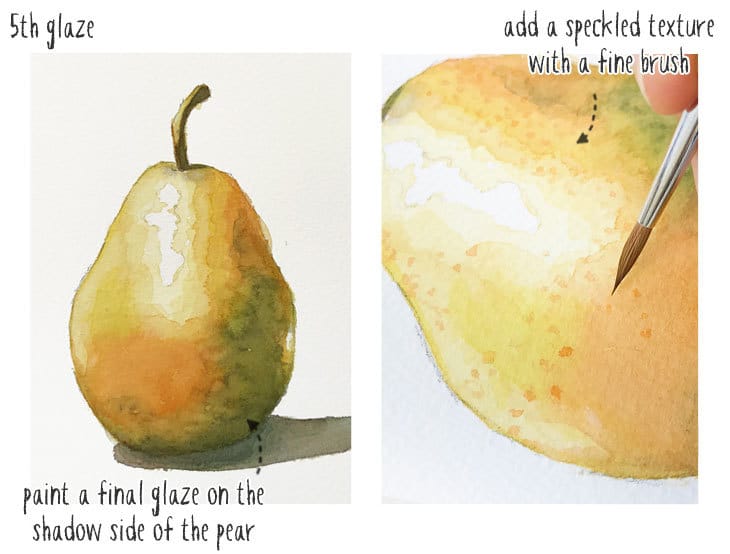
Pears often have a speckled skin and I added these details with a fine sable brush when the base colors where all dry. I tried to paint an interesting distribution of speckles without painting over the highlight area of the pear.
Taking things further
I hope you enjoyed this little tutorial. This is just one way to paint pears using a glazing technique. Keep in mind that for glazing to work well you need your watercolor paints to be transparent. It’s not always easy to find a full color palette which all have good transparency. it takes a little time and research but the results are worth it ( If you’d like to know more about the watercolor paints I use you’ll find more help and some of my preferences here… )
There are loads of different ways to paint pears with watercolor. It might seem like a simple subject but it involves a lot of technique. Paint as many pears as you like ! Each time I’m sure you’ll learn something new which helps you progress. The main thing is to have fun and get painting.

Thank you Anthony for your pare tutorial. I’m a beginner watercolor hobbyist. I was painting golden brown pares today. Forget the actual name. But they are beautiful. After painting I found your tutorial. I got some things wrong but so glad as your tutorial cleared up by mistakes. I think I will paint more pares this week and use your step by step process. Thank you so much. You’re a very good teacher. Pat
Thanks Pat!
Glad the tutorial was useful 🙂
Great lesson, Anthony! I learned a lot from your online course and now the tutorials on your blog help me practice.
I loved the value study and my pear turned out pretty good. I’ll try the same exercise (value study + the actual painting) with other fruit or objects I have at home.
Hi Carla
Happy to hear you’re pursuing your watercolor journey !
Have fun 🙂
Quick question: What do you do while waiting for the paint to dry between washes? Do you work on other paintings or just be patient… I always end up rushing the process and end up with muddy colors… Love your tutorials. You’re the best!
Hi Danielle.
If you really get impatient between layers you can use a hairdryer to speed up the process ! Just don’t hold it too close so it doesn’t disrupt the pigments too much 🙂
I really like your explanations….very clear. I’ve been confused by the term ‘glazing’ and when to use wet in wet or wet in dry. Looking forward to practicing this pear tutorial and then I want to try your seashells!
Happy to help Teresa !
have fun 🙂
Also: do you have a fb or IG group we can post our work?
I don’t use Facebook, and I’m a noobie on Instagram. So no unfortunatley not.
But you can ask me questions in any lessons and i will reply personally.
cheers !
Great tutorial! Two questions:
1) why did you choose pyrrol orange abd phthalo blue for the cast shadow? I suppose it’s because the pear color reflects on it? Mine came out a bit too greenish.
2) In your classes online, do you have tutorials in videos or just written instructions like this one?
Thx so much! I feel like i hit jackpot in your website!
Hi Hanna !
I rarely use black paint for neutral colors. the combination of Pyrrol orange and Phthalo blue can make a cool or quite a warm gray, depending on the amount of each paint in the mixture, and the shadow in my original reference is a warm gray color…
Using combinations of two paints for darks and neutrals produces more vibrant results (in my oppinion) and you can vary the color bias more easily.
My online course has both videos and written text for each lesson (if that’s what you mean ?)
Have fun with your paints !
I wish I could share with you how it turned out! Thanks so much for the tutorial!
Glad you enjoyed it Mary Ann !
This may be the lesson that inspires me to start painting again, it’s been way too long!
Hi Annie
Go grab those brushes 🙂
I’ve learned so much from your site! Thanks for all the articles, the step-by-step studies, and the pdf templates! I’ve painted several of these pears. I don’t have enough experience to do delicate variegated washes successfully. But, I can do flat glazes fairly well, so I’m varying the colors of the layers slightly to see if I can get similar effects to variegated washes. I’m realizing I’m having fun with this exercise!
Thanks Vivian – glad you’re enjoying this watercolor exercise !
I’m a beginner and having fun trying my hand at watercolors during the COVID19 “stay at home”.
Thanks, so much for this tutorial. It helps me to see and understand the mysteries of watercolor shading, color, and shape.
Thank you ?
You’re welcome Molly -stay safe!
Thouraly enjoyed this tutorial. Tried it out very pleased with the result. Had been overworking this showed me how to paint loosely. Look forward to more of your tutorials. Glenys
What a terrific tutorial! The best explanation that I have seen,. Very well done and thank you for such great detail. I will try this out soon. So much better than some of the art classes I’ve taken. Please do some more.
Neil
You’re welcome Neil ! Glad it was useful…
What a fantastic tutorial!
Probably one… if not the best I have seen, and I have seen lots of them!
Thank you and please post more…more…more!
I’m glad you enjoyed it Basia… Have fun with your watercolors!
Great lesson. Please do more of these for us rank beginners. My pear actually looks like a pear and not just a golden lump!
Excellent news Abi ! Keep on painting !
Thank you! I’ve been tortured by trying too hard on subjects out of my reach. This is a terrific refresher and gear down! ?
Thanks Helen. Keep on painting – you’ll get better and better!
very nice instructions. thank you very much.
What a helpful tutorial! I like the way you explained the light and shadow areas, assigning names to them. Your step-by-step process was so thorough and clear. Thank you.
You’re welcome Patty – hope you give it try for yourself!
Love your sight Anthony! One of the best Ive found for beginners. Id be happy to pay YOU for more tutorials and PDF downloads. No kidding. Youve been more useful to this journey Im on than Skillshare, numerous books and countless blogs etc. PLEASE, keep em comin!
Hi Kalia
Thanks so much for your kind comments! I’m planning to share some new stuff in the new year 🙂
Great tutorial wxplaing values,etc.
thanks Julie
Happy you found it useful…