
How to Paint Watercolor Roses (From Sketch to Finished Painting)
It’s that time of year again.
(For those of you who’ve forgotten, I’m talking about Valentines day!)
And I know what a bunch of romantic folks you are, so in this step by step tutorial I’m going to show you how to paint a rose in watercolor. I’ll go over all the details so you can understand the process from beginning to end.
What better way to paint this weekend ?!
Flowers are a favorite subject for a lot of artists but the forms of roses are particularly complicated, which can sometimes make painting these flowers a challenge.
If you want you can follow along and paint your own version of this composition. All the reference material and the sketch template can be downloaded below.
And who knows, you could end up with the perfect valentines gift (psst… if you forgot to order flowers, all is not lost!)
How to Paint Roses in Watercolor
Roses are fairly complex looking flowers which can make them seem difficult to paint.
The sketches below simplify the anatomy of a rose into basic geometric shapes. Understanding the structure like this will help us to figure out how it interacts with light and shadow.
The overall form of a rose can be compared to a cup.
The center of this cup contains a series of smaller closely packed petals that make up the inside of the rose.
The outside of the cup is surrounded by bigger petals which progressively curve outwards and unfold.

When you draw these three basic elements you start to get something which resembles a rose.
As a general rule when a rose is lit from above, the upper part of the rose will appear lighter than the bottom part.

Also, because of the way the petals converge towards the center of the rose, each petal will look lighter at the tip and get progressively darker as it reaches the heart of the flower.

The combined effect is that the tonal values of a rose get progressively darker from top to bottom (light at the top and dark at the base), and from the tips of the petals towards the center as they gradually become hidden from the light.

Simply keeping these ideas in mind about how the light and shading changes across the surface of the flower is enough to be able to paint a reasonable interpretation of a watercolor rose without even trying to copy the subject exactly.
Watercolor Rose Sketch

Before tackling the final painting I did a quick watercolor rendering, following the “tonal value rules” we just described.
First I sketched a freehand version of a rose which approximates the geometry of the flower, with tightly spaced petals in the center and larger unfolding petals on the outside.
The idea is to do a loose painting as a warm up for the final watercolor, so I’m not trying to be very accurate with my brush strokes and at the same time I can test out my paint mixtures.
I begin with a very light and diluted pink color, charged with some yellow for a bit of variety.
I paint the petal shapes, keeping in mind the overall rules for shading. You can see that I try to leave some white highlights for the tips of the petals where they would be the most exposed to light. And I make the inner folds of the petals darker because these are the parts which are the most shaded.
I use a glazing technique to add more layers of paint to strengthen the values of the underside of the rose which would logically be more shaded. And I leave the petals at the top and on the outer edges light in color. A single layer of diluted paint is enough for these shapes.
As a final touch I add a few brush marks of darker paint to the most shaded parts of the flower, such as the folds on the lowest petals, and the core of the rose which is generally quite dark because of the concentration of closely spaced petals in the center.
I’m not really worried about blending edges at this stage. I just want the overall tonal values to look approximately right.
I added a quick background using a contrasting green color to help the flower stand out on the page.
I find it can be useful to do a loose watercolor sketch like this before you commit to the final painting. It’s a good way to familiarize yourself with a subject.
Watercolor Rose Step by Step

Try this painting for yourself ! Click the button below to download the worksheet for this painting.
Here are the paint colors I used for this project (links to Amazon):
- Quinacridone rose – Pigment number: PV19
- Pyrrol scarlet – Pigment number: PR255
- Hansa Yellow Deep – Pigment number: PY65
- Phthalo Green BS – Pigment number: PG7
- French Ultramarine – Pigment number: PB29
This is the reference photo I chose for my final rose painting.

Begin by transferring the outline of the rose onto a sheet of watercolor paper and tape it down to a flat board using masking tape.
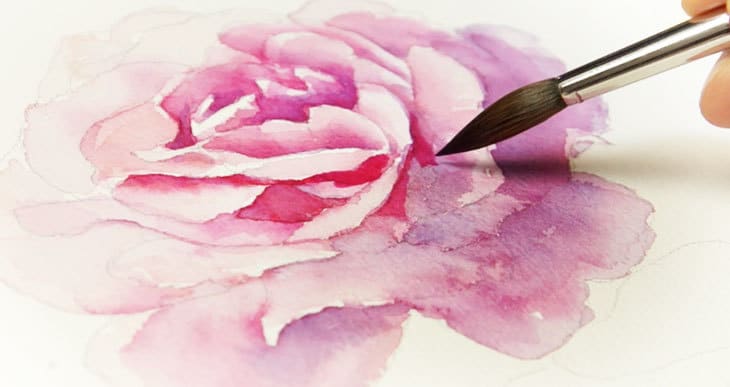
I begin painting the flower from the center outwards using a medium strength mixture of quinacridone rose. (You’ll find a list of all the colors I used for this painting below).
I applied my first brush marks to the inner folds of the petals where they are darkest in tone, then using a rinsed and blotted brush, I blended the color outwards to become lighter at the tips. You can use the reference photo as a guide to help you with this.
Keep working from the middle outwards using the same method. You can also charge in some different colors such as warmer reds or yellows to add some color variation.
When you reach the outer petals towards the bottom you should adjust your paint mixture so the petals appear shaded. To do this added a small amount of french ultramarine to make a purple-violet color.
In the real world, outdoor lighting tends to be warm, which produces shadows with a cool blue-violet appearance. The result will be much more colorful and realistic than if you try to use a dark colored paint such as gray or brown. Brown is too warm and will produce the wrong color for shading and shadows in this situation.
Continue painting the outer petals at the top of the flower, but of course this time you need to use a diluted light-toned pink color. As you can see in the reference photo the very top of the rose is brightly lit.
As you progress downwards, you can use stronger colored paint. I’m working using mostly a wet-on-dry technique. I apply brush marks directly onto the dry paper, then I rinse my brush and blend out the edges to get a smooth gradient of color from dark to light. Just make sure your brush isn’t too wet when you start blending, or you might flood the existing wash and cause unwanted stains known as “blooms”.
I use stronger colors as I reach the bottom of the flower, and I also drop in some additional color in places where the paper is still wet. This is a wet-on-wet technique known as “charging-in”.

Let the paint dry then go back over the parts that need stronger values such as the center of the flower and the petals on the underside which are in shadow.
Leave the paint to dry again. You’ll find that watercolors appear lighter when they dry, so repeat the layering process once again to increase the tonal values for the darkest folds of the petals.
Repeat this process as many times as needed until you’re happy with the overall result.

Now that the flower is complete you can move on to the leaves and the stem.
I painted these in a very loose style. I didn’t want to add too much detail to the leaves because these are not the main focus of the painting.
I paint these using quick brush strokes without trying to be too accurate. While the shapes are still wet I take advantage to either drop in different colored greens or use a dried brush to blot up the paint. The objective is to create loose leaf shapes with variation in tone and color.
When the first layer of paint is dry I added a few quick brush strokes to add some texture to the leaves. Nothing too precise, just a suggestion of the kind of patterns you find on leaves.
And here’s the finished painting…
If you give this project a try for yourself then let me know what you think in the comments below !


Best Valentine’s present ever. No time on V Day, but this weekend I’ll be happily enveloped in your lesson. Many thanks.
Have fun!
Thank you for this wonderful lesson. I have looked at loads of you tubes on painting (more advanced than simple c curve) roses – usually with NO instruction and just watching professionals paint with zillions of colours at lightning speed with lousy (sometimes) music in the background – talk about make me want to give up. This is THE BEST . I can read it through, digest it all, prepare what I need and THEN give it a try. So glad to have found your instructions. Thank you.
I can draw but watercolour painting is simply another world – and I love it!
Thanks Julie!
So glad you’re having fun with your watercolors 🙂
I’m in the middle of a Udemy watercolor tutorial right now, but I’m impressed with the information you have here (as well as your tutorials). I know you would like people to sign up for your course, and it’s on my “wish list.”
I’ve been doing acrylic painting for quite a few years now, and I’ve gotten pretty good. But watercolor is so much harder. Sometimes I do pretty well, and other times I could throw up my hands in frustration.
What does it take to get competent at watercolor? (I’ve been practicing almost daily for several months, and I started some courses last winter during the Covid lockdowns.) I’ve definitely learned a lot, and I see some improvement, but I feel as though my progress is slow.
Hi Anne
Happy to hear you’re persisting with watercolors 🙂
Yes, watercolors can be unpredictable. Unfortunately, answering your question is pretty much the objective of this whole blog 🙂 (And my course !)
So in short, I would say to get competent it takes “practice” and “observation”.
Every time you see something unexpected happening try to ask yourself why…
Don’t give up !
I find your instructions so easy to understand, you are a natural instructor. And when I look at the images of your paintings I feel not only inspired but excited. Thank you for giving me the inspiration to learn this wonderful art!!
Thanks Linda !
This is a beautiful painting and tutorial. Thank you so much for sharing. I just ran off your sketch and I’m off to paint. 🙂
Thanks Barbara ! Have fun painting…
Your lessons are so inspiring! Thank you!
I can’t wait to try this beautiful rose! Your projects always come out so well! Your instruction is the best! Thank you Anthony!
Thanks so much Lorraine !
Hope you have fun painting it !…
I have printed out many of the pages of this lesson because the finished rose you painted is so pretty without being overdone. I want to practice with these pages because I’d love to paint a pretty rose that just looks delicate and not perfect.
Hi Donna
I think watercolors is a balance between control and “letting go”. When you understand how to better control the paint then you can start to loosen up your style.
Have fun !