
Halloween Watercolor Painting Ideas (Spooky Step by Step Paintings!)
The other day my daughter said we should get some pumpkins so we could make jack o’lanterns. I admit, this is probably my favorite activity at Halloween. But this year I decided to extend the fun and do some Halloween watercolor paintings ! You can follow along in the step by step tutorials below… And I reckon these paintings will take you less time than to scoop out and carve a pumpkin !
For each of these scary paintings I’ve provided templates which you can download so you can paint your own versions (you’ll find a link below the video to my website where you can download all the templates and reference material). So grab your brushes and get ready. But do try not to let your hand shake too much !
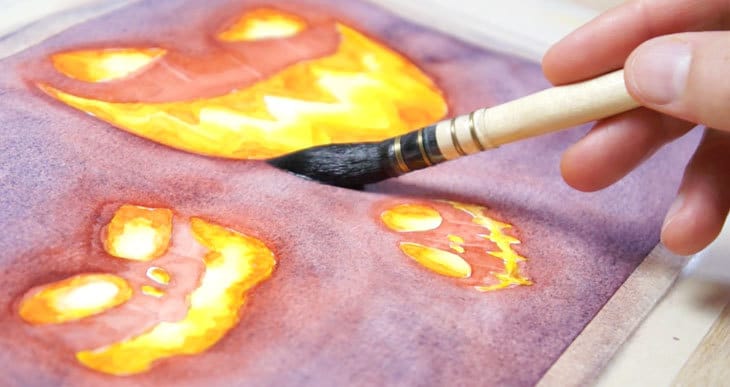
Watercolor Jack O’lantern

Try this painting for yourself ! Click the button below to download the worksheet for this painting.
Before we get into the painting process I just wanted to talk quickly about the composition of these jack o’lanterns. Notice for example, that I chose to paint 3 lanterns. Grouping in odd numbers like this generally improves compositions. There’s something about odd numbers which is pleasing to the eye. Notice also how the lantern faces get progressively bigger. This gives an impression of movement as if the lanterns are coming towards us. And it helps lead the eye to the biggest face which becomes the focus of the painting.

I mention this because I think that if you keep little composition tricks like this in mind when you plan your projects it can go a long way to improving your paintings.
Begin by transferring the outline of the subject onto watercolor paper, then fix the sheet down onto a flat board with masking tape. This just helps stop the paper moving around while you paint and it will produce a nice white margin around the finished painting.
Start by painting the eyes, nose and mouth shapes with a cool yellow color.
For example I’m using Daniel Smith Lemon yellow for this – For reference here’s a list of all the colors used in these paintings (Please note, these are affiliate links):
- Hansa Yellow Deep – Pigment number: PY65
- Lemon yellow – Pigment number: PY175
- Phthalo Green BS – Pigment number: PG7
- Phthalo blue GS – Pigment number: PB15:3
- French ultramarine – Pigment number: PB29
- Quinacridone rose – Pigment number: PV19
- Burnt umber – Pigment number: PBr7
- Paynes gray – Pigment number: Pb29/PBk9
While the first layer of paint is still wet, add a warmer yellow color to the outer edges of the eyes, mouth, and teeth. Adding color like this is a wet-on-wet technique known as “dropping-in” or “charging-in”, and it’s a way of blending colors to produce a soft diffused edge.
Next use a blotted brush to remove some of the color in the brightest parts of the mouth and eyes. This is a technique known as “lifting off”.
The objective is to paint a gradient of warm colors ranging from light to dark orange, to reproduce the glowing appearance of the jack o’lanterns.
Paint the other lantern faces using the same method. Start will a wash of cool yellow, then charge-in some warmer yellow paint. When you’re finished leave the paint to dry completely.
Mix up some orange paint and start painting the teeth and the outer edges of the eye and mouth shapes. Use a blotted brush to blend out the edges of your brush marks. Refer to the reference photo to help locate the areas to paint.
Again let the paint dry. As a final touch mix up a neutral orange color and deepen the tonal values of the teeth and the inside of the eyes.
Tips & Tricks: by the way, the term “values” simply refers to the lightness or darkness of a color.
This time don’t blend the edges of your brush strokes. Leave the hard edges of your brush marks to add some more texture to the painting.
Now that the eyes and mouths are finished you can move on to painting the faces.
We want the faces to be darker because they should fade into the dark background like in the reference photo. For this you need to mix up a more neutral orange color. To achieve this kind of hue, start with an orange mixture and add another paint color to lower the saturation, such as a small amount of blue or burnt umber.
Paint around the eyes and mouth, then dip you brush in your rinse water and begin to blend out the edges of the face. Keep dipping your brush in the rinse water and blend the color outwards into the background.
Don’t worry at this stage if your brush marks are noticeable. When you paint the darker background these will be mostly masked by the stronger paint color.
Again leave the paint to dry. At this stage I took advantage to add some detail to the faces to represent the vertical segment lines on the surface of the pumpkin. Use the tip of a clean damp brush to make vertical brush strokes. This is another example of a lifting technique.

The background is painted using a wet-on-wet technique (this is when you apply wet paint to a damp surface). The reason for using this method is because I wanted the edges of the background color to blend smoothly around the glowing eyes and mouths of the jack o’lanterns.
The difficulty with painting backgrounds in watercolors is that if you don’t work quickly enough your paint will dry and you end up with visible brush marks. So to avoid this problem I started by pre-wetting the surface of the paper with clear water, being careful dampen everything except the eye, mouth and nose shapes.
For the background mix up a dark purple color.
Tips & Tricks: Rather than using black for the background you can create a more harmonious result by using purple. Purple is closer to red and yellow on a color wheel and this results in an analogous color harmony.
To mix this color I used a combination of warm red and warm blue. (E.g: french Ultramarine and Pyrrol Scarlet).
Notice when you apply the purple paint to the damp paper the color diffuses more evenly across the surface. You can use your brush to push the paint pigments around and achieve a nicely blended edge around the faces.
When the background dries you’ll notice that the color looks lighter than when you were painting. this is one of the characteristics of watercolor paint.
So to deepen the value of the background we can simply apply the same same process again.
Re-wet the background with clear water, making sure not to wet the eyes or mouths. Then add another layer of purple to the background.
When the paint was completely dry I added some final touches by lifting off some more paint to reinforce the vertical ribs on the pumpkins.

Halloween Watercolor Tutorial – Bats Composition

This next painting idea is a simple composition of blood sucking bats !
Notice that I arranged the flying bats so that they describe an “S” shape. Artists discovered long ago that this type of S shaped curve generates a kind of leading line which adds a sense of movement to a painting. This works particularly well on vertical compositions like the one I used here.

To increase the sense of movement of the bats I also gradually decreased the tonal value of each bat shape so that as they get smaller and smaller they fade into the background. This creates a sense of depth which reinforces the impression that the bats are flying out of the paper !
As before, begin by tracing the outline of the bats onto watercolor paper then fix your paper down to a board.
Begin by mixing a fairly strong mixture of gray paint. A good way to do this if you use paint tubes is to put a spot of paint onto your mixing palette and add only a small amount of water at a time. I used Payne’s gray as the main color for the bats, but to make the painting a bit more interesting I also charged in a hint of purple as well.
While the paint is still wet, drop in some purple color to one side of the bat shape. The color will blend evenly into the first wash of paint.
Paint the second bat with a slightly diluted gray mixture. Add a small amount of water to your puddle of gray paint to dilute the color and make it lighter. Do this a small amount at a time. You want the change from dark to light to be progressive.
Then charge-in some purple while the shape is still damp to create a bit of color variation.
Do the same thing for the next bat down. Add a small amount of water to dilute the paint, fill in the bat shape with the gray color, then drop in some purple wherever you like.
Keep moving down the page, making your paint lighter and lighter in value until you’ve painted the final bat at the bottom of the composition.

Halloween Scary Cat Eyes Painting

Try this painting for yourself ! Click the button below to download the worksheet for this painting.
The subject of this next painting is this set of scary cats eyes !
OK… I know they’re not super scary, but after all, cats are a traditional symbol of Halloween. Especially black cats like this.
Start by transferring the drawing of the eyes onto watercolor paper and tape down your sheet onto a flat board.
I started by painting the cats eyes with a diluted turquoise blue color, being careful not to paint the white highlights of the eyes.
Tips & Tricks: Leaving the paper untouched like this is called “reserving whites”.
Charge in a slightly stronger mix of paint into the iris around the pupil and at the base of the eye. Next I dropped in some green color at the base of the iris while the first wash was damp. The iris has a lot of color variation so using a charging-in technique like this is a good way to get diffused variations in color.
Do the same thing for the left hand eye, then leave both of them to dry completely before you move on.
If you look at the reference photo you’ll see that the outer edges of the eye and the area around the iris tend to be darker in color. To reproduce this effect, add a stronger turquoise color to these areas of the painting and then blend out the edges.
Do the same with a darker green color at the bottom of the eyes. Repeat the process for both eyes then fill in both of the irises with a dark toned gray.
Continue to darken the bottom of the eyes, this time using a green color, then fill in both of the pupils with using some dark gray paint.
Keep on building up the values around the outer edges leaving the central part of the eye lighter in color. You can also add some darker shapes without blending the edges. Try to use the reference photo to help you judge the darker shapes on the cat’s eyes.
Because watercolors are transparent you end up with layers of complex textures which help make the eye look more convincing. Notice also that the values get darker as you paint one layer on top of another. Painting layers of transparent watercolors like this is a technique known as “glazing”.
Now that the eyes are finished I’m going to paint the background using the same technique as the jack o’lanterns. Begin by pre-wetting the background with clear water, leaving the eye shapes untouched, then mix up a fairly strong puddle of Payne’s gray paint. Cover the whole of the background with an even wash of gray.

While the first background wash is still wet I charged in some more pigment to intensify the color. I used a mixture of Payne’s gray plus Phthalo green to produce a slight green hue which harmonizes with the green of the cat’s eyes.
When you’re happy with the background, leave the paint to dry completely.
The paint dries lighter in color compared to when it’s wet. To darken the value of the background we can repeat the same process, wetting the background with clean water then painting into the background with a dark mixture of Payne’s gray.
This time I started by painting a dark circle around the eyes. Then while the paint is still wet I blended the edges inwards towards the eye shapes so that the eyes look more like they blend gradually into the background.
Now you can add wash of dark gray to the rest of the surface.
So long as the surface remains damp you can keep working the background shape, adding darker paint until you’re happy with the intensity and value of your painting. This wet-on-wet technique helps to disperse the pigments across the surface of the paper, but nevertheless you should try to use even brush strokes to spread the paint uniformly and avoid unwanted brush marks as the paint dries.
Leave the painting to dry again. As a final touch I used a lifting technique to put back some lighter highlights around the eyes.
And there you go ! You now have three spine-chilling watercolor paintings for Halloween!
I hope you have fun painting these easy Halloween watercolors. And as an extra treat you can also watch this tutorial on YouTube !
Yep ! This is my first ever Youtube tutorial. If you like it, subscribe to my YouTube channel. They’ll be more videos coming in the future.


These are so flippin’ cool! Definitely doing all your Halloween projects next month!
🙂
Thank you for your advice! I will enjoy painting these 🙂
These are so helpful! Thank you for sharing these tutorials. I am so glad I found your website!
Have fun with your watercolors Chelsea 🙂
WOW, thank you for all the helpful advice. Best regards, Nancy