
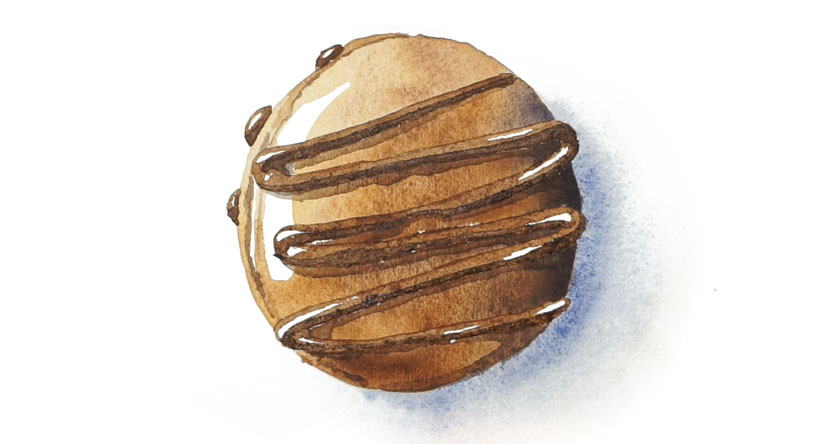
How To Paint a Macaron in Watercolor

These tasty looking pastries are very popular in France, where I live.
In this lesson I’m going to show you how you can paint this macaron in watercolor in just a few simple steps.
In all my tutorials I try to simplify the painting process into easy to follow stages so that anyone can try subjects like this for themselves.
And this is a perfect example of a very beginner friendly painting. It’s a really fun and satisfying watercolor, so I hope you’ll give it a try.
Grab your brushes to make your own “macaron masterpiece” in just a few easy steps.
Step 1 – Getting Started
Begin by sketching the outline of the macaron onto a sheet of watercolor paper.
As usual, anyone should be able to easily follow along with this painting… But for those of you who want to go further, you’ll also find the full length video, the outline sketch, and all the reference material for completing this painting on my Patreon : you’ll find my full library of ad-free video tutorials, plus other exclusive bonuses that I only share with members of my Patreon channel. Follow the link to find out more...
When you’ve completed the sketch, tape the sheet onto a flat board with some low-tack masking tape. Before painting the first brush stroke you need to protect the wavy line that represents the icing using masking fluid.
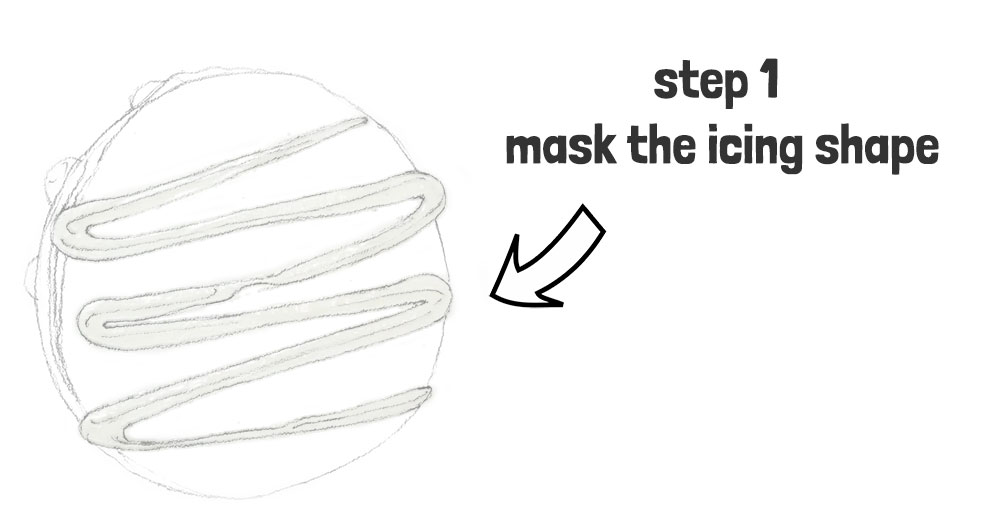
Doing this will make the painting process much easier, and it will let you paint the whole macaron shape with uninterrupted brush strokes, giving you a much smoother result.
I used a bamboo quill pen to apply the masking, and a hair dryer to speed up the drying process!
Step 2 – Foundation color (graduated wash)
Next we’re going to apply the foundation layer of paint, by painting the whole macaron shape in one go.
To do this I mixed up a puddle of brown paint using burnt umber. I then start to fill in the shape. But I’m being careful to leave a fairly big white highlight in the top left corner of the macaron.
Note that in the reference I’m using, the light is coming from the upper left – this will influence the way you shade and shadow the macaron.
My first brush strokes use a pretty diluted mix of brown. And as I progress from the upper left to the lower right hand portion of the shape, I’m adding more and more paint into the mixture, making a more intense color. In this way I’m suggesting the direction of the lighting, and making a more convincing three-dimensional effect.
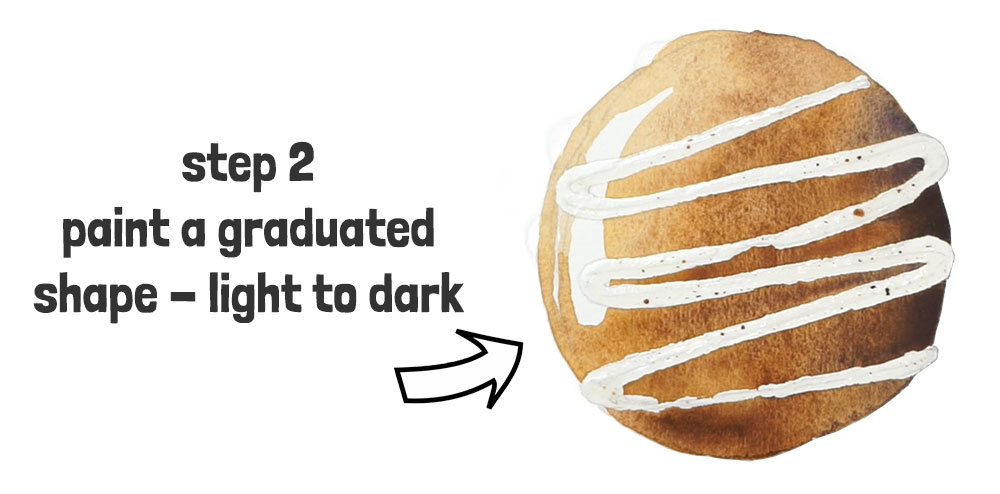
To make the shaded side of the macaron even darker, you can add some french ultramarine blue into the mixture.
Mixing with a complementary color like this is a good way to neutralize a color.
Step 3 – Shading & shadows
Leave the first layer to dry then in the next stage we’ll add some shading and shadows.
Begin by adding a cast shadow on the lower right of the macaron. I started with an extremely diluted puddle of Payne’s grey, which I blended out to almost nothing. After I had defined this shadow shape, I charged in a more intense mix of grey into the damp wash, adding a stronger color close to the edge of the macaron.
Leave the cast shadow to dry so you don’t smudge the paint while painting…
Next I used a mid-toned brown color to add a cast shadow to the curvy icing.
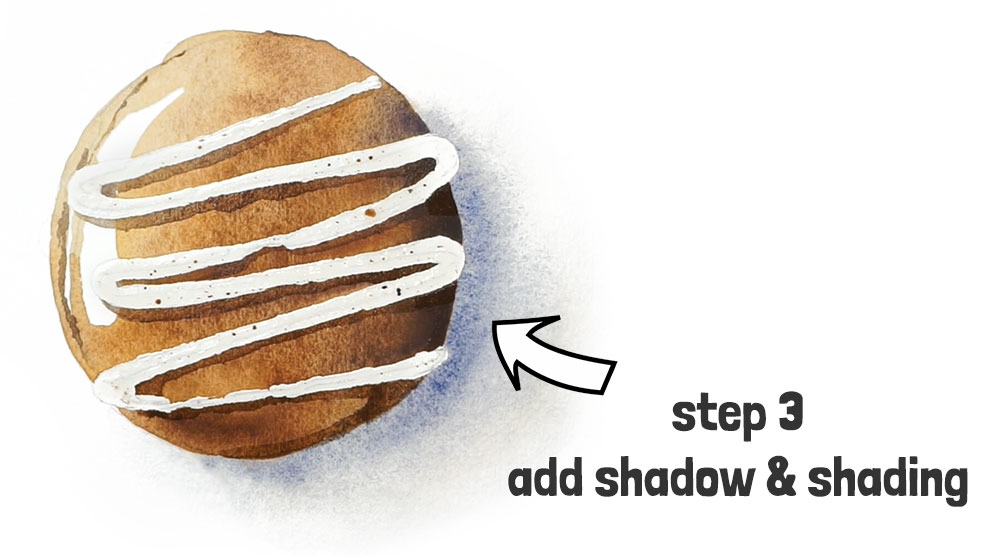
Do to this, think about the direction of the light and add brush strokes to the shadow side of icing all the way down to the bottom.
I’ll let you follow along in the video so you can see the brush marks I used to paint these shapes.
Finish off with a few lines of darker detail where the two sides of the macaron are sandwiched together.
Before continuing with the rest of the painting, it’s time to remove the masking fluid. You can use a rubber cement pickup tool like this or just an ordinary eraser.
Step 4 – Paint the “icing on the cake”
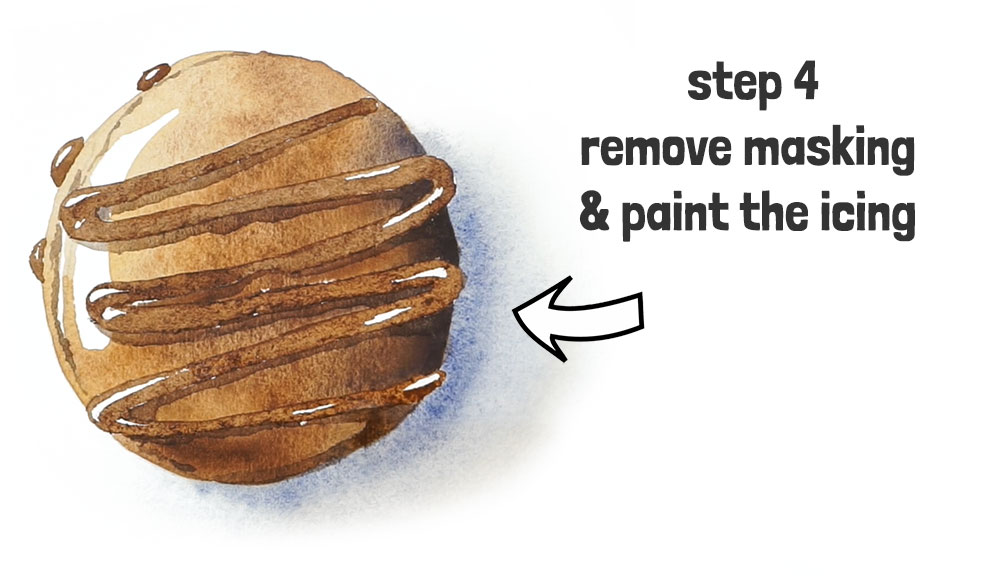
Now we can fill in the shapes of the icing. I’m using a mid-strength mixture of brown paint for this.
I began with the small blobs of icing protruding from the underside of the macaron. And since we’re now painting the details, I also swapped to a small pointed brush.
The icing shape itself is also quite shiny, so I’m being careful to leave some small white highlights on the parts of the icing shape that are turned towards the light.
Leaving those white highlights in a watercolor painting adds a level of interest and liveliness. It’s all about adding contrast – those bright spots make the colors around them pop!
This is quite a fiddly and intricate part of the painting process… (I have a video of this on my YouTube channel – just search for “watercoloraffair”).
Add a few more lines of color along the separation between the two parts of the macaron.
When the icing shape is complete, leave the paint to dry completely.
Step 5 – Final shadow details
To give a more three-dimensional feel to the icing I’m going to finish off by adding some shading to this wavy shape.
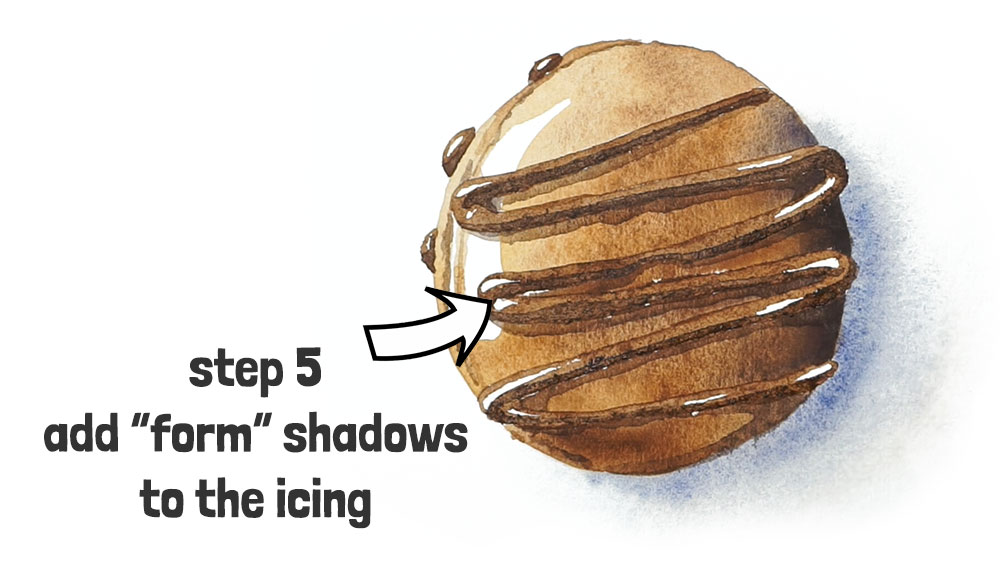
We already painted a cast shadow for the icing earlier on… but the icing itself looks slightly flat. To do this I added a few brush marks to the shaded underside of the icing. This “shading” is also called the “form shadow”, this is the part of a form that is not directly illuminated by light. Adding this adds depth to your artwork and makes it seem less flat.


Anthony, I did love this tutorial, love the small sizes, I can finish a few in the morning. My burnt umber looks quite cloudy compared to yours. Do they vary in color from brand to brand or deteriorate with age or both? Some of mine our quite old, but most have held up well over the years.
Hi Linda
Glad you enjoyed the tutorial 🙂
Yes, the color can vary between brands… each manufacturer may have a different source of pigment and manufacturing process, which alters they color slightly.
Cheers!
While it is faster to blow dry the masking fluid, often this makes the fluid adhere to the paper more than you might want. It takes a bit more patience, but it’s safer to allow the fluid to dry naturally.
Thanks for the lesson!
Hi Pamela
Thanks! I agree… natural drying time is better.
Actually for this painting I put the masking fluid on a bit thick (so I got impatient!).
Also, this was done on student grade paper. And although you don’t see it in the demo, the masking tends to tear the wood pulp paper when you lift the masking off!
Just something to look out for…
Loved it… You simplified the directions. Thanks for being a wonderful teacher to would be artist like me!!