
Easy Watercolor Seashells (Step by Step Tutorial)
Recently, I went to the beach for a quick break.
Yep… Lucky me !
It’s a couple of hours drive to the coast, but it was well worth it. And one of my favorite beach activities is picking up shells and stones. Which is why this lesson is about showing you an easy way to paint seashells in watercolor.
Even though this subject looks difficult because of the complex shapes and the intricate textures, I’m going to show you how to paint a convincing interpretation of these shells without needing to be completely accurate in the way you paint…
Painting seashells in watercolor
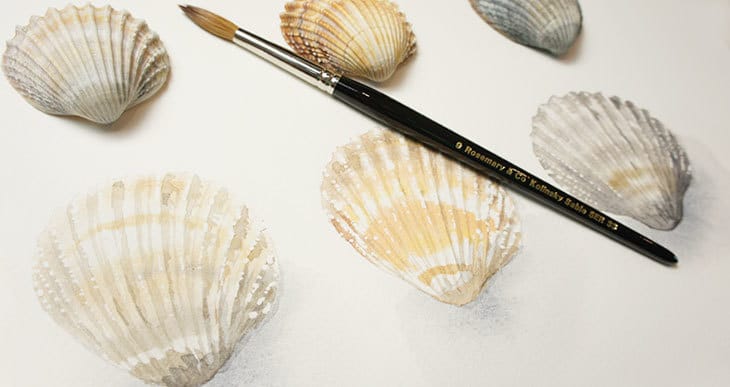
If you look closely at the structure of these seashells you can see that there are two overriding patterns which stand out.
- The radiating lines created by the ridges which spread out from the bottom
- The colored lines of texture which follow the curved form of the shell

These two patterns are overlaid in opposite directions to each other, and we can use this underlying design to help us paint a pretty good looking version of a shell.
Watercolor Seashells Tutorial
I’ll be painting this simple composition of three shells. They all have the same overall form, but the colors on each one are different, and I’ll be using two fundamental watercolor techniques:
- Wet-on-wet
- Wet-on-dry

You can download the sketch template for this painting below, and you’ll find a list of the paints and supplies I used here:
- Hansa Yellow Deep – Pigment number: PY65
- Pyrrol scarlet – Pigment number: PR255
- Burnt umber – Pigment number: PBr7
- Paynes gray – Pigment number: Pb29/PBk9
- Yellow Ochre – Pigment number: PY43
- Arches Watercolor Pad 140 lb Cold Press (100% cotton Artist grade paper)
- Pebeo Masking Liquid
- Rosemary & Co Kolinsky Sable pointed round Series 8 size 4 (short handle)
Try this painting for yourself ! Click the button below to download the worksheet for this painting.
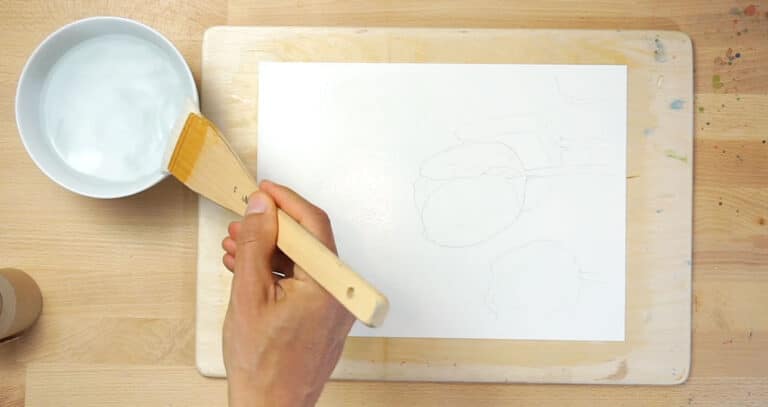
Start by transferring your drawing of the shells onto a sheet of watercolor paper then fix it down onto a board. You might find it useful to draw the ridges of the shells quite accurately to use as a guide during the painting process.
If you look closely you can see that the seashells have a series of white bumps along the ridges. So before I started painting I used masking fluid to preserve the white paper to create this pattern of white bumps.
I’m using a bamboo quill pen to do this. You just dip the end of the quill in the masking fluid and draw in a similar way to using a dip pen.
Let the masking fluid dry, then prepare to paint one of the shell shapes by wetting the surface with clear water. Be careful only to dampen the shape of the shell, and try to get the surface evenly damp all over.
Mix up an orange-brown color and start painting the texture of the shell using a wet-on-wet technique. Follow the curved pattern of texture using the reference photo as a rough guide. This doesn’t need to be accurate. The colored pigments spread nicely into the damp surface producing a blended edge to your curved lines of color.
Vary your colors as you progress downwards and also vary the width of your brush strokes. You can also use a few vertical brush marks in the direction of the seashell’s ridges.
The overall effect produces a nice random interpretation of the colored markings on the shell.
Don’t worry if the surface of the paper starts to get dry. Just continue to paint the pattern using random shaped brush marks. I’m adding more color to the bottom, right hand side of the shell because this is the side that’s in shade.
While this first layer of paint dries, move on to the next shell, wetting the whole of the shape like before.
Start painting wet into wet in the same way you did previously. Make your marks fairly random but try to follow the curving shape of the shell. The colors on this shell are much lighter toned than the others, so be sure to use very diluted paint to achieve a light-valued appearance.
Leave the paint to dry again and start preparing the final seashell with a coat of clear water.
This is the darkest shell in the group. I used a mix of gray and brown to create some color variety. Try to leave white spaces between the curved lines to simulate the pattern in the reference photo. And apply some more solid shapes of color to the bottom, and right hand side, to suggest shading.
Leave everything to dry before moving on to the next stage. Now that we’ve added the curving texture, we’re going to use a glazing method to suggest the radiating lines of the ridges.
Glazing of course is a wet-on-dry technique, which means the surface should be completely dry before you add paint to paper. In contrast to the soft blended marks created by a wet-on-wet technique, glazing produces brush marks with sharp well defined edges.

By painting a series of lines following the direction of the ridges you can easily represent the shading created by the upper ridges and lower valleys on the surface of the seashells.
I start with a light-toned mix of paint on the left hand side of the shell which is turned towards the light. Then as I reach the right hand side which begins falling into shade, I use lines with a slightly darker value. Add a few more darker lines here and there to make the progression from light to dark more gradual. Overall this helps to reinforce the illusion of three-dimensions.
Use the same approach to paint the ridge lines on the next shell along. Paint directly onto the dry surface to get sharp edges. Start with a fairly diluted mixture of paint to get light colored brush marks, and as you progress towards the shaded side on the right, use a more concentrated, darker mixture.
Repeat the process with the last shell shape. Adapt the color of your paint to match the color of each of the shells to achieve a better color harmony. For example I’m using a gray paint color over this gray shell, but for the first shell I used a sandy color mixture, and a neutral brown color for the middle shell.
After leaving the paint to dry I’m going to use a wet-on-wet technique again to paint some shadows. Dampen the surface of the paper by painting around the seashell shapes using clear water.
Tips & Tricks: When you work like this it’s useful to have two jars of water – one for rinsing and one for picking up clear water.You can also use two brushes. A clean brush for applying clear water, and a second brush for painting. Like this you avoid any color contamination from your rinse water, or from your brushes.
Drop in some very diluted gray paint to the underside and right hand edges of the shells. Run your brush up to the edge of the shell shapes and let the rest of the paint diffuse smoothly into the paper.
After you’ve applied a first wash of light gray, and before the surface has time to dry, dab in a few drops of slightly darker gray paint up near the edge of the shells. This helps produce a more realistic looking shadow, because cast shadows are always darker as they get closer to the object.

Now we’re going to leave the paint to dry again and switch back to a wet-on-dry technique to add a final glaze of shadows and shading.
This will reinforce the shading and give the shells a bit more depth, and a more three-dimensional appearance. You don’t need a very concentrated mixture of paint. By using a glazing method, building up layers in this way will naturally increase the tonal values, and create a darker appearance with each new layer of paint.
Add a few brush marks to the underside of the seashell, and up into the ridges on the right hand side. You can even let your brush strokes overlap slightly onto the cast shadow you painted previously.
Add the final brush strokes and then make sure you leave the paint to dry well before removing the masking fluid. I find that a kneaded eraser is ideal for this because it doesn’t leave any debris and lifts the latex masking fluid quite easily.


I really loved this, thank you!
You’re welcome 🙂
Great reference materials and step by step instructions. You make it so easy.
Sylvia
Thanks Sylvia
This was fun and a very effective process. Did one with “unnatural” colors just for the heck of it and it turned out beautifully. Thanks for the well drawn shells! That makes all the difference. By the way, always love to see your work in progress.
Thanks Kathryn
Good to hear you’re getting creative !
Excellent.