How to make watercolor pans
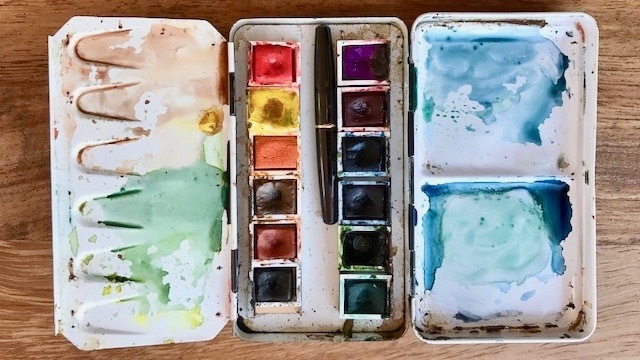
At some stage in your pursuit of watercolor art you will want to make your own watercolor pans.
Watercolors in pan format are an excellent option with a heap of benefits. They’re convenient, easy to use, portable. And in my opinion if you make your own pans they are more economical than the ready-made alternative !
So how do you make watercolor pans?
Making pans is a relatively simple process. You fill an empty pan with paint from a tube and then let it dry. But the reality is sometimes a little more complex. Which is why I’ve written this in depth study of the pan making process.
I remember the first time I tried to make watercolor pans. I squeezed my paint into some of those little plastic tubs and filled them right to the brim. I checked my handiwork the following day, and the paint still hadn’t dried ! Neither was it dry the day after… or the day after that ! When I closed the lid on my palette, the soft paint stuck to the inside of the box.
It all ended up in a rather sticky mess !
It turns out that different brands of paint dry differently depending on the ingredients used in the paint formula.
That’s just one of the details you need to know if you want to make good watercolor pans.
But don’t panic ! This little guide will put your mind at rest. I’m going to go through all the details of making and setting up your palette with home made pans, and hopefully you’ll avoid the same mistakes I made the first time I did this !
Why make your own pans?
Some artists like to squeeze out fresh paint every time they start work. I understand perfectly the pleasure of painting with wet watercolors, but I find the difficulty with this method is avoiding waste.
You can of course reuse tube paint after it has dried in the mixing palette, but I inevitably end up washing out the palette to get a clean surface and wasting some paint at the same time.
Pans on the other hand are more practical and you have less waste.
If you want a watercolor palette which suits your needs perfectly then the best route is to make it yourself.
You can of course purchase ready-made palette sets with pans in them. But you inevitably end up with colors that you don’t use. On top of that, not every paint manufacturer makes pans, and for some strange reason most pan colors are only available as half pans. Personally I prefer full pans because they’re just easier to dip the full brush head into.
Like they say… You want something done right then do it yourself !
Another good reason for making your own pans is cost. I can refill my pans two or three times from a single tube for just a slightly higher price than a commercial half pan.
further reading: watercolor pans vs tubes
Watercolor pans and cakes
Let’s get a few details straight before we begin. Pans come in two different sizes. These are known as full pan or half pan. Full pans are larger, and half pans are, well… half the size of full pans (no surprises so far).
The word “pan” can refer to the empty container (often made of plastic), but it can also refer to a tub which is already full of dried paint. You’ve probably also heard watercolor artists use the word “cake”. This term refers mostly to the dried brick of paint inside the pan.
A bit of history:
The term watercolor cakes appears to have its origins in the first commercial paints used by watercolor artists in the 18th century. These water soluble cakes were very hard and needed to be crushed and dissolved with water to make the paint. It was a long process. Imagine having to go through this laborious task every time you wanted to paint !
For this reason paint makers started to provide improved formulas with softer paint. This was achieved by adding substances such as honey or glycerin which help make the paint less brittle and keep the paint moist.
Because this improved paint was “wet” it was supplied in sets of small porcelain “pans”. And so the first watercolor pans were invented…
What kind of paint to use to make pans?
Before you roll up your sleeves and start squeezing paint from your tubes of watercolor it can be useful to take a moment and consider the type of paint you are using to make your pans.
One of the main problems artists face when they try to make their own pans is how the paint dries.
Each paint manufacturer uses a slightly different recipe to make their paints. Tubes of watercolor are made up of colored pigments, plus a liquid which holds the pigments in suspension. The ingredients in this liquid are designed to improve the handling attributes of the paint.
A couple of these ingredients seem to affect the drying characteristics of tube paints when you put them into pans.
First you have a “plasticizer”. This makes the paint less brittle, and reduces cracking when the paint dries. In modern paint formulas this is usually glycerin.
A “humectant” is also commonly added to paint. This helps to preserve moisture and makes paint easier to dissolve. Most brands use some kind of sugar syrup or honey(honey being more efficient at retaining moisture).
Why is this important ?
The brand of paint that you choose to make your pans will effect the final results.
For example, honey crystallizes but never really dries completely. This is why brands that use honey for the humectant such as M. Graham and Sennelier remain moist even after several weeks.
Some brands will dry too hard and crack, probably because they don’t contain a large amount of glycerin. They can end up falling out of the pans and may be difficult to activate when wetted. (If your chosen brand of watercolors reacts like this, a simple solution is to add a drop or two of glycerin when you make your pans).
Other brands like Daniel Smith which are glycerin based will dry just right to form a normal cake of paint, which reactivates easily when you add water, (this is one of reasons Daniel Smith is my preferred brand of watercolors).
The point is you need to know how your brand of paint behaves when it dries. But also think about your personal preferences.
Do you like soft paint ? Or are you happy with dry cakes ? (so long as they reactivate properly).
Both are perfectly legitimate.
For example if you want to work with pans which are moist you can choose to use honey based M. Graham watercolors. Or if your preferred brand dries too hard, add some honey while making your pans. Choosing to work with wetter paint also affects your choice of palette box. A standard tin probably won’t fit the bill. But you can get watertight palette boxes which will do the job nicely.
(A quick note about using “wet” watercolors: the humidity of the paint can result in mould growth. If you live in a warm climate you might want to keep your palette box in the fridge to reduce this possibility).
But the majority of artists want classic dry pans of paint. To make dry cakes be sure you avoid any brands formulated with honey. Daniel Smith is my personal favorite. A lot of artists like Winsor & Newton, although I have heard that they can be difficult to activate once dried. If this is the case, try adding some glycerin during the pan making process.
If you’ve never made pans before, it’s probably a good idea to start by doing a test with just one pan. It would be a pity to squeeze out all your tubes only to find the results are not what you expected !
What kind of palette box to choose?
We’ve talked about using a watertight palette if you intend to use wet pans. But if you’re making dry pans then I would encourage you to think about the kind of palette box you need for storing your pans.
Ideally your palette box should be adapted to your style of work and painting routine.
Are you making a travel palette ? Or do you need a palette for studio work ? Maybe you will be working indoors, but you need the palette to be portable for when you go to art classes…
You can find all kinds of empty boxes for storing pans. Most of them integrate a mixing surface which folds into the box. A few of them are just tins with a lid for keeping the pans protected from dust. All of them offer the opportunity to organize your pan colors the way you want.
Personally I use the following options for different situations:
A simple palette box with lid.
I find this solution perfect for studio work. When I’m working indoors like this I don’t need a folding palette with a built-in mixing tray which takes up a lot of space. I prefer to use a separate mix surface. A standard folding palette box just takes up too much room on my desktop…
The tin I use holds 20 full pans which is great for studio conditions and each little pan has a magnetic strip so you can place them where you want inside the tin. These fun little tins look great and you get a choice of different designs for the lid.
It’s perfect for organizing and protecting your pans from dust between painting sessions.
A small folding travel palette.
Painting outdoors or when away traveling requires a compact and portable palette. I can make do with a more limited color palette when painting “plein air” but I opt for half pans so I can still choose from a reasonable range of colors. I have an old Winsor & Newton box which I like because of its small size. I just refill the half pans whenever they need topping off. The small lid and folding mixing tray are enough to do small sketches.
A large folding palette box
One of the big advantages of pans is their portability. So when I’m away from my studio but I want the comfort of a larger mixing surface and a big variety of colors I use a large folding palette box. The one I have is a generic brand but it does the job nicely. It’s filled with full pans, which for me is a comfortable option.
Step by step process of filling pans
Start by selecting your colors. If you want advice on the best colors to get started take a look at my recommended color palette.
Grab an empty pan and a tube of paint. You’ll also need a small stick for stirring (the wrong end of an old brush or a toothpick is what most people use).
Label your pans. For future reference it’s a good idea to write the paint name, brand and pigment number on each pan. Use a sharpie marker or a waterproof pen.
Be careful when opening your tubes. Sometimes if your tubes have been untouched for a while, the pigments can become separated from the liquid vehicle, (gum arabic, glycerin, sugar syrup, etc.) so it’s a good idea to massage or shake the tube before opening so all the ingredients mix together. Sometimes paint gushes out of the tube – be ready to catch it in a pan in case this happens.
Begin by squeezing paint into the corners of the pan. Don’t fill the pan completely – no more than half full is good. Stir the paint with your stick. You want to avoid any air bubbles from forming and get the paint to adhere to the inside of the pan as it dries. You can also tap the pans on your table top a few times to chase bubbles to the surface.
Leave the pan to dry for at least 24 to 48 hours then check the results. Drying time varies depending on temperature and humidity and can take a few days. Just let it dry naturally. Don’t try to speed up the process by heating. Personally I find this risky. By using an oven you might melt the plastic pans and a hairdryer can get messy if you start blowing paint around ! If your watercolor cake doesn’t dry after several days there may be something in the paint ingredients preventing this. In which case you may want to try a different brand. If the cake shrinks and cracks substantially this can probably be prevented by adding a drop or two of glycerin.
Fill the pans a second time but don’t fill them right to the top.
Part of using watercolor pans is getting your paint to the right consistency before you start painting. You do this by adding a few drops of clear water at the beginning of each painting session to pre-wet the paint. When you make pans, if you fill them right to the top there is no room to hold any water. You want to leave a small reservoir at the top of the cake which makes it easy to form a pool of water and activate your watercolors.
You may notice a small amount of cracking or shrinking. The advantage of filling your pans in stages means that you can fill any gaps with a new layer of paint and improve the adherence of the cake to the inside of the pan.
Make sure all your pans are completely dry before putting them in a palette box.
How to organize pans in your palette
I always set up my color palette by placing each hue in a color spectrum, like the colors of the rainbow. Organizing colors harmoniously this way helps locate similar hues easily and also color contamination between pans is less of a problem.
For example yellow contaminated with orange is less of an issue.
To sum it all up
I really do think that making your own watercolor pans is the best practice for most watercolorists. Not only because DIY pans are economical and ultimately the best way to get a personalized color palette. But also the fact that starting with tubes of watercolor gives you the best of both worlds. If you start with tubes you have the choice and flexibility of making pans, or working directly from the tube with freshly squeezed paint.
Making your own pans is certainly worth the effort.
Give it try !


Such a great piece about making one’s own watercolor pans! Thank you. Grateful for the read before diving into making mine for the first time.
Have fun Naomi!
Thanks for your tutorial, such great information and suggestions! I want to try making my own pans, and loved the idea of the metal tin with the pans that have a magnetic strip. Can you tell me where you found these?
Joanne
Hi Joanne.
This is the tin I used…
You can find magnetic strips with adhesive backing on line quite easily…
Have fun making your pans !
You can cut strips from promotional magnetic fridge stickers. Then glue then to bottom of pan. Works great!
Hi Anthony thank you for this – I am researching to find the best watercolor paints I can – the ones I purchased at Micheals are really transparent and hard to get good color. I was going back and forth between getting tubes or pan and after reading your information I am going to get tubes and make my own. One of the brands I was thinking was Qor from Golden, have you used these and if so, would you still choose Daniel Smith over these? I want a good pigment in my colors.
Hi Monica !
I have never tried QoR watercolors but I’ve seen several artists who have. QoR is produced by the US manufacturer “Golden”.
When I choose paints I particularly look for two qualities – single pigments and transparency rating. The only thing I can say about the QoR range is that they don’t have that many “transparent” paint mixes compared to DS. Overall the colors are quite vibrant. QoR also use a non traditional binder (usually Gum Arabic). This will effect the flow of the pigments and the way the pigments adhere to the paper – from what I’ve seen they disperse rapidly on the paper, but also it’s more difficult to use lifting techniques (in other words they don’t re-wet as easily, probably because of the binder). This isn’t necessarily a problem but something you either like or you don’t. They seem to be good value for money when you buy them in sets, but individual tubes appear more difficult to get hold of and they’re more expensive. Hope that helps !
I recently took up watercolor and my teacher recommended I make my own pans from tubes for all the reasons you mentioned above! I just got my palette box in the mail yesterday so I’m glad I came across your article – I was just about to start squeezing out tubes to fill my pans to the brim!
I’m glad to go into this with a better idea – of course, I can’t imagine why it hadn’t already occurred to me that filling it in one go would make the drying process last ages longer!
Great article – thank you!
I wish I had read your article before attempting to fill some of my half-pans with Daniel Smith watercolours! I didn’t do too pour-ly, except for the fact that I may have filled a few of them too close to the top, and forgot to write the brand and pigment number on the pan. Finding your site is a godsend though and I look forward to reading EVERYTHING now, Anthony! I agree with many who have commented: your instructions are clear and informative without being overwhelming. And most of all, you make things fun. Thank you for this site and I will look into your class as I am just starting my watercolour journey. Happy New Year! Didi in Canada ??
Hi Didi
Happy to help – and I look forward to putting out more useful watercolor tutorials this year 🙂
I use watercolor pans & want to know if I can break a piece off to downsize? And how would I put it back together? Would it follow the same binding principles you used above?
Hi Ana
I’ve never tried this… But I find the best solution is experimentation !
Give it a go on a small sample
Hey Anthony!!!
Just wanted to send you some massive thanks for ALL your AMAZING tutorials, posts and information. I don’t think any of my beginner questions could be better answered than here on your site! Your explanations are detailed but not overwhelming. Every aspect you cover is encouraging for anyone to pick up a brush and start! Thank you so much for the time and effort you obviously put into all your articles. I wish you all the success you deserve! Hope you are staying safe! 🙂 Lainey in Western Australia
Hi Lainey
Thanks so much for your kind comments… I’m pleased you found the site useful !
I have plans for loads more articles in the near future.
Stay safe yourself down in Australia !
Well, I should have googled diy pans before just filling them this morning hah! Painter’s remorse? I just have some cheaper reeves I got on sale so I’m not too worried if it doesn’t work out 😉 Definitely bookmarking for next time, thanks for the info!
I think making pans is mostly about technique. The more you do the better you’ll get at it !
Thanks so much!
I just received my half pans and am waiting for my Daniel Smith Basics liquid watercolors to arrive.
Your site has answered all the questions I had about how to create my own palette set.
Your site is now bookmarked.
Thank you so much, Anthony, the obvious effort and work you put into this article have given you and artists excellent results. Your information is well presented and very easy to follow. Stay well.
thank you Celia
stay safe yourself…
I wanted to experiment with a different color palette so I bought Daniel Smith Alvaro Castagnet’s Master Artist Set. I figured I’d “kill 2 birds with 1 stone” – try a different set of colors and Daniel Smith paints. I prefer pan to tubes so filled an empty palette as I have done with all my paints. The majority of the colors fell out of the pans! This is a first for me. I added more paint to “glue” them back in and it seemed to work – until I tried painting. Once again some of the paints popped out of the pans. Now what do I do? By the way – I like painting with this set of colors – very different from my usual choices and Daniel Smith is lovely to use! I’ve only been painting about 2 years and have so much to learn. Thanks for a wonderful site!
Hi Sue
When you fill the pans try doing this a little at a time and use a small stick to make sure the paint goes into all the corners and sides of the pan. You should get better adhesion.
Hope that helps…
I live in rural so GA. Humidity is awful-3 year old washing machine literally rusting away. You made me so happy I chose Daniel Smith tubes.
I made my pans- doing 2 pouring’s, letting them dry two days in-between and today I made my first swatches with them! All went well except the French Ultramarine blue dried and actually fell out of the pan. Is there anything I can do now to get it to stay in the pan? Glycerin? Adding another layer of Paint? Thank you for your wonderful site and your assistance!
Thanks Michelle ! You could try glycerin, although it may soften the paint a little. Otherwise try some more wet paint to “glue” the cake back into the pan…
First – I would like to express how much I appreciate the work you have put into this site. As a beginner, I am finding your information priceless! (Even better than the YouTube channels I have found). Once I make pans, how much water do you use to “reactivate” the paint? Can you add too much and actually dilute the color? I just purchased the Daniel Smith starting colors you suggested and I’m excited to try them out!
So glad you’re finding the site useful Michelle! I usually just add two or three drops using a plastic pipette – this is enough to reactivate the paint…
Happy painting!
Thank you Anthony. You answered my question. My paint is Winsor Newton 1/2 pans in the professional line. I will do a test with the Winsor Newton Professional Tube paint to see if it will harden.
No problem Patty – you should be fine with W&N tubes…
Very helpful to this beginner — thank you!
Thanks for your post. Really helpful. Your site is great. I’ve learned a lot.
Have you tried to refill with sennelier tubes? Was the result similar to Daniel Smith?
No – I haven’t yet tried Sennelier in pans. If you do then perhaps try putting them in a watertight palette. Because they use honey in their formula the paint won’t dry completely like other brands…
Hope that helps !
Thank you for sharing this information. Your explanation of how to build a watercolor palette is concise and clear….. which is so very helpful for a beginner like me. Thanks again.
Glad it was useful Janie… Happy painting!