Easier Watercolor Portraits (Get a Better Likeness)
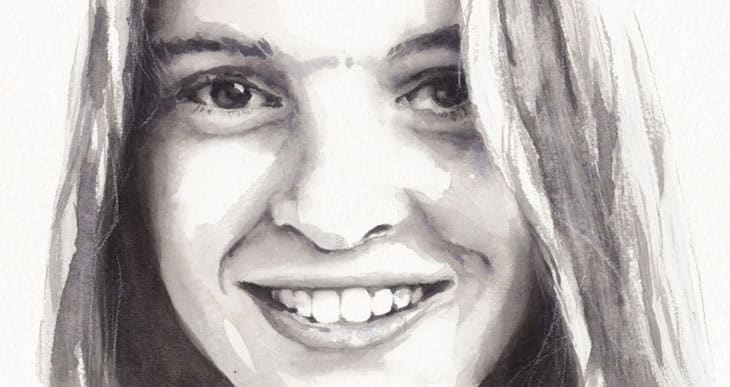
If you want to paint better watercolor portraits then I have a few tips which I think will help transform the way you paint !
Whether you’re painting in watercolors or using another art medium, portraits are considered one of the most difficult subjects in art, especially when it comes to getting a good likeness of the person you’re painting.
A lot of artists don’t attempt portraits for fear they won’t end up with a realistic representation of their subject.
So if you’d like to be able to take a photo of your family and friends and transform it into a great looking painting, I’m going to show you a few ways to make that process easier.
How to paint a watercolor portrait
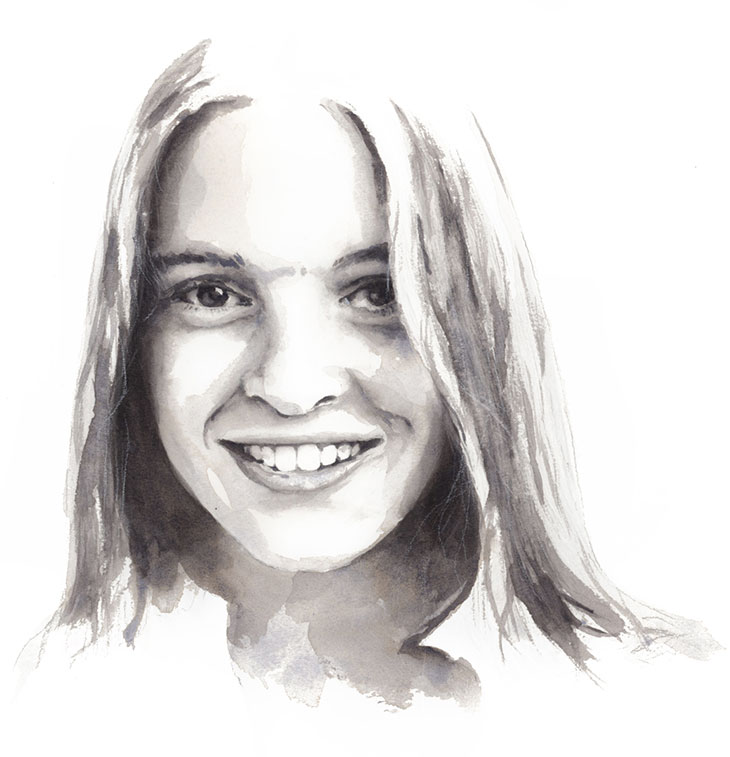
So here are the tips you can try applying to help improve the quality of your watercolor portraits.
First of all you probably noticed the portrait in this demonstration is black and white.
This is for a good reason.
Painting in monochrome makes it easier to judge tonal values.
If you don’t know what tonal values are, this is just how artists refer to the lightness or darkness of a color.
Values are the backbone to painting realistic looking paintings. This is what allows artists to create depth, and the illusion of three-dimensions.
So artists need to be good at observing and reproducing values. But this is much more tricky to do in color. Which is why a black and white portrait will be much easier to get right.
Nowadays it’s an easy process to convert a photo to black and white. You can do this using image editing software or directly on your phone.
Begin by removing the saturation of your photo, so that all color is removed. Another thing I recommend you do is to increase the contrast slightly. Doing this produces a bigger difference between the light and dark shades, which in turn will make it easier to read the range of black, white and grays.
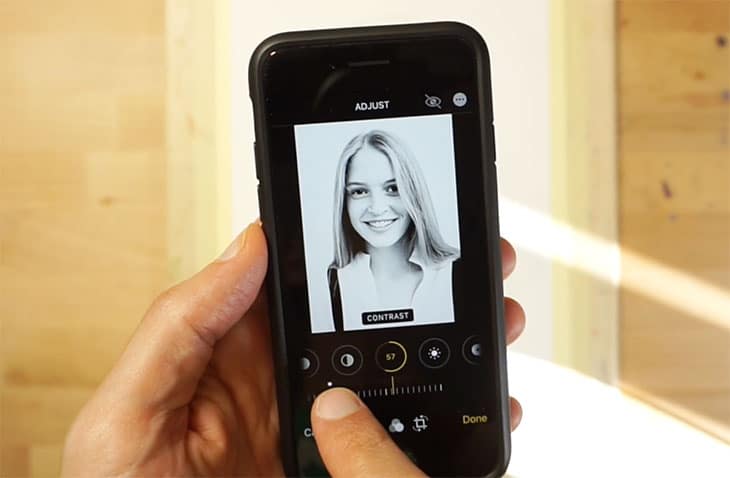
Print out your black and white photo so you have a reference while painting. Or if you prefer to follow along with this demonstration, follow the link below to download the worksheet.
Try this painting for yourself ! Click the button below to download the worksheet for this painting.
Accurately “seeing” values is something a lot of artists struggle with. But there are a couple of other things you can do to make this easier.
The first is to cut out small viewfinders like this. This is just a scrap of paper with a one inch square cut out of the middle. You can use this to focus on a specific zone of your reference and get a better idea of the levels of light and dark.
(For example, you can see in comparison to the white paper viewfinder that even the zones which appear white are in fact light gray)
If you have a smartphone, you can also try using a tool like this “see value” application.
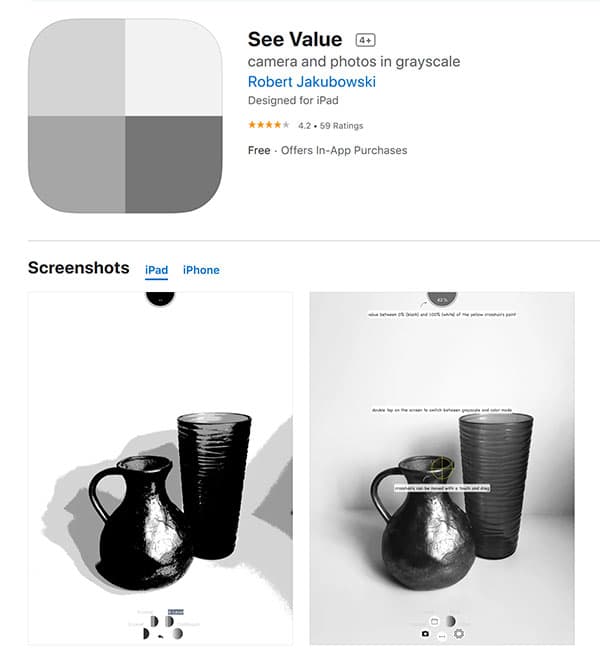
With this you can scan any scene with your camera and instantly get an image reduced to 4-levels of value. Or you can access photos stored on the camera, and convert them to a value study, which you can then print out for reference !

The final tip for succeeding your portraits is to trace the outline of your subject, rather than drawing freehand.
Tracing is not cheating. Tracing is just a helping hand. It will help you to achieve a better starting point for your portrait, with more accurate proportions, and is much quicker than trying to sketch the outline freehand.
Believe me… it will remove a lot of frustration and produce more convincing results.
So to sum up, to make portraits easier:
- Paint in monochrome
- Observe and reproduce correct values
- Trace the outline of your subject (so you start off with better proportions)
Step by step Easy Watercolor Portrait
Once you have a good sketch outline of your subject drawn onto watercolor paper, tape it down onto a board.
I’m using a mixture of french ultramarine and burnt umber to make black. If you feel more comfortable using a tube of black paint then go ahead, but I think making your own black mixes creates more interesting results.
(I talked more about using black watercolor in this previous lesson)
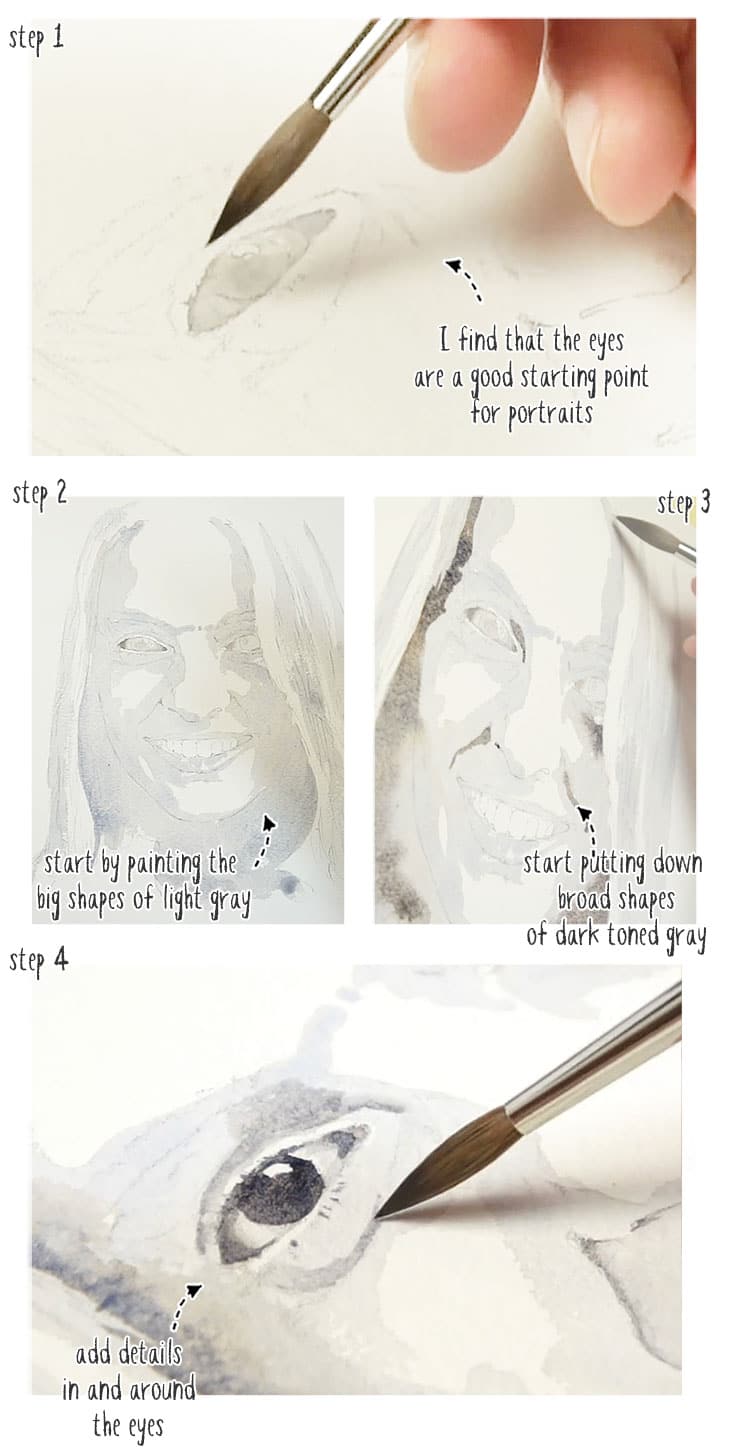
I’m going to begin by painting the eyes. I always think the eyes help bring life quickly to a portrait.
Notice that I’m painting the “whites” of the eyes with a diluted gray color. This is something that new artists often get wrong. We assume something like this should be white, when in fact there are a whole range of different values.
Use your reference photo to try and discern the true tonal values.
This is true for the whole of the portrait painting process. All I’m doing is using my observation to try to identify the correct levels of gray.
Keep your reference photo nearby so you can constantly refer to it for help.
You can also use some of the tools we discussed in the introduction as a guide. If you have a traditional grayscale finder, use it to help evaluate the levels of light or dark tones.
When you observe your reference, squint from time to time, and look for the big shapes of gray, or use the 4-level tonal value image if you made one earlier.
The next stage is to paint the big shapes of light tone. The idea in general is to start light, and build up to darker colors later, and also to paint big shapes first and smaller details at the end. So I start by putting down all the biggest shapes of light gray that I can see.
I think that establishing the overall shading like this provides a good foundation for building up the rest of the painting.
You can also see me put down a wash of light gray in places which are obviously much darker in the reference photo. For most of this portrait I’m using a glazing technique, which simply means applying successive layers of paint, one on top of the other. Each successive layer will make the overall appearance darker.
This means you can use a progressive method of painting, and build up your values a little at a time until you’re happy with the results.
You can see me doing exactly this in the next step. Using a dark mix of gray I start putting down shapes of darker tone where I can see them. A few areas are still damp so the colors blend and fuse into each other nicely. But other shapes are painted onto a dry surface. I’m not too worried about this because I can come back and blend the edges later.
Now that the shading is a bit more established, I turned my attention back to the eyes.
I’m adding details inside the eye and also for all the creases and folds around the eyes, trying to create better depth and a more three-dimensional feel for these parts.
Repeat this on both sides. Working on features like this helps start to bring the portrait to life and encourages you to keep going.
At this stage the portrait looks kind of freaky and unreal ! The contrast between the dark eyes and the rest of the unfinished painting doesn’t help. But don’t let this put you off !
Watercolor paint always has a lighter appearance after drying. So now that the painting has time to dry, you can re-evaluate the tonal values for the portrait.
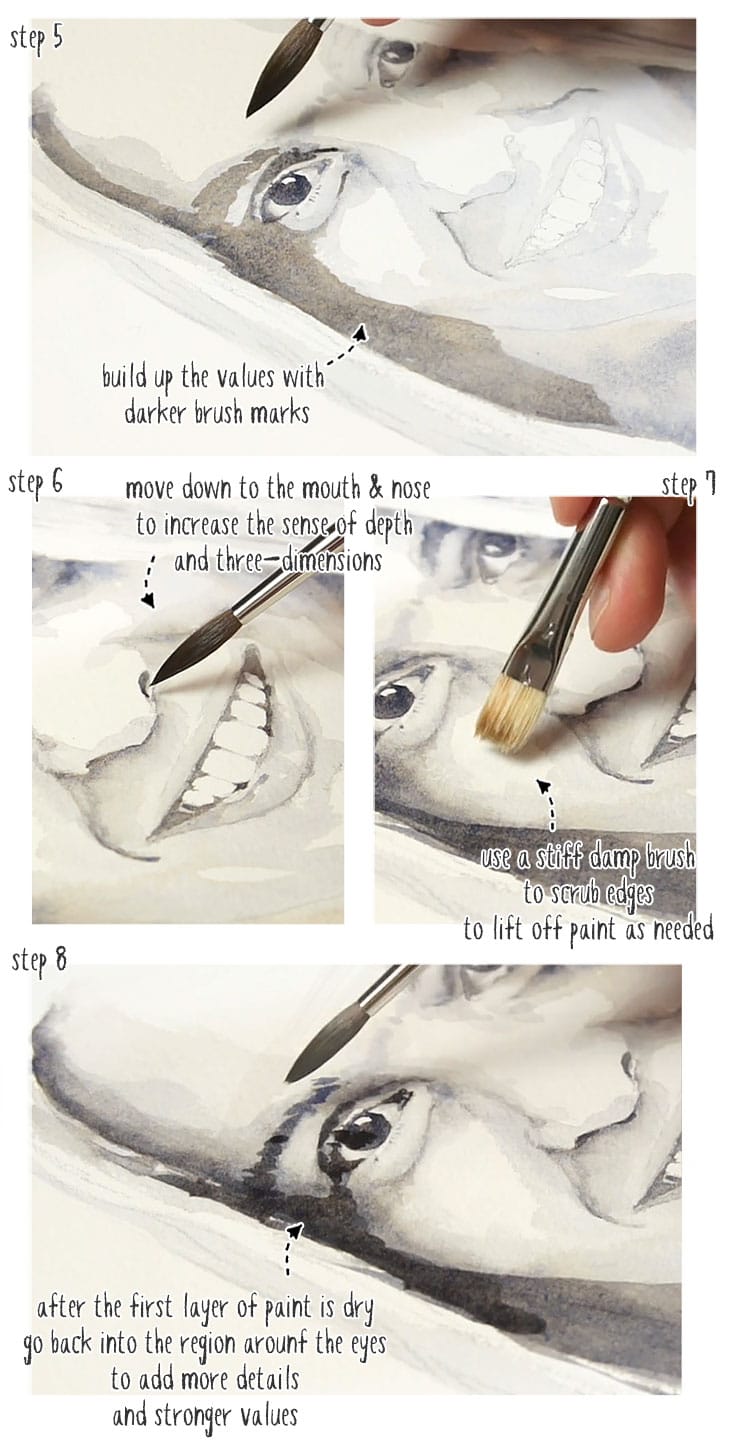
To start building up stronger values, you can see me adding some darker brush marks to the shadow shape created by the hair, and things like the eyebrows, and the shaded area over the eyes.
You can do this progressively, adding a shape, then blending out the edges to get a graduation from dark to light. Apply the same principle to the other side of the face, adding shading wherever needed.
Move down to the nose and apply more shadows and shading. Use your reference photo to guide you. Look for the darker shapes caused by the form of the nose and the creases on either side.
At this stage I moved down to the mouth, adding darker paint to the interior and the gaps around the teeth, but a lighter more diluted gray for the softer shading on the lips.
The paint has had time to dry again, so I move back into the eyes to reinforce the shading.
I’m constantly trying to increase the sense of depth and three-dimensions. You can work on one area while another part of the face has time to dry before you come back and make more adjustments.
The method repeats itself over and over. I find that a glazing technique where you layer paints in this way is the best way to construct a portrait progressively. It’s also a good way to avoid the mistake of using paint that’s too strong, and finding that the appearance is too dark. You’re essentially working from light to dark, each new layer of paint makes the tonal values more intense and increases the contrast. This large range of tonal values improves the overall illusion of three-dimensions.
What you can see me doing here is known as “lifting” (which basically means I’m lifting paint off the paper). I’m using a fairly stiff bristle brush which I’ve dampened in clear water to scrub the surface of the paper where I want to remove some of the color. This is a very subtle effect because the paint has already dried, but it can help blend out edges or lighten the tones if you need to make adjustments.
I’m going back into the region around the eyes to add more details and stronger values. These are often the focal point of a portrait so it’s good to concentrate on these parts more than others.
I then move down to the mouth and nose, I’m only adding very small details here. Then one more time I go into the shadow areas created by her hair to really deepen the shading.
Her face is starting to look pretty good at this stage. This is a good moment to compare your portrait with the reference photo to try to find any last details which might need retouching.
For example, I find that the level of shading inside and around the eyes is notoriously tricky with portrait art, so here you can see me fussing with several minor details, but which overall I think will help the feeling of depth and realism.
I’m constantly referring to the reference image to make these improvements.
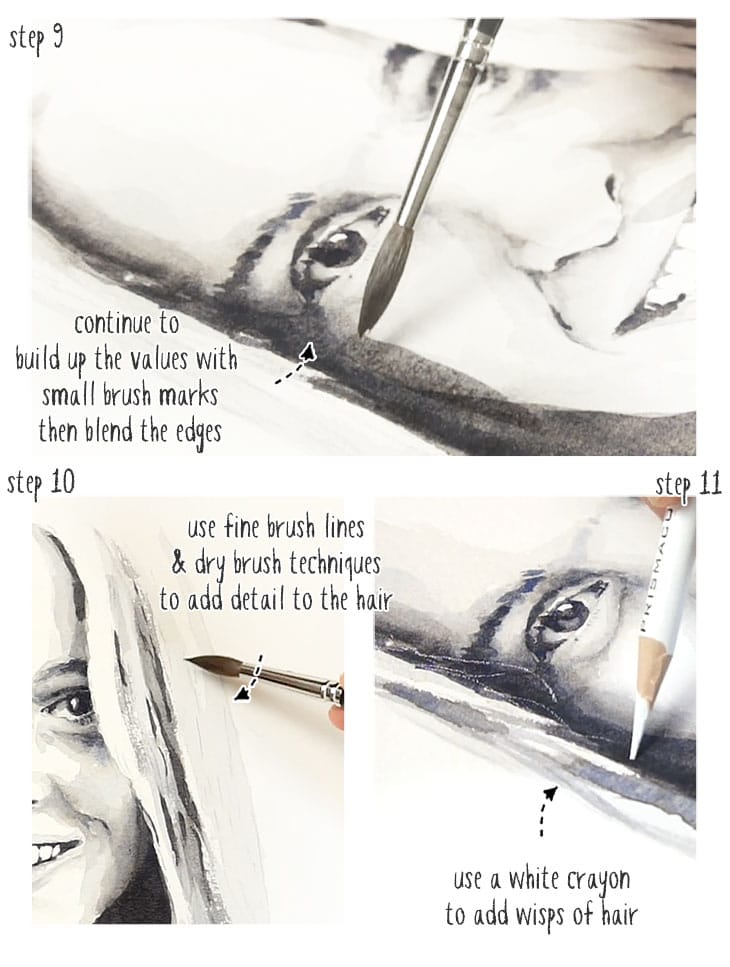
The painting technique here is to simply add small brush marks, then I rinse and blot my brush, then use the damp brush to blend out the edges.
These might look like insignificant changes but they can make useful differences to the final result. And working like this can improve your observation skills if you can pick up on things from the reference photo that need modifying.
Finally I turn my attention to the hair to add a bit more volume and finer detail. I’m using a combination of thin brush marks and also a dry brush technique to add texture to the hair.
A dry brush technique is exactly as it sounds… Your brush head needs to be very dry. When you drag the hairs across the textured surface of the paper, you get brush strokes with broken lines that are very effective for adding texture.
Leave the paint to dry completely. Then use a white colored crayon to restore a few wisps of hair. You can see these in the reference photo. To achieve fine white details like this in watercolor you have a few different options. You can use masking fluid at the beginning of the painting to protect the white paper. Or you can add these details back afterwards using a more opaque medium such as gouache paint, or like I’m going here with a wax based crayon.


Thank you Anthony for this course! I’m delighted with the content and the way it’s presented. I found answers to questions I had for months and after several other online courses on watercolor. As a bonus, I really had fun doing (and redoing) the exercises offered. My only regret is that I didn’t find this course sooner.
Thanks for your kind comments Nathalie 🙂
Keep on painting !
I took lesson from a very talented artist for years, and she was the one who recommended using a lightbox or projector. I’m not sure why so many people have a problem with that, especially when it’s for a painting. Getting proportions, shading, etc., correct takes time, and I want to paint! Plus, tracing isn’t always that easy!
Hi Anne
I agree completely 🙂
You have away of explaining the most difficult subjects, and I thank you for your generosity and knowledge!
Thank you Helen 🙂
Glad you found the tutorial useful !