
Watercolor Practice Exercise (Do you Think YOU Can do This?)
This is going to be tricky!
Some of you might not like me very much after you try this watercolor practice exercise… I can see people pulling their hair out in frustration already.
This tutorial will allow you to practice all of the different watercolor wash techniques, plus your brush control. It means combining a number of painting methods in one go, as well as using a wide range of brush methods, from very detailed to broad brush strokes.
And just to make things more fun, the objective is to paint one continuous and complicated shape using all of these techniques in succession.
But don’t worry…
There are a few tricks you can use to make the process easier. Read on to find out more.
Watercolor Practice Exercise for Beginners

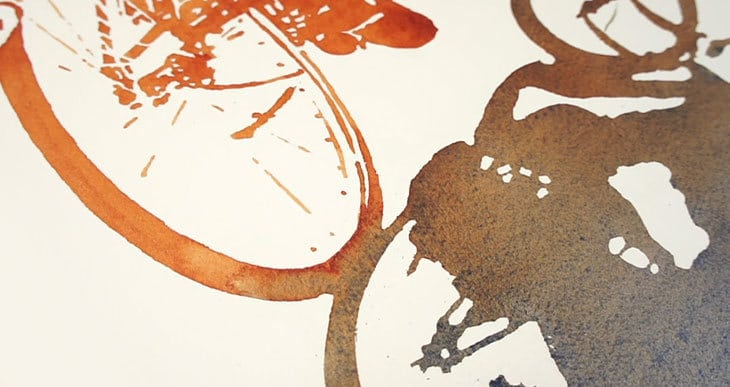
Here’s the composition for this painting. It shows the silhouette and shadow of someone riding a bike. You can download the template for this project below so you can print the outline sketch and transfer it to a sheet of watercolor paper.
Try this painting for yourself ! Click the button below to download the worksheet for this painting.
I’m going to show you how to paint a flat, graduated, variegated wash. “What the heck is that ?” I hear you say…
Well… You’ve probably heard of the different watercolor wash techniques.
The term “wash” is regularly used in watercolor to refer to a colored shape applied to paper. A wash can be any shape or size. But strictly speaking, the appearance of a wash should be smooth. The result should be seamless without any visible brush marks.

This is what makes washes technically difficult. The watery nature of the paint and the fact that it dries relatively quickly means that to execute a perfect wash, you need to be fast ! Otherwise you can end up with blotches and a streaky wash…
Washes can be applied in a number of ways to achieve different effects.
- A flat wash is a shape of uniform color. There is no obvious variation in hue or tonal values.
- A graduated wash (also known as a gradient wash) changes in tone from dark to light in a smooth, even way.
- And a variegated wash changes in color also in a soft diffused manner.

The challenge with this exercise is to combine all three washes in a single painting !
On top of that, the shape to be painted is intricate and quite complex.
Normally when learning to master the wash techniques you start with something like a simple rectangular shape. This makes it easier to work quickly with your brush. In this case the shape is relatively complex which implies some tricky brush work that can slow you down.
I’m going to show you the step by step approach that I used to achieve this combination of techniques and at the same time handling a complicated shape.
Watercolor Practice Techniques – Step by Step
Because this shape is quite elaborate I used an LED lightbox (like this one – links to Amazon) to help trace a sketch outline onto a sheet of watercolor paper. Then I taped the paper down onto a flat board.
Next, before starting to paint I used this masking fluid to mask the shadow shape in the lower half of the painting.
Latex based masking fluid like this protects the surface of the paper so that the paint can’t touch it. The masking can be easily removed when you’ve finished painting.
I’m applying masking only to the shadow shape, and not the silhouette above. This is because the upper silhouette will be painted using a flat wash. There’s no variation in color or tonal value to worry about. And the silhouette shapes are quite small which makes them fairly easy to paint in a uniform flat wash. Also this part of the exercise will get you to practice handling your brush and how to paint fine brush marks ! (I’m using this fairly large round brush by Rosemary & co)
Use the masking fluid to apply a border of about half an inch around the outline, and fill in any smaller shapes inside the shadow. Then, when the fluid is dry I used some masking tape to finish protecting the rest of the paper outside the shadow shape. This is low-tack artists tape, the kind that’s not very sticky so you can lift it off without damaging the surface of the paper.
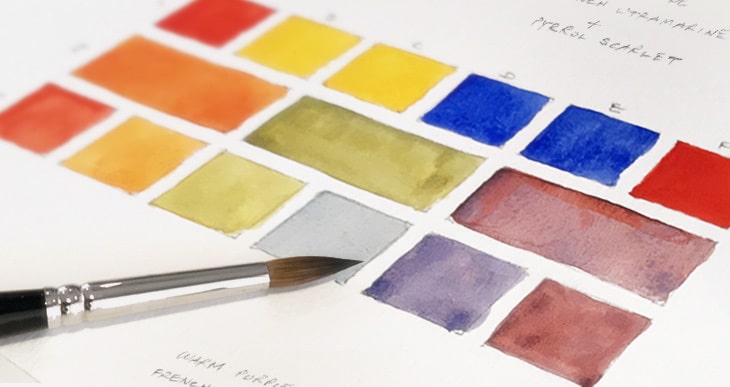
I’m using just two paint colors for this exercise. You can choose any two you like, but I started with a warm orange color and progressed towards a cooler blue.
To begin I mixed up a puddle of fairly strong paint for the silhouette shape. In order to paint a good looking flat wash, pick up a generous amount of paint with your brush and start painting the small shapes.
Keep your brush marks fairly wet so they won’t have time to dry. By keeping the colored wash moving with the tip of your brush there’s less chance for the paint to adhere to the surface of the paper. If your brush isn’t moist enough you’ll get a dry edge where the paint has begun to dry. This will ruin the effect of the flat uniform wash.
I said earlier that this is one continuous shape. At first glance that seems true, but in fact I broke down the silhouette into several smaller shapes.
This means I can paint one shape at a time and get a nice flat looking color, without actually keeping the paint wet and flowing from beginning to end.
You can see the series of smaller shapes here…

Before you paint each small shape identify the beginning and the end of the shape so that you know where to begin and when to stop. Like this you won’t get carried away trying to paint the whole thing in one go !
Things start to get more difficult when you paint the last two shapes of the silhouette, which continue down to join the shadow shape. This is where you begin to make the transition from a flat wash, to painting using a variegated wash technique.
From now on the rest of the shape needs to be painted in one continuous process from top to bottom !
This one big shape starts as a flat wash at the top, transforms into a variegated wash, then ends up as a graduated wash at the base.

Make sure you have two big puddles of paint for each color ready to go in your mixing palette before you begin. Then fill in the remaining part of the silhouette with a flat wash of orange.
Be sure to leave a nice wet mark at the end of each brush stroke. This excess of paint will help to keep the colored pigments flowing as you begin the next stage.
Now add a small amount of blue paint to your orange mixture. Use this new color to pick up the bead of wet paint, and continue painting the wash downwards. If the previous wash is still damp, the two colored paints should blend together smoothly.
Keep adding a small amount of blue to the orange mixture which will become more and more like a neutral brown-gray color. Also, keep the brush moving from side to side to get a good even covering of paint. And don’t hesitate to go back into the wet wash to re-distribute the pigments so that the overall wash looks evenly blended.
You should progressively add more and more blue paint until blue becomes the dominant color. Then switch to using only blue paint.
Your brush should be well loaded with lots of paint, and you can use big broad brush strokes from side to side to achieve a soft blend of colors.
As you progress towards the bottom of the shape, start adding clear water to your blue paint mix. This dilutes the color so that wash becomes lighter in tone as you move downwards. This is the method for painting a graduated wash.
Add more and more water to the mixture until eventually you just use your brush dipped in water to finish off the graduated wash.

When you’re happy with the results, leave the paint to dry completely, then remove the masking tape and the dried masking fluid.
There’s something very satisfying about the moment when you remove all the messy looking masking to reveal the final result underneath !
You can use a kneaded rubber to help you lift off the masking fluid.
As a final touch I added the last fine details to the silhouette shape
Practicing Watercolor can be Difficult
In the beginning of this lesson I warned you that this is going to be tricky. It’s true, some techniques in watercolor can be difficult. So if the result isn’t quite what you hoped for, don’t be disappointed !
But that’s the point of practicing. The goal is not to create a wonderful painting, but just to fill the page. Each new painting is a step towards success because we learn from our mistakes.
As a beginner, I think you need to accept the fact that at first you will paint badly !
Once you’re happy with that idea, learning becomes easier.
And remember, failure is good ! Do not fear failure.
Why do I say that ? Well… The formula for successful painting is to “Double your rate of failure”!
You’re thinking of failure as the enemy of success. But it isn’t at all…
So go ahead and make mistakes. Make all you can. Because, that’s where you’ll find success.


Love it
This is great help. Especially encouragement to make mistakes as I want to have a professional result when I’m just a beginner. Is that a joke or what? (smiles). Looking forward now to failing again.
I havent tried this yet as i need to get some supplies for this project but it looks awesome. Thanks Revs
Give it a try when you can Reva 🙂
I really need lessons
Your lessons are so delightful: very clear, so I don’t have to puzzle out what you are talking about, very re-assuring and encouraging. Excellent visuals!
Thank you!
Now I will go and make my mistakes.
thanks Mary
and have fun too !