The ONE BRUSH Every Watercolor Beginner is Missing
If you’ve ever put down a wash of color that came out too dark… and then just left it, because you didn’t know what else to do, this video might change how you approach that problem.
Most beginners learn fairly quickly that watercolor is hard to fix. And that’s true, up to a point. But there’s a brush that most beginners don’t have in their kit (or maybe you have, but have never thought to use for watercolor), and a couple of techniques that go with this type of brush that give you a lot more control over what stays on the paper and what doesn’t.
Today I’m going to show you what these brushes are, and the techniques that make them so useful in watercolor.
The brush you’re probably missing
One of the things that frustrates a lot of beginners about watercolor is the feeling that once the paint is down, it’s stuck there.
And that makes sense because watercolor is ‘transparent’ and all your previous brush marks are visible!
You can’t cover a mistake with more paint the way you might with acrylics or oils. If you try to layer over something that went wrong, you risk making it darker, or overworking the painting until it loses that fresh, luminous quality that made you want to paint in watercolor in the first place!
But it’s worth knowing that watercolor is actually more forgiving than it first appears.
The paint doesn’t become truly permanent until it’s completely dry, and even then, with the right brush and a bit of water, you can change the appearance quite a lot. You can lighten a wash that came out too dark, you can soften hard edges, and you can move pigment around to get a more blended effect.
The brush that makes this possible is a flat synthetic with short, stiff bristles (the kind you’d more often find in an acrylic painter’s kit.) That stiffness is what regular watercolor brushes don’t have, but it’s very useful for the techniques I’m going to show you.

Here are a few ‘scrubbing & lifting brushes’ I would recommend:
- Silver Brush Bristlon – Bright, Size 2, Short Handle – https://tidd.ly/3Q5IA8p *
- Silver Brush Bristlon – Bright, Size 4, Short Handle – https://tidd.ly/4xJy9bA *
- Silver Brush Silver Silk 88 White Goat Hair Brush – Short Handle 3/8″ – https://tidd.ly/3SbXnim *
The scrubbing technique
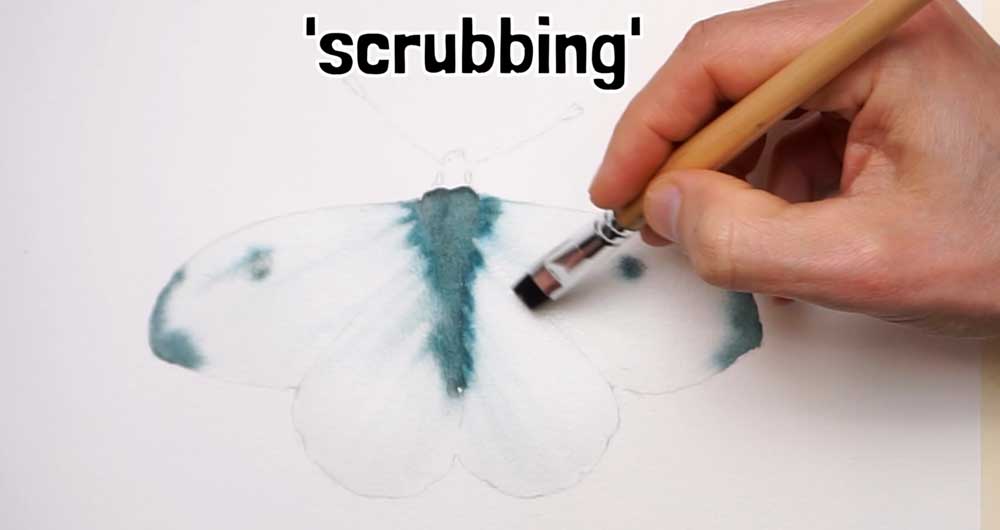
So the first technique I use with this kind of brush is something I call ‘scrubbing’.
For this painting I’m starting with the butterfly’s body by painting a dark shape down the center of the paper. Then while that’s still wet, I’m using a dampened watercolor brush to blend clear water outward into the wing shapes on either side. This causes the dark pigment to drift slightly into the wings. And it gives the wing shapes a moist surface to work from.
Now, while the surface is still moist, this is where the stiff brush comes in.
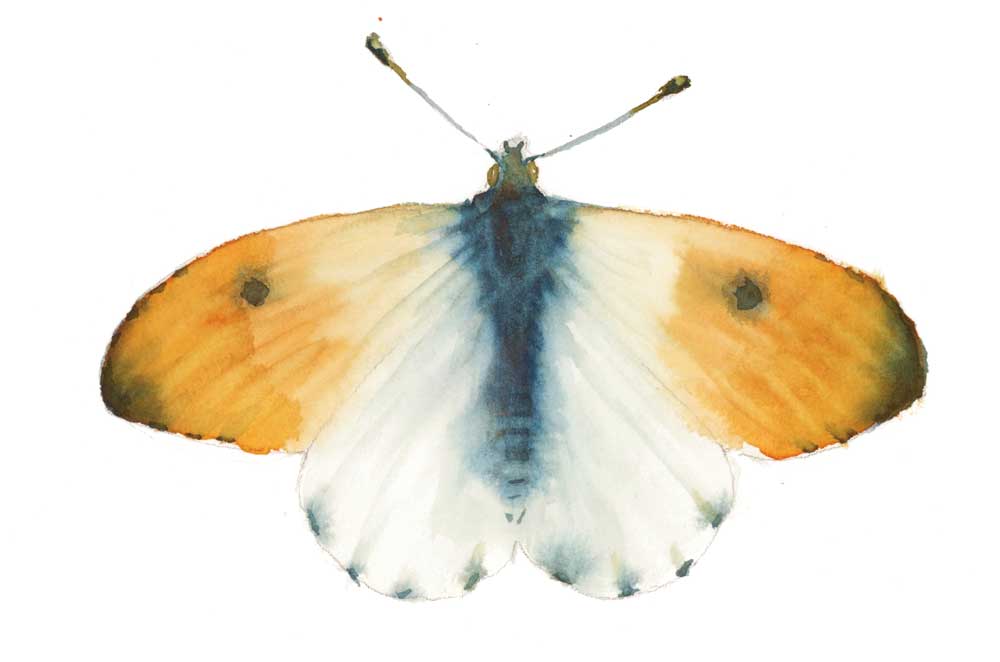
The goal is to pull the paint outward from the body toward the edges of the wings, in radiating lines that follow the linear pattern you see on this reference image of a butterfly. A soft watercolor brush wouldn’t do this quite so well. It would move pigments around without much control. A stiff brush helps to actually drag the pigment more precisely.
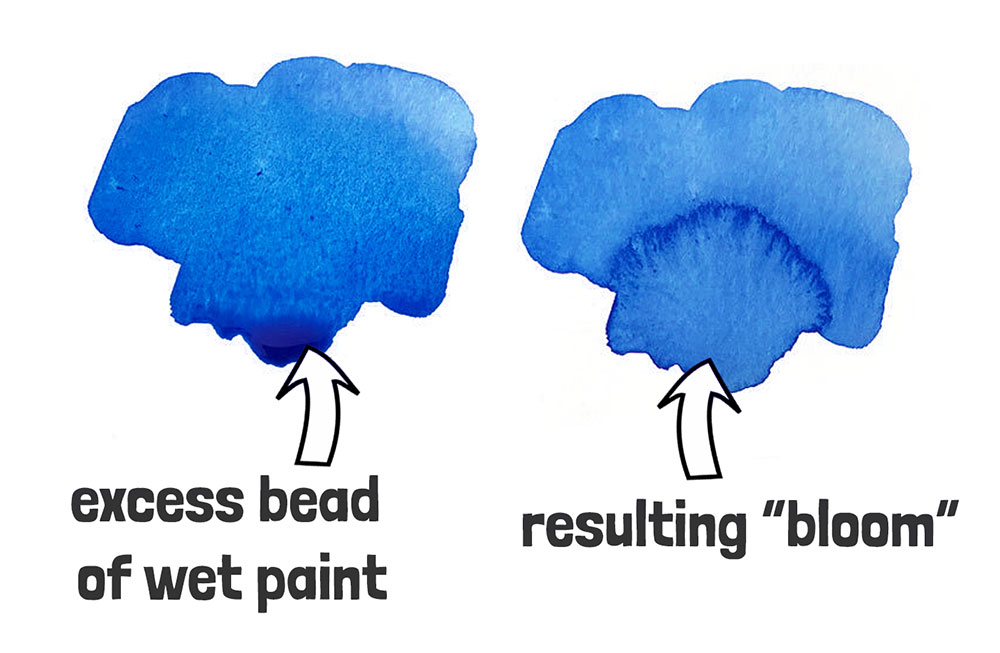
The brush should be damp but not wet. If there’s too much water on it, it might flood the moist surface and cause a bloom. (A bloom happens when very wet paint flows into an area that’s starting to dry, creating those cauliflower-like shapes we usually want to avoid.) Blotting your brush on a cloth to remove some moisture helps avoid flooding the surface.
One other thing worth mentioning: I’m working on 100% cotton paper, which is more resistant to this kind of technique. But you still need to be careful not to scrub too hard to prevent the paper from pilling.
With the brush just damp enough, you’ll find you have a surprising amount of control over where the pigment goes.
Want to practice this with me?
If you want to practice this painting with me, the full lesson, including all reference images, is available on my Patreon, with the scrubbing and lifting techniques as the main focus.
My Patreon is full of lessons like this — each one is built around a specific skill, so you’re practicing the right things, in the right order, with a clear idea of what you’re trying to improve. With a bit of guidance from me if you need it.
Join my Paint & Create Club here – you can sign up for free.
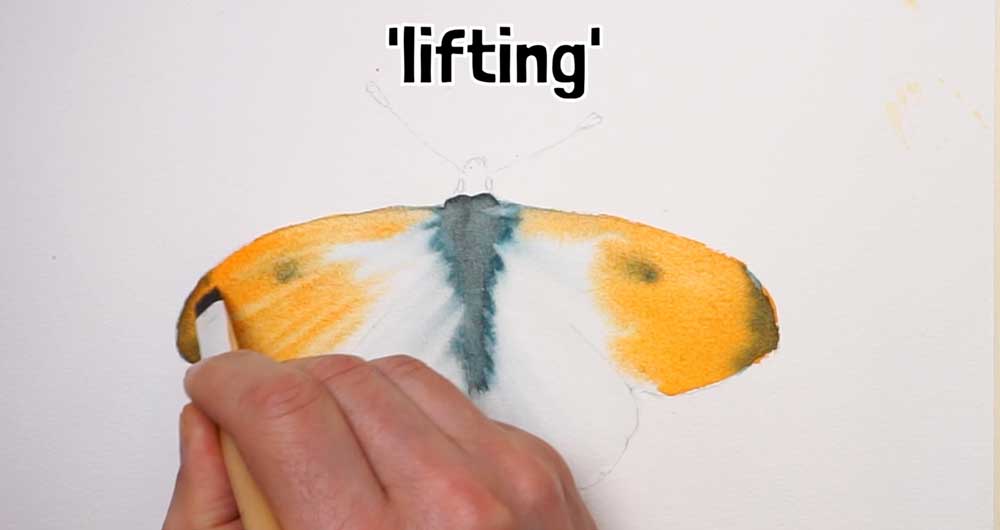
The lifting technique
The second technique is called ‘lifting’, and it’s a little different in what it does.
Where scrubbing moves pigment around, lifting removes it. You’re using the brush to pull color up off the paper and lighten an area that came out darker or where you want to introduce lighter brush marks.
Lifting works at different stages of paper wetness, and the stage you choose affects how much color you can actually remove.
While the wash is still moist, the pigment hasn’t fully settled into the paper yet, so the brush can pick up quite a lot of it. You load the brush with a little clean water, blot off most of the moisture so it’s damp rather than wet, then work it over the area you want to lighten. The color should come away pretty easily.
Once the paper is completely dry, lifting still works, but you’ll remove less color. The pigment has had time to bond with the paper, so you’re working a little harder for a smaller result.
What this gives you, at either stage, is a way back into a colored wash you thought you were stuck with. Perhaps a highlight you forgot to leave, an edge that needs softening, or, in the case of this butterfly, a way to add controlled brush marks to a surface that already has paint on it.
The point is that you’re no longer stuck with whatever the first brushstroke left behind.
Step by step – Let’s paint!
Start by sketching, or tracing, a simple outline of the butterfly wings and body onto a sheet of watercolor paper.
Then I tape the paper down onto a flat board. We’ll be doing some wet-on-wet work in this painting, and this can help keep the paper flat and make the painting easier to manage.
For the butterfly’s body I’ve mixed together some Phthalo blue and burnt umber. This produced a nice dark, slightly bluish-grey color.
The first part of the painting shows me putting down that dark body shape down the middle of the paper.
Then, while that’s still wet, I take a damp brush loaded with clean water and use it to blend the edges of the body shape outward into the wing areas on either side. The dark pigment drifts and blends slightly into the wing shapes on each side.
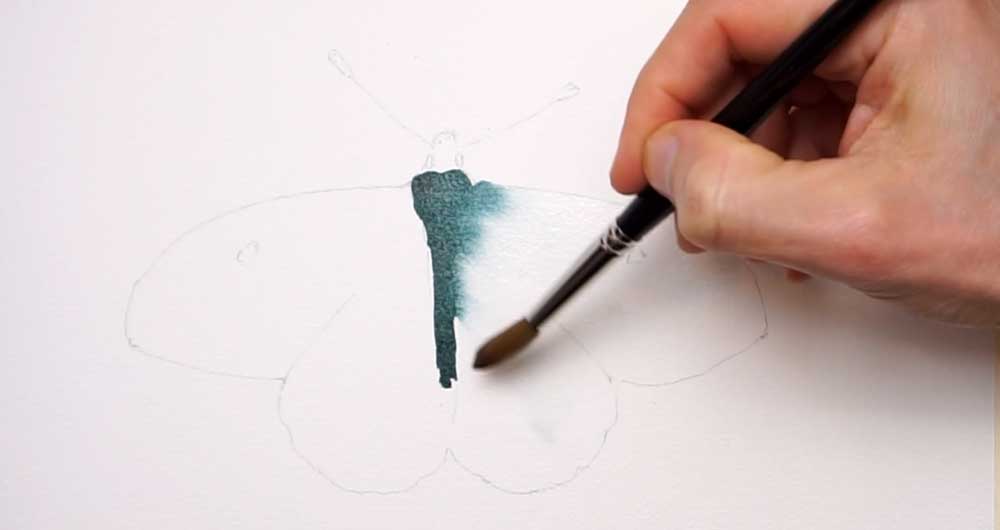
On the right side that worked well. On the left, the paint had started to dry a little faster, so I re-loaded the brush with dark paint and charged it back into the edge of the body shape.
(Charging-in simply means adding wet paint to a moist surface and letting it disperse naturally rather than brushing it in.) That gave me a more balanced result on both sides.

I’m also adding the small dark dots and wing-tip markings you can see on the reference photo.
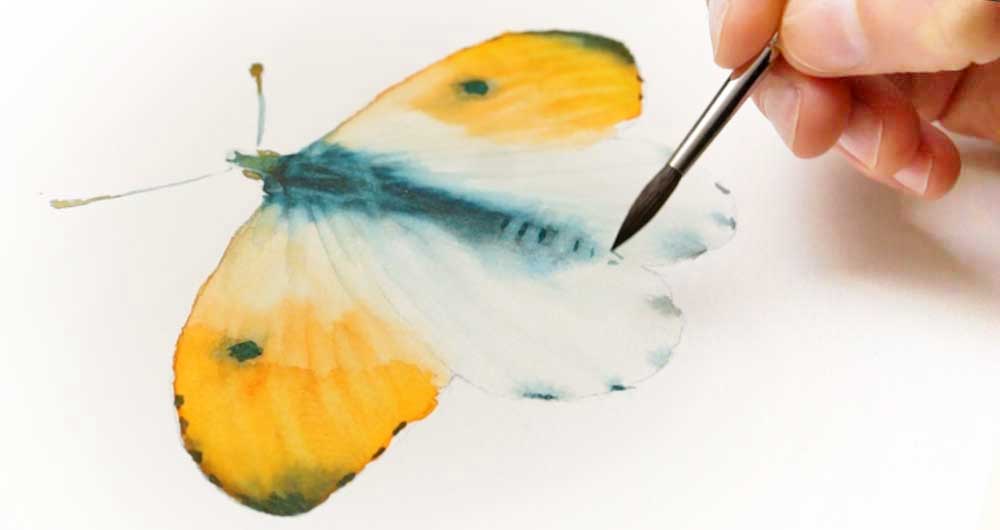
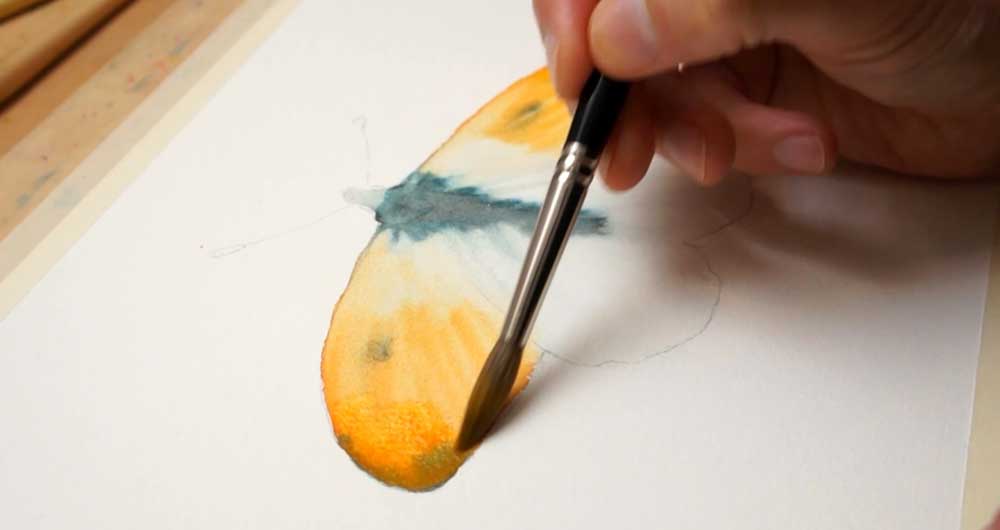
Now, while the surface is still ‘moist’, this is where the stiff brush comes in for the first time.
What I’m doing is pulling the paint outward from the body, in radiating lines that follow the linear pattern on the butterfly’s wings. A regular soft watercolor brush would just move the paint around without much control. The stiffness of the brush is what makes it possible to actually drag pigment more precisely.
The brush should be damp, but not wet. If there’s too much water on it, it can flood the moist surface and cause a bloom. (A bloom happens when very wet paint flows into an area that’s beginning to dry, creating those cauliflower-like marks we usually want to avoid.) A quick blot on a cloth before you work is all it takes.
The stiff brush lets me drag the paint out from the dark body shape which is still damp. The aim is to create a pattern of radiating lines spreading out from the body toward the outer edges of the wings. I’m lightly working the surface to encourage the paint to spread in that direction.
This is what I call ‘scrubbing’, for want of a better word. It’s less about removing paint and more about moving it, shaping it into a deliberate pattern while the paper and paint are still cooperative.
Next I’m mixing a bright orange using Hansa yellow deep and pyrrol scarlet.
I’m adding this to the tips of the wings to match the reference. The paper is still very slightly moist, so the orange spreads a little as it goes down. That gives a nice soft, diffused effect rather than a hard edge.
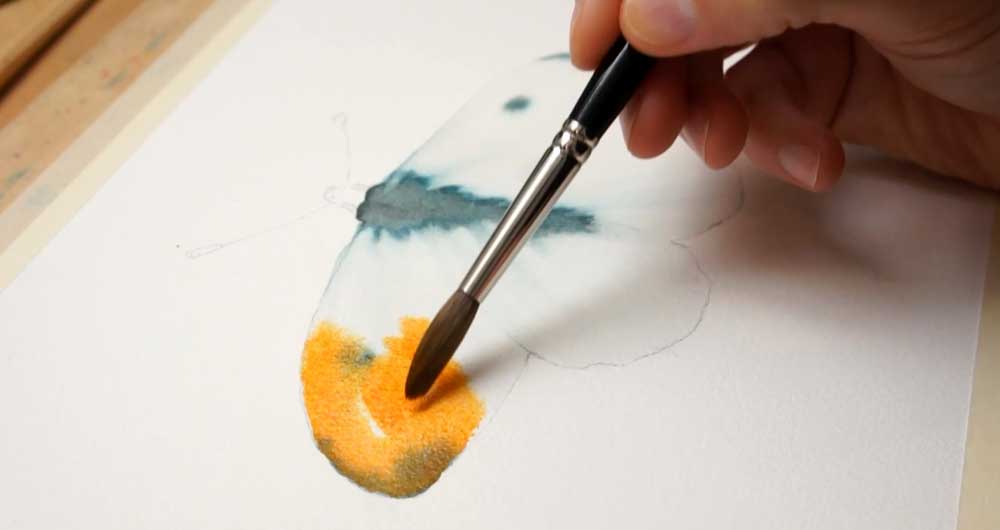
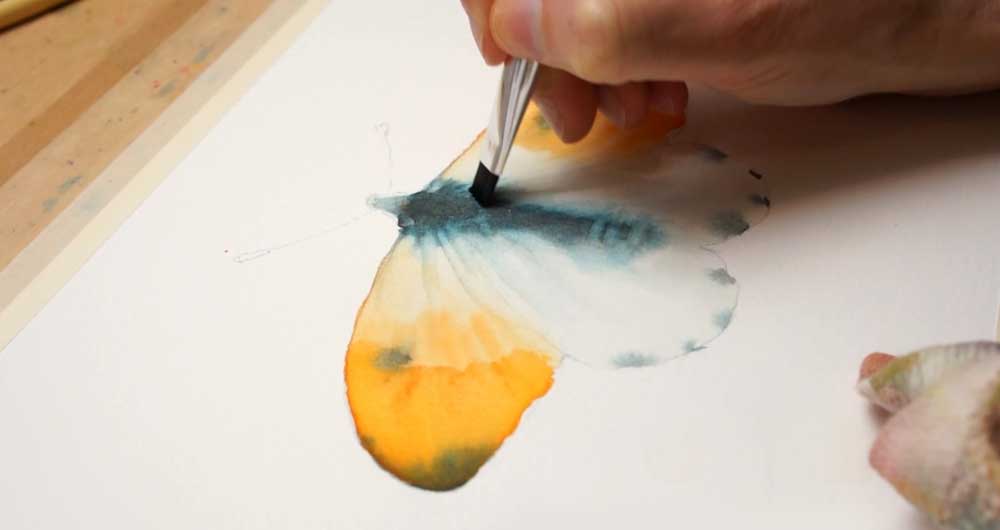
Then I pick up the stiff brush again, rinse it, blot it on a cloth, and use it to lift paint from the orange areas. I’m using the same linear motion, pulling back toward the body. This creates lighter-toned marks that suggest the fine pattern of veins on the wings.
This is the second technique I wanted to show you with this brush, known as ‘lifting’.
Unlike scrubbing, which moves pigment around, lifting takes it away. You’re pulling color up off the paper to lighten an area, or to introduce lighter marks into a wash that already has paint on it.
You might notice that as the lifted marks appear, the paint drifts back in to cover them slightly. That’s because the surface is still damp, and the pigment around the marks is still moving. How much color you can lift, and how long it stays visible, depends on what stage of wetness the paper is at.
If you’re having trouble lifting, you can just rinse and blot the brush dry, then keep working the area. Sometimes it just takes a bit of persistence.
I repeated the same process on the right wing, where the paint seemed to lift a little more easily. That’s probably because it had dried slightly more, so the pigment had less tendency to drift back in.
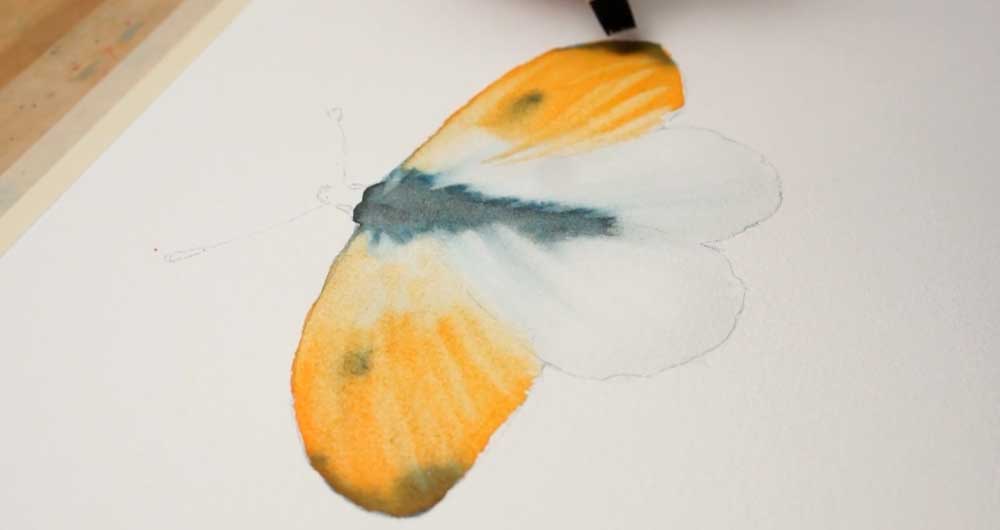
Then I used the brush to feather and blend the edges of the orange areas, softening the boundaries between the orange and the rest of the wing.
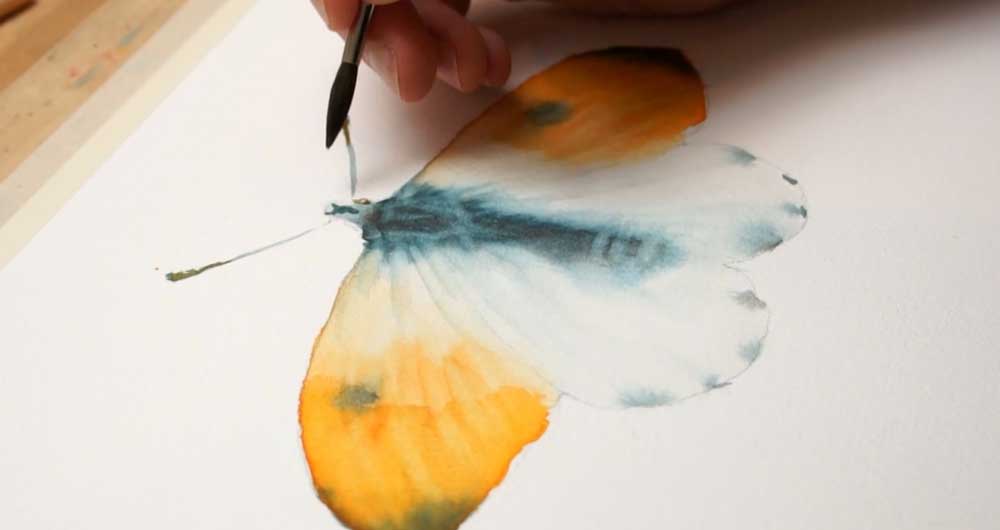
Next I pushed a bit of the dark paint from the body upward into the head shape. And carried on scrubbing and pulling dark paint from the body.
Then I mixed a slightly stronger, more reddish orange and added a fresh layer to the outer tips of the wings, painting over the ends of the lifted lines I’d made earlier. The effect of this is to soften those ‘lifted’ lines which can sometimes end abruptly. And because the surface was still damp, the orange blended evenly without leaving a hard edge.
I dampened the lower parts of the wings (the white areas), with clean water. Then I mixed a fresh batch of dark paint and added a few marks to the body – the small dark dots on the wings, and a few tiny marks along the bottom edges of the white wing shapes.
The dark brush mark down the middle of the body was painted onto dry paper leaving a hard edge. So I softened it with a clean damp brush.
At this point the paint was a bit too wet to continue with the scrubbing technique, so I used a hairdryer to bring it back to ‘slightly damp’. That’s a better stage for this kind of work. Moist or damp is where scrubbing and lifting techniques work best.
I use the stiff brush to carry on pulling dark paint out from the center and reinforcing the pattern of radiating lines on the wings. You might occasionally need to rinse the brush clean and dab it on a cloth to remove some moisture.
If paint builds up on the brush you may just end up pushing pigment around instead of lifting it off.
I also used the brush on the body shape itself, lifting and scrubbing to bring out a little more of the butterfly’s structure. To represent the detail of the body I used the reference photo to guide me on which areas to lighten and where to leave the paint alone.
Then I went back to the lower edges of wings, scrubbing upward from the dark dot marks at the bottom, pulling lines of pigment upward in a linear pattern.
And then into the orange wings again, reinforcing the pattern of lighter lines along the wing veins.
The stiff brush is also useful at this stage for feathering out any marks that feel a bit sharp, just working gently over them to soften the edges.
Then I switched to a small watercolor brush to add some final details. I added a few tiny marks to the head and antennas with dark paint.
And a slightly dirty orange mixture for the eyes on either side of the head, leaving a tiny highlight in the center of each one.
And to finish off, a few small sharp-edged marks on the base of the body, the little black dots on the wings, and tiny specks of dark paint all along the outer edges of the wings.
If you like you can go back over some of these tiny details lightly with the stiff brush to soften the edges.
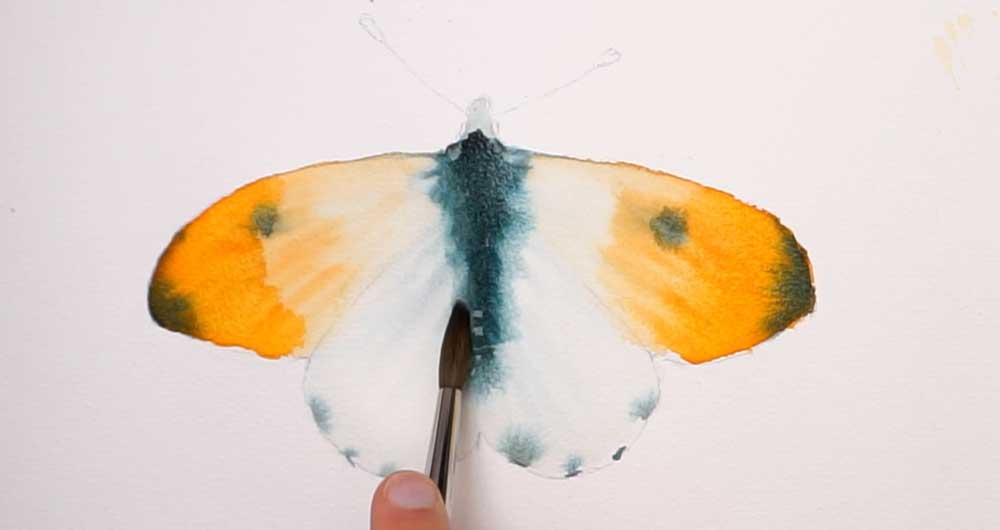
And here’s the finished butterfly.
Don’t forget to share your version of this painting in the Patreon chat – I’d love to see how you get on!