
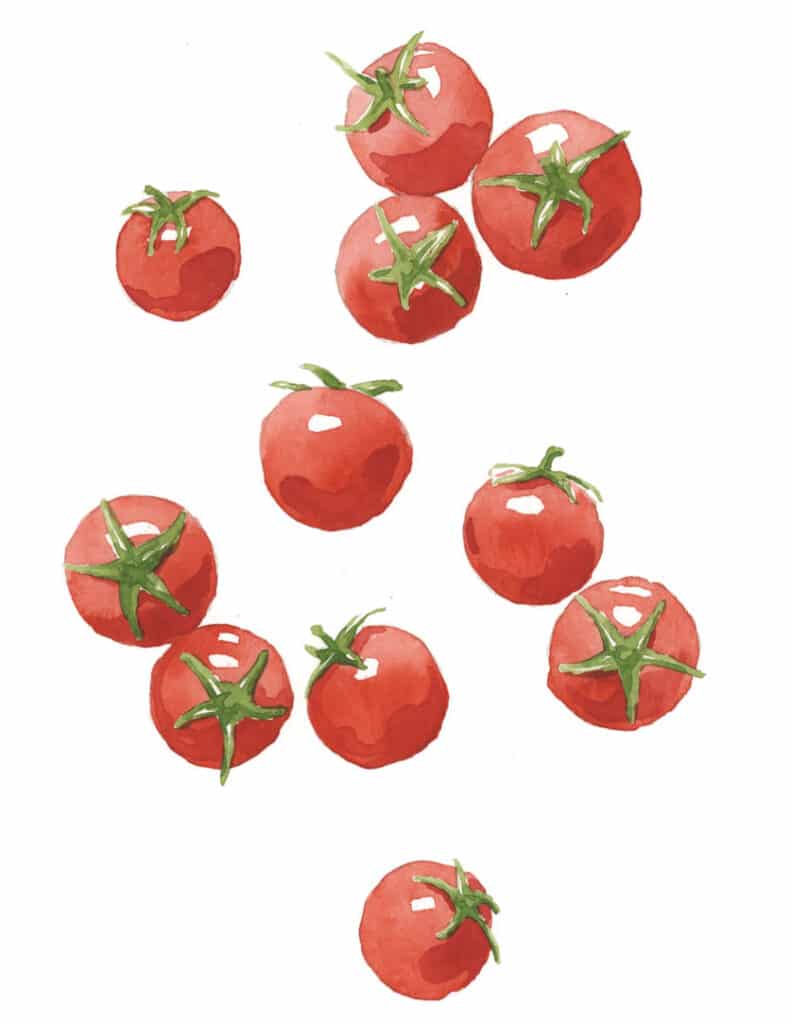
How to Paint Tomatoes (You’ll Be Amazed How Easy This Is!)
In this tutorial I’m going to show you how you can paint these tomatoes in watercolor.
And I think you’ll be amazed how easy it is to get satisfying results if you follow this method.
You don’t need any experience with watercolor. I’ll show you all the steps from beginning to end. And I’ll even throw in a free sketch outline that you download if you want to follow along!
How about that ?!
Painting Tomatoes in Watercolor (Realism & Depth)
I spend a lot of time trying to simplify the subjects that I paint. It helps me visualize the painting process better. And I believe this helps artists like yourself understand the process too…
Painting is all about interpretation!
We interpret the subject we want to paint into a series of shapes on the paper. And to add depth and realism, artists rely on “values”.

Values is just a fancy way of identifying the range of tones from light to dark that an artist uses to create depth, and contrast in a work of art.
Trying to identify every subtle shade of light and dark in a reference image can be very challenging. In real life the range of tonal values can be pretty overwhelming.
This watercolor painting that I’m going to show you is based on a simplified use of values.
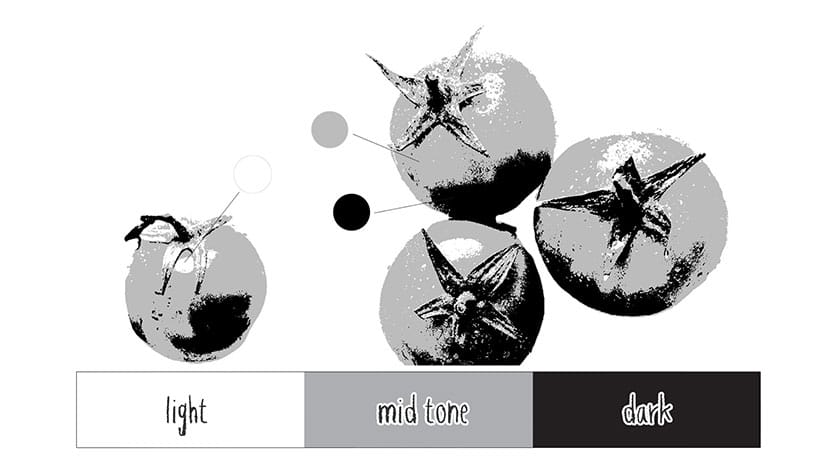
In other words I will break down the values into just three components:
- Light
- Mid-tones
- And darks
And to be honest, this is all you need to start creating depth and realism in a painting!
Watercolor Tomatoes Step by Step Process
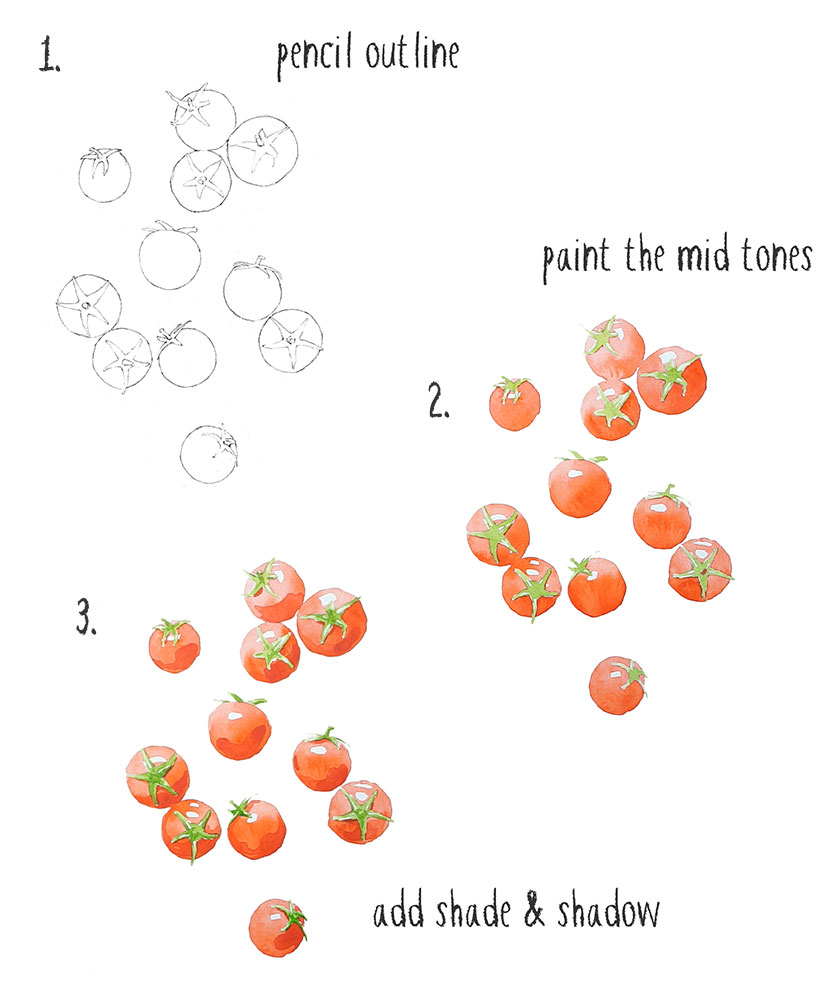
So before we begin, here are the basic steps to this painting:
- Draw the pencil outline
- Paint the midtones, leaving the white paper blank to show the highlights
- Then add the darker shades on the shadow areas of the tomatoes.
And that’s it!
Try This Painting Yourself!
If you’d like to try this painting yourself you can download the traceable outline for free below. I also offer a special series of free watercolor lessons for anyone who signs up to my email newsletter. This is entirely optional (you can skip this and just grab the free stuff below).
You’ll also find a link to my Patreon membership where you can get ad-free video tutorials, plus other exclusive bonuses that I only share with members of my Patreon channel. Follow the link to find out more...

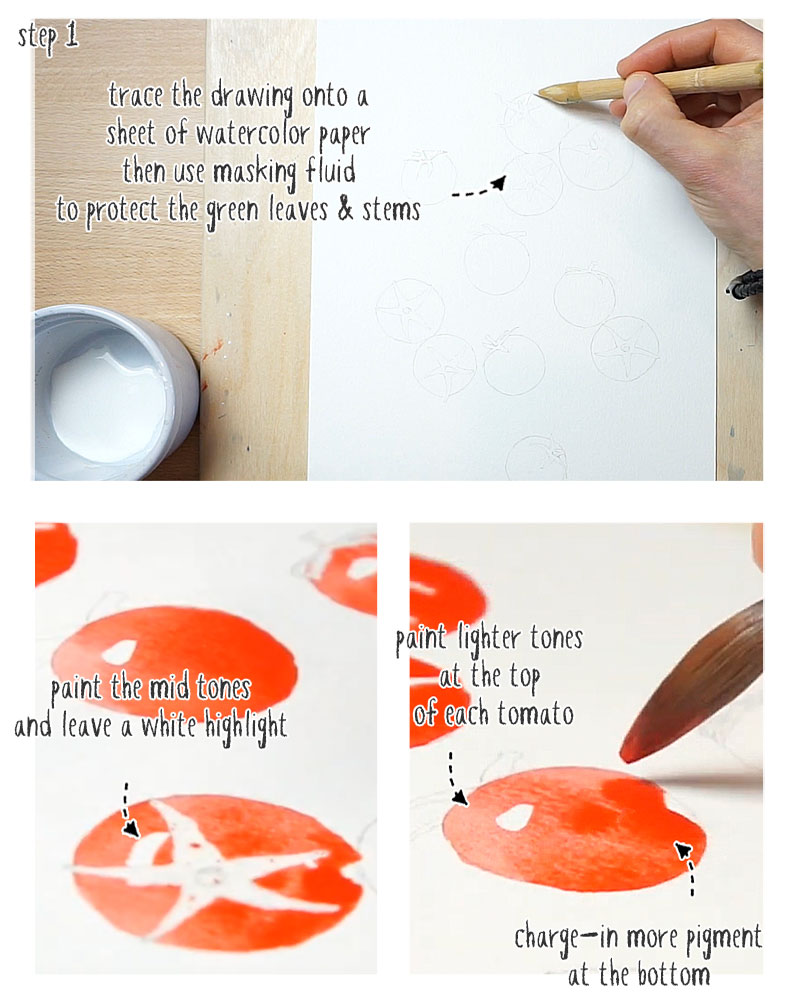
Step 1
Begin by tracing the outline of the subject onto a sheet of watercolor paper, then tape it down onto a board.
I’m going to start by painting the red tomatoes. To simplify this step I used masking fluid to protect the green stems and leaves. This just makes the process easier because you don’t have to paint around the detailed shapes of the stems. You’ll be able to paint the tomato shapes quicker and more freely.
When the masking fluid is dry, the first step is to paint the mid-tones! At the same time you’ll be painting the highlights by leaving the white paper untouched in a few chosen places.
Before painting the tomato shapes, think about where the light is coming from. In this example the tomatoes are lit from above. This means I need to leave a sharp white highlight at the top of each tomato.
Also notice that I’m not simply treating each mid-tone shape as one uniform color!
Because I know the light is shining from above, I’m using this idea to paint a lighter toned color at the top, and charging-in more pigment towards the bottom of each tomato. This variation in tone across the shape helps suggest light and dark shading and a better feeling of three-dimensional depth.
Paint the other tomato shapes using the same method, and remember to leave a small white highlight.
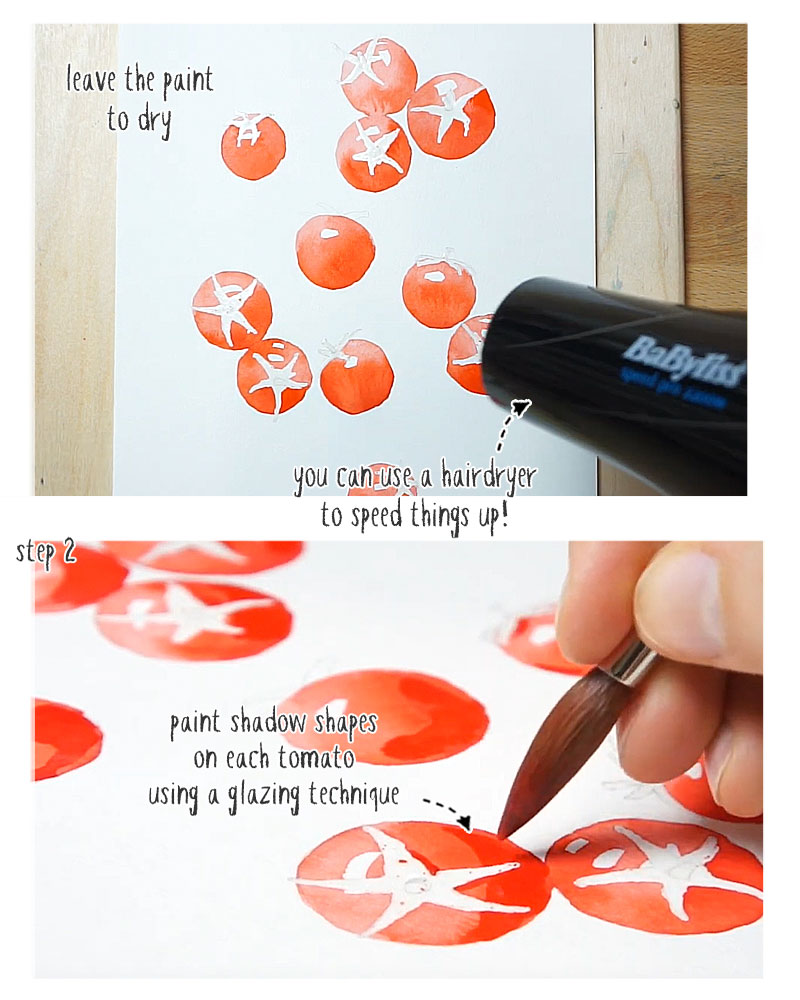
You need to leave the paint to dry before moving on. If you’re impatient, like me, you can use a hairdryer to speed things up!
Step 2
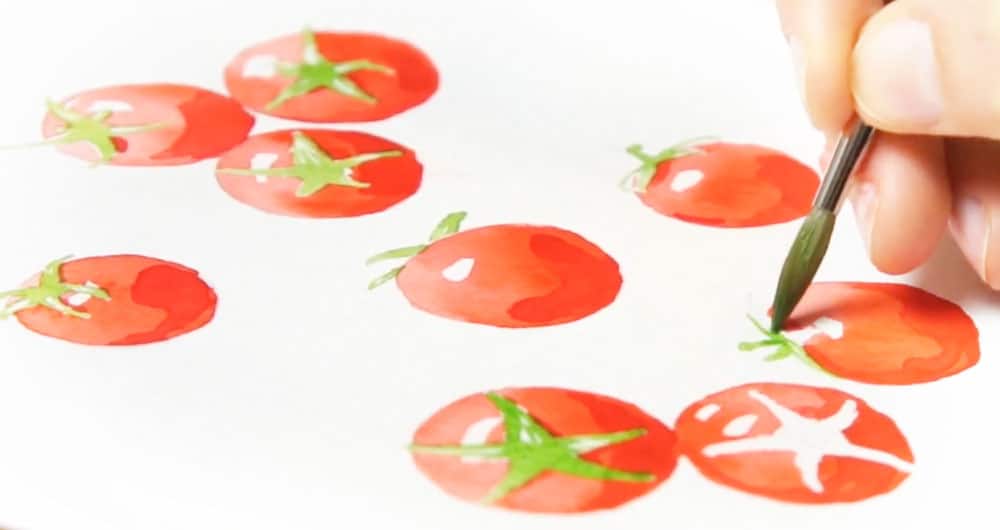
The next step is to paint darker shapes to represent the form shadows on the tomatoes. You can see these rough shapes here in this monotone value image. (All of the reference images and studies are available on my Patreon page).
Painting onto a dry surface like this is a glazing technique. The new layer of brush marks will naturally darken the color appearance making shadow shapes on the tomatoes. Also, don’t worry about blending out the edges to get a smooth transition from light to dark. Painting hard-edged shapes like this is enough to suggest shade and shadow.
You can also see me add a small shadow underneath the leaves and stems.
Continue painting an approximate shadow on each of the tomatoes, then leave the paint to dry again.
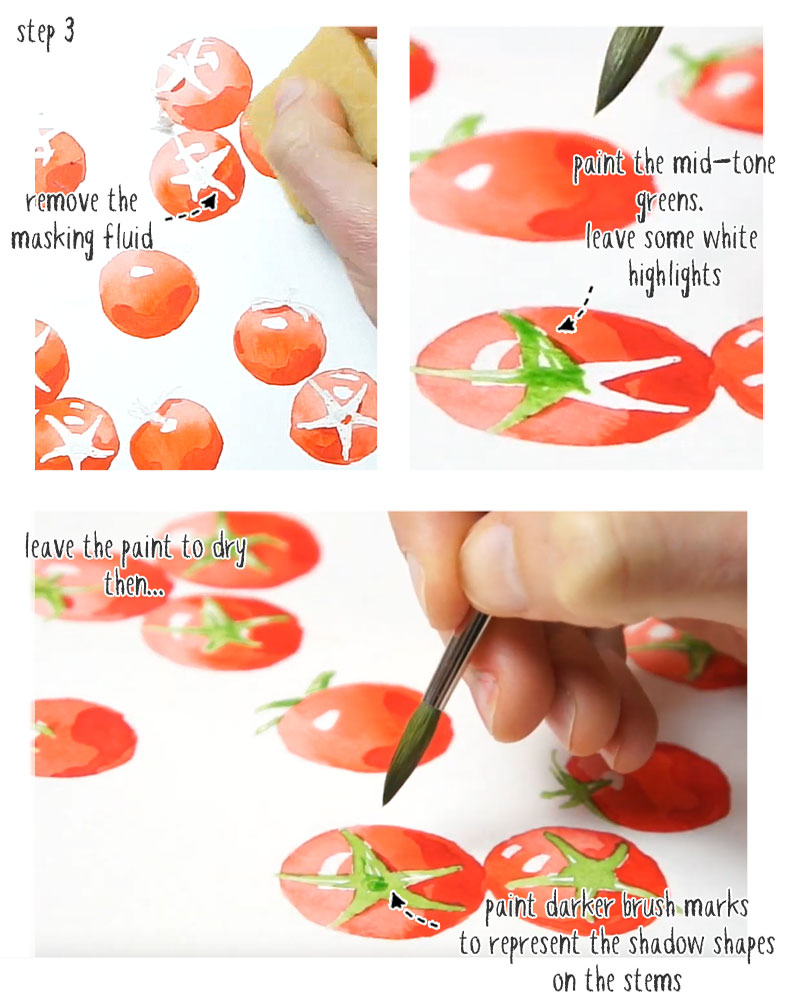
Step 3
Now we can move on to painting the green leaves and stems.
Start by removing the masking fluid. The best tools for this are a rubber cement eraser like the one I’m using here (see photo), or a standard kneaded eraser.
To paint the stems and leaves we’ll use exactly the same method as before. In other words, this first layer of paint represents the mid-tones. And you can leave small shapes of white paper to represent the bright highlights. You might also want to change to a smaller brush for this part of the painting.
Paint all the leaves and stems then leave the surface to dry.
All that’s left now is to paint a few darker brush marks to represent the shadow shapes on the leaves. Again, follow the principle that the light source is coming from above the subject.
This painting involved just three simplified values – lights, mid values, and darks. This is an incredibly useful way to deconstruct a complicated subject and still suggest realism and depth. And I think the result looks pretty good!
Now go check out this other video where I’ll show you how to apply this incredibly simple method to draw anything realistically!


I used too much water and forgot to wait for the red of the tomato to dry before I added the green leafy-bits so my tomatoes got messy and blurred with the green colour. But I really like the way it looks and how the colours merged a bit so I am still very happy with my picture. Thanks for a great lesson and all the tips you provide on your website. I feel a lot braver now when picking up the brush to paint.
Glad to hear you’re making progress Susanne !
Keep painting 🙂
Hi Anthony this looks good just studying it at the moment, before I start. Looking forward to doing it.
Thank you.
Mary O’Donnell
Thank you so much for this tutorial. I love how you simplified the process, making it more accessible to people who are just starting their watercolor painting journey.
That’s what I was hopeing for Jess 🙂 Have fun!
hello
a little word from France
I have just been quickly through your mails and honestly I appreciate the details et the efficiency !
I haven’t started yet but I am impatient !
have a good day
thank you
FT
Enjoy your watercolors Pakita!