
How to Blend Watercolors (Here’s What you NEED to Know!)
Blending watercolors used to feel like a losing battle – I’d end up with harsh lines and unwanted streaks no matter what I did.
It can be very frustrating to endlessly struggle with your brushwork this way! Especially because blending is an often repeated gesture whenever you paint something.
In short… You really need this technique in your skillset to feel comfortable with watercolors.
But there is hope on the horizon 🙂
Because blending can easily be mastered with a few tried and trusted methods.
In this article, I’ll reveal everything you need to know.
Blending watercolor
Before I show you how to blend with watercolor paint, it’s a good idea to clarify what this painting technique actually is. Because different artists seem to have their own interpretations. And to be honest, they’re not always giving you the best information.
It can be very confusing :-/
So here’s a straightforward definition of what blending is (and isn’t!)
What is blending in watercolor?
Blending is a brush technique to create a transition in color or tonal value. Blending is used to fade out or remove hard edges. The aim is a smooth shift from dark to light or from one color to another.
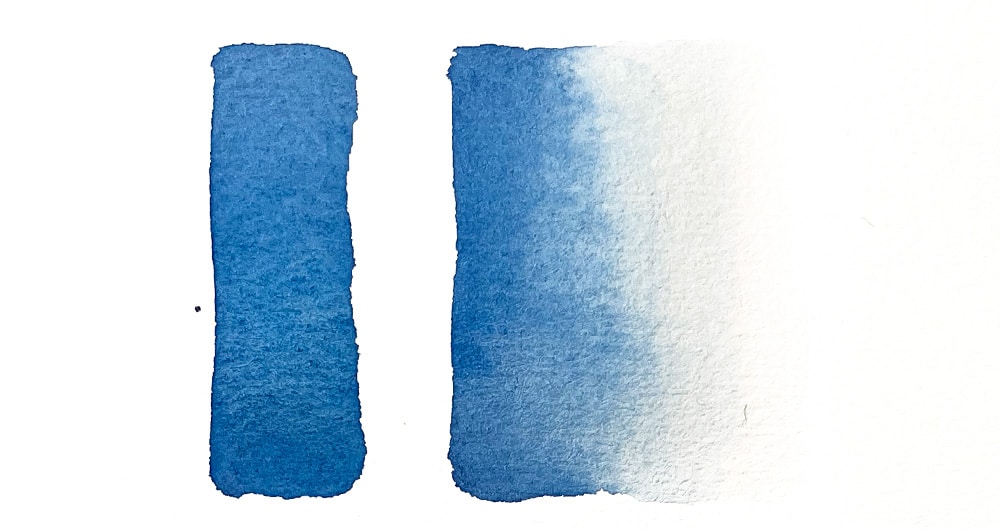
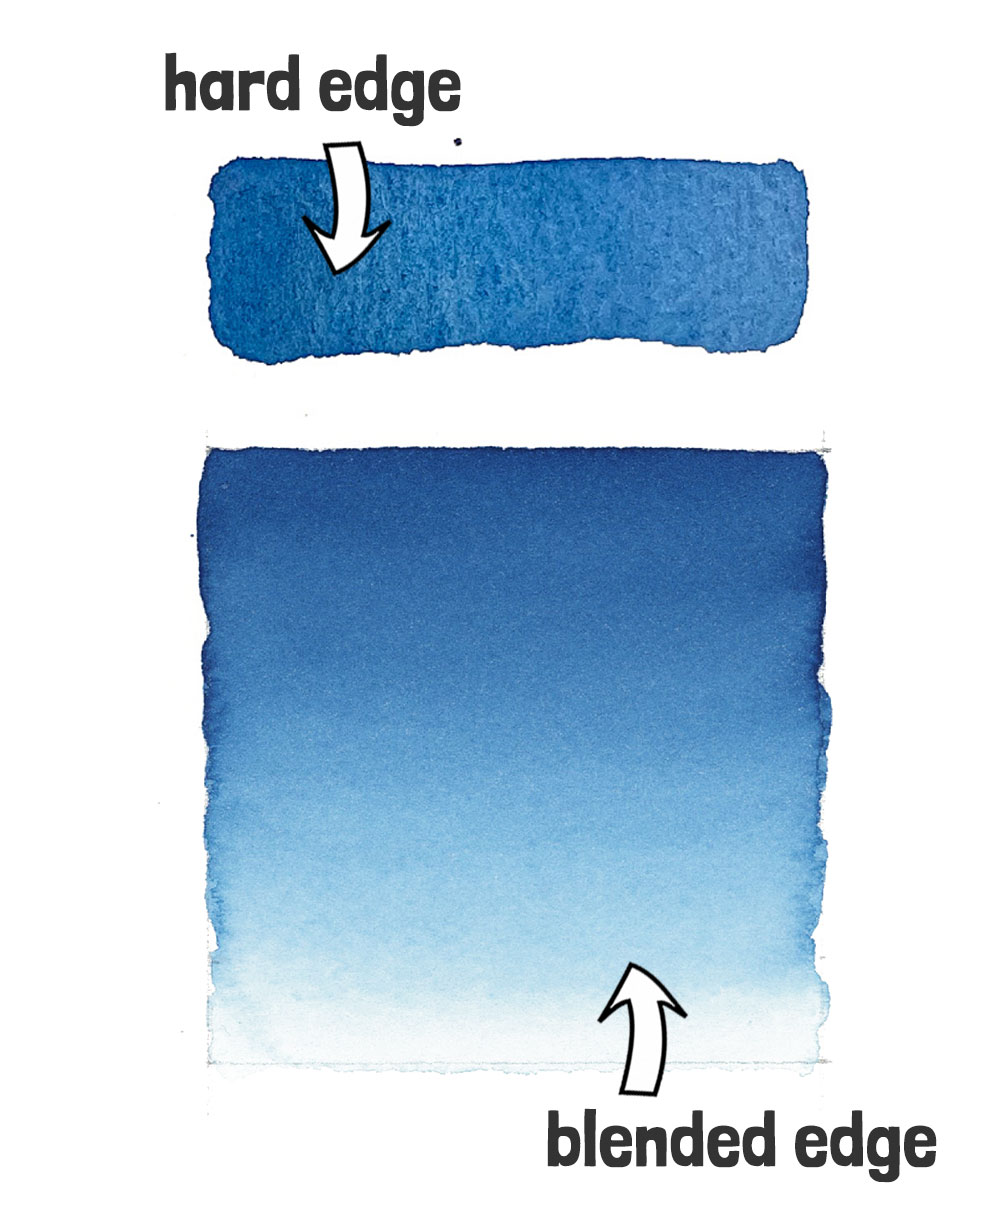
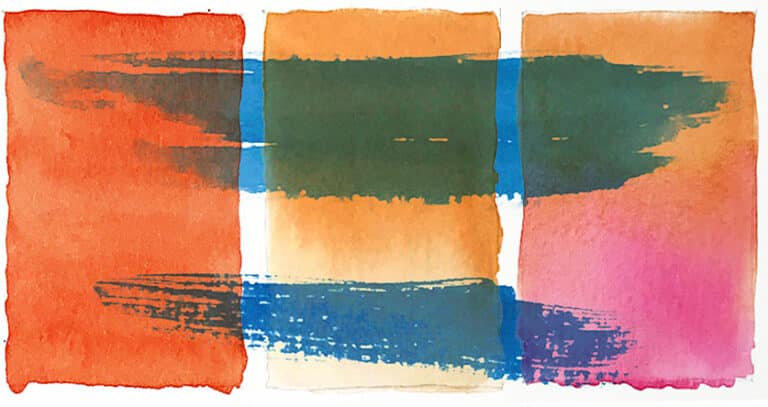
For example, you can see the difference between blended vs. unblended watercolor below.
The first demonstration shows a brush stroke left to dry, creating a hard edge. The second brush mark has been blended to fade out one of the edges.
The other example shows two colors applied to the paper with and without blending. The shape was left to dry in the first case before applying the second brush stroke. The following image shows the two colors blended together.
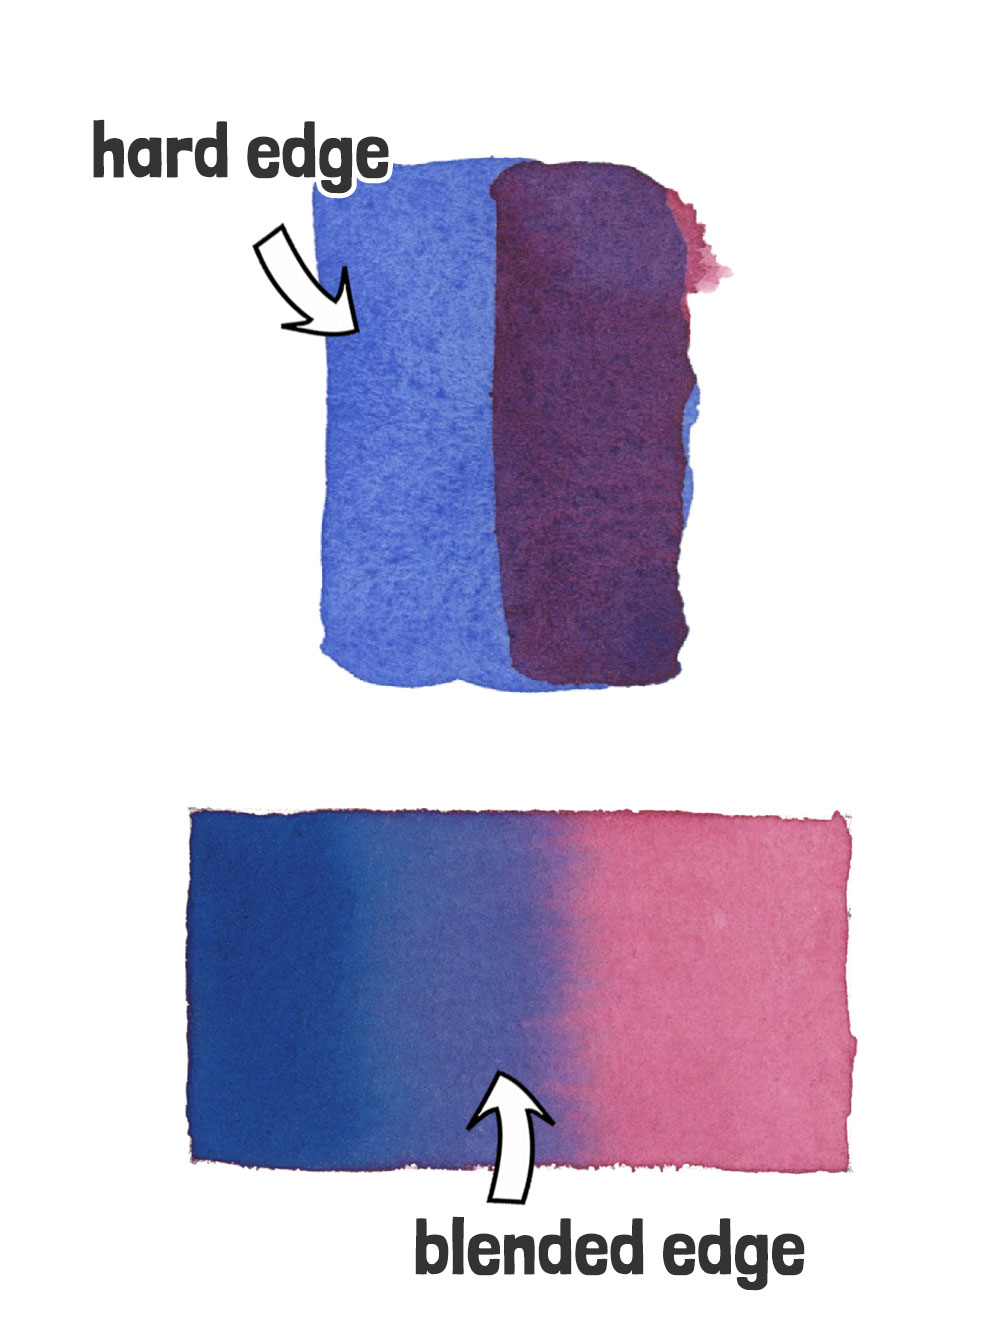
So blending is about making smooth transitions and soft edges. This technique creates fuzzy, indistinct edges rather than crisp hard shapes.
Keep in mind that blending can be a compositional tool in painting. An edge that fades out attracts less attention than a hard edge. Crisp edges draw the eye. This can control the eye and entice the viewer to different parts of a subject.
What blending is not!
Beware of similar terms and methods that are commonly confused with blending. For example:
- Blending is not mixing
- Shading is not blending
Blending is different from mixing. It’s true… blending colors sometimes results in a mixture or fusion of colors. But not always. Blending can be done with a single color, with no mixing involved. Remember, to blend a brush mark means smoothing it out and making it blurry.
For instance, I’ve sometimes seen artists refer to a glazing technique as a way of “blending” colors. However, glazing is a wet-on-dry technique that results in color mixes on the paper. It’s not blending. Read more about glazing here…
The term “shading” is also sometimes used interchangeably with blending. In the real world, shade and shadow allow us to perceive three-dimensional volumes. In watercolor painting, shading is used to represent this depth of space.
How to Blend Watercolor
There are various methods to achieve soft blends in watercolor. Some approaches use wet watercolor techniques. Others are for blending dry brush strokes. But the key to successful blending is controlling moisture levels.
1. Wet-on-dry blending
Painting wet on dry in watercolor is just a fancy term for applying wet paint onto dry paper. For example, suppose you paint a shape and want to make one of the edges soft. A common method for softening edges in this situation involves a blotting technique called “pulling out.”
Let me explain… To practice this technique:
- Lay down a brush mark.
- While the paint mark is still wet, rinse your brush to remove some of the color, then blot it on a cloth to remove about half of the moisture.
- Run the blotted brush along the edge that you want to fade. Your brush only needs to touch the edge of the existing shape.
- Repeat the process if necessary to continue fading out the color.
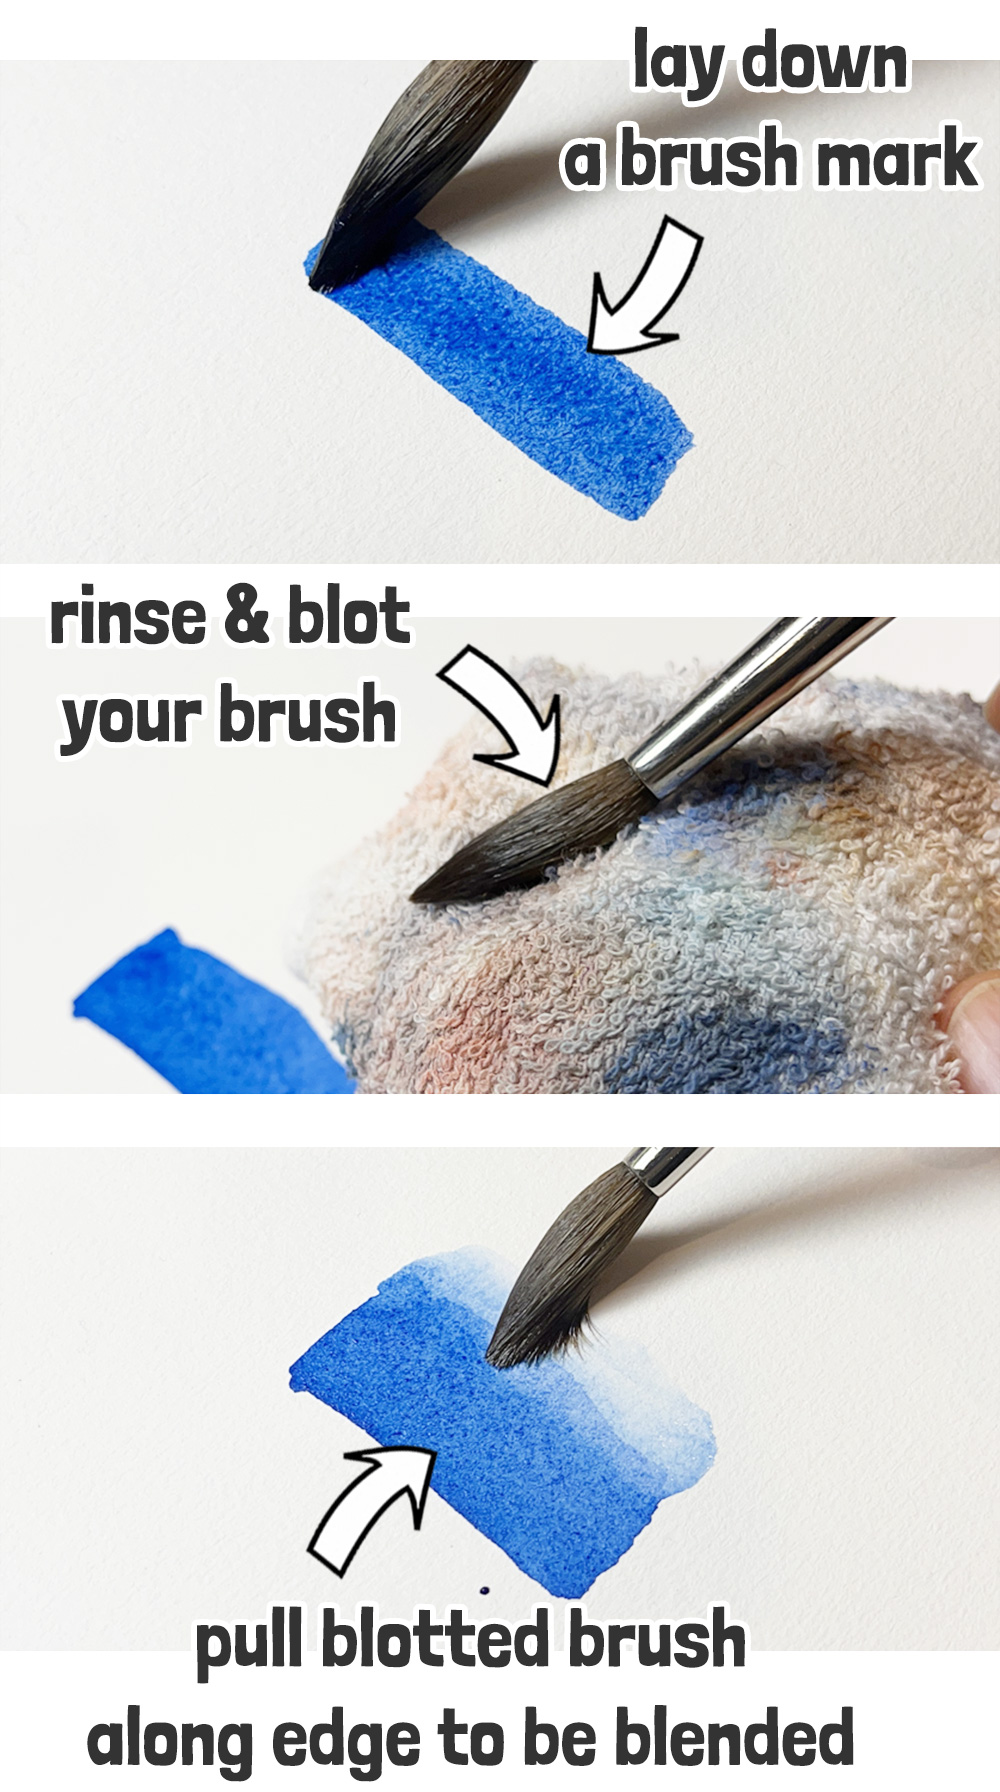
What’s happening? The colored pigments are being “pulled” into the area of clear water created by the blending stroke. Hence the term “pulling out.”
The result is a shape that fades out from dark to light.
Mistakes to avoid:
Make sure your brush is sufficiently blotted. If your new brush stroke is overcharged with water, it will flood back into the previous brush mark. This causes a textured effect called a “back-run.”
2. Wet on wet blending
So how do you blend watercolor wet on wet?
Wet on wet refers to when you paint into a wet surface. This can be a surface moistened with clear water or a damp shape of colored paint.
This is a less-used method of blending but can be effective if you plan ahead. It’s like the reverse method to wet-on-dry. Instead of applying clear water to an existing brush mark, you wet the paper first, then add colored pigment to the water.
- Begin by defining the shape you want using only clear water.
- Pick up paint with your brush, then blot it on a cloth to remove some moisture. A heavily loaded brush might flood the clear wash.
- You can control the flow of pigments with a rinsed and blotted brush.

Sometimes this can be tricky to control, so blotting up some of the pigment and pushing the paint around with the tip of your brush can help restrain the movement of color and the degree of blending.
3. Graded wash
Another common approach to blending in watercolor is the graded wash. Often used for painting large surfaces, a graded wash is when you paint a shape that changes tonality from dark to light (or vice versa).
This can be done using either a wet-on-dry or wet-on-wet technique. Many artists prefer the wet-on-wet approach because the results are smoother.
This technique is particularly effective for painting graduated skies, for example.
- To make a graded wash, begin with a big puddle of mixed paint.
- Lay down the first brush marks, then dilute the paint mixture in your palette.
- Continue painting the shape with this weaker mix of color.
- Repeat the process until the shape is faded the way you want.
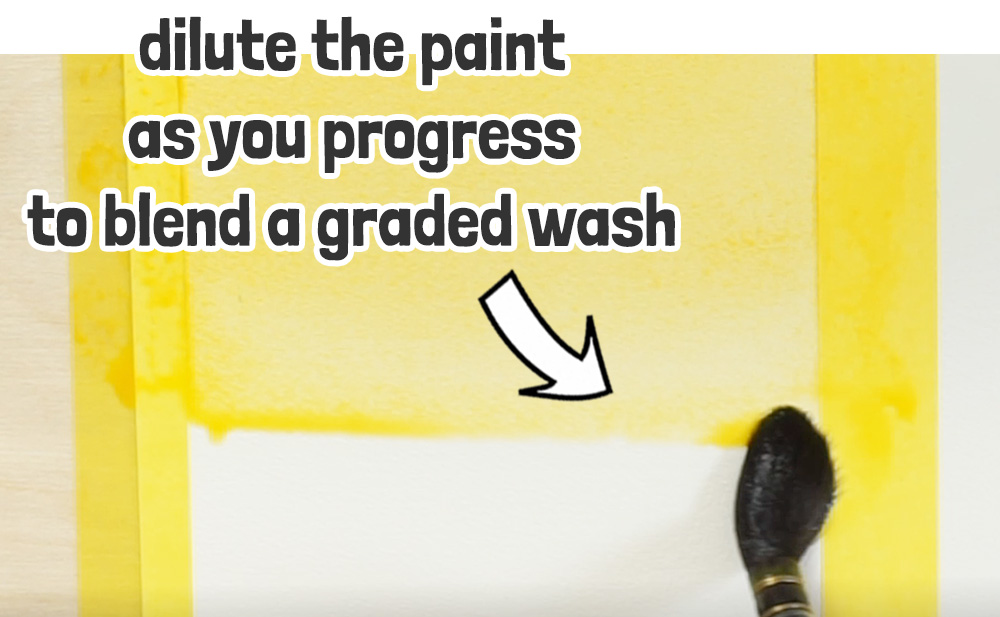
Sometimes, a smooth transition is easier if you tilt the board and use gravity to help push the pigment down the shape. Also, Working quickly helps reduce the possibility of streaky brush marks.
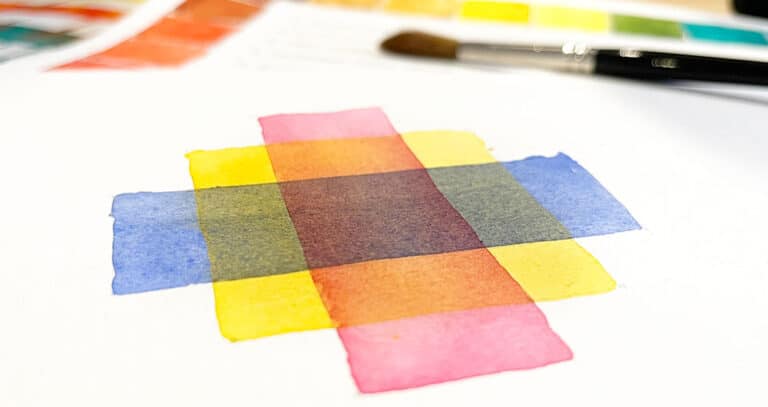
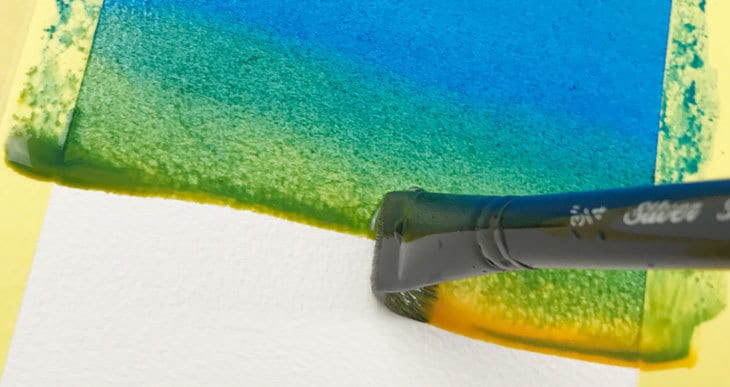
4. Blending colors in watercolor
It’s often more interesting to vary the color of a shape 🙂
(Painting this way is also known as a variegated wash technique).
To achieve a transition of color, you can use a wet-on-wet or a dry technique.
Blending colors with a wet method is also known as “charging-in.”
- Begin by painting a form with the first color.
- Pick up a second color with your brush, and dab the tip into the first shape.
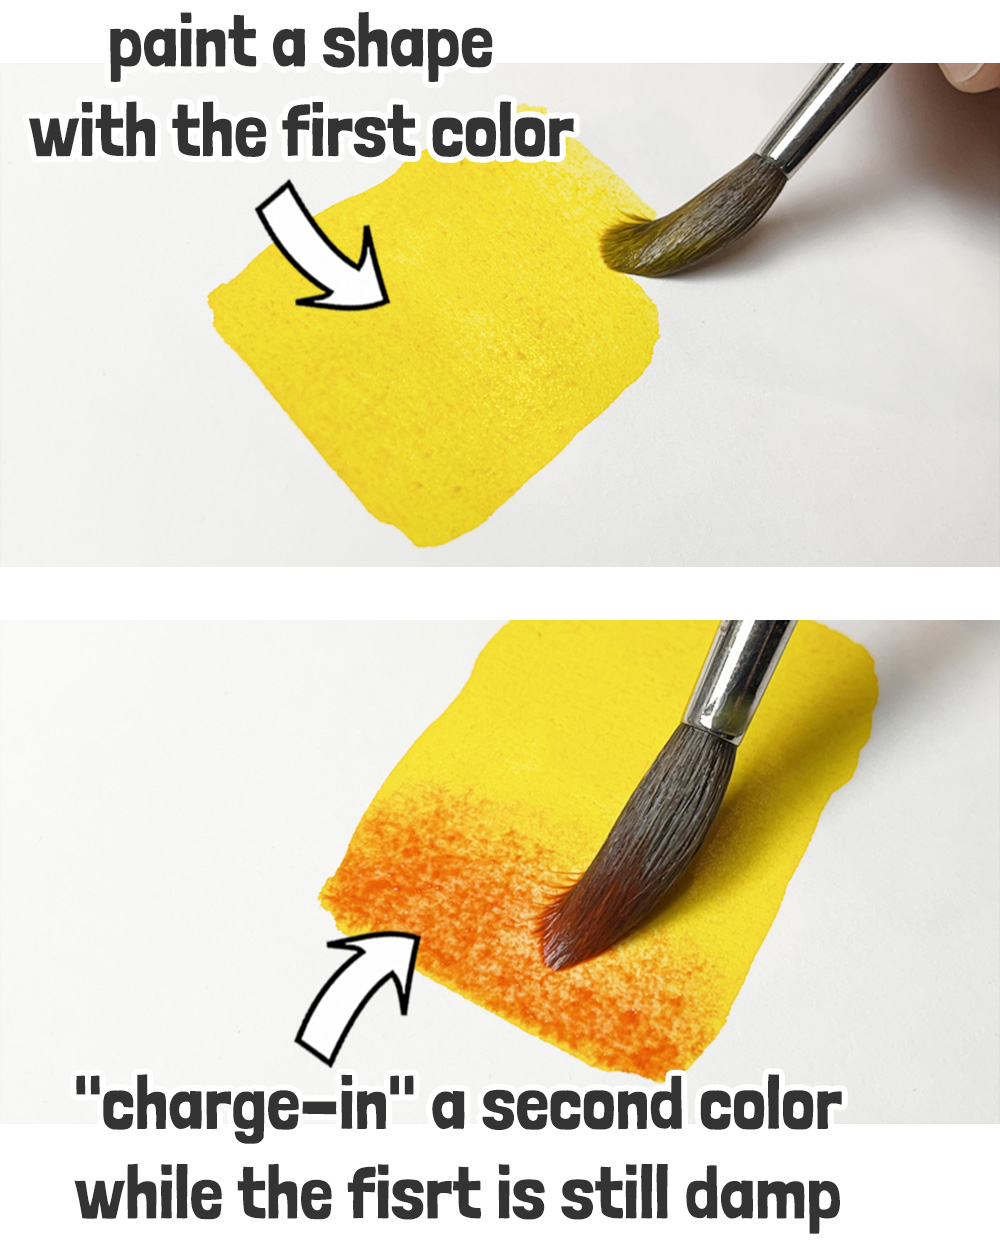
The color will diffuse into the underlying watercolor. When it dries, the two colors are blended with a soft transition from one color to the next.
As with other blending techniques, be careful with the amount of moisture added to the second pass of paint. Use a damp but not overly-wet brush.
Color blending can also be accomplished using wet-on-dry. The two colors to be blended are painted adjacent to each other, then brushed and manipulated to create a blend of colors.
- Paint each colored shape side by side.
- Rinse and blot your brush to remove some of the moisture, then pass it from left to right.
- Rinse and blot again, then repeat the brush stroke, passing from right to left.
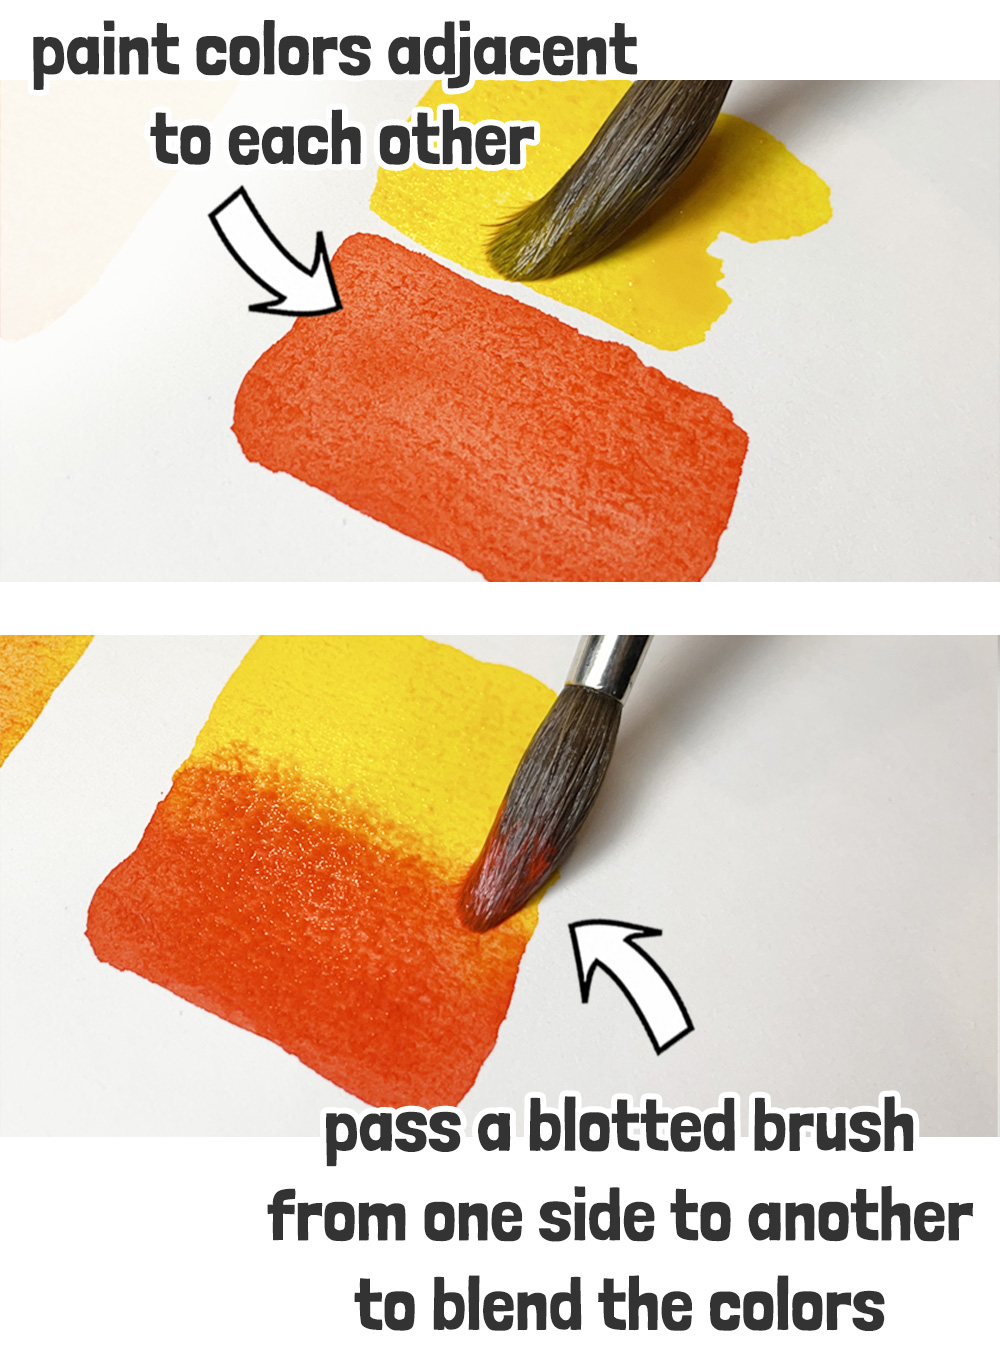
Keeping your brush clean between passes will help reduce color contamination.
5. Blending by lifting
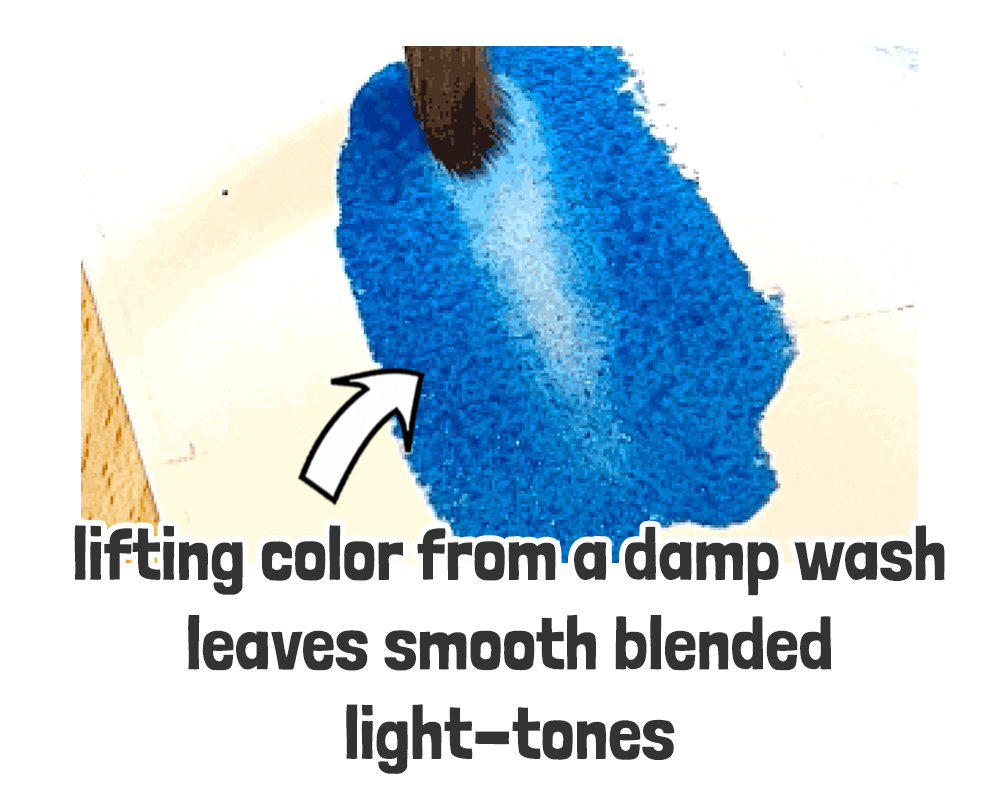
A lifting technique is where you remove pigments from the paper’s surface. When this is done during the damp painting stage, the result creates a lighter-toned shape with a smooth blended edge.
This technique can be done with any absorbent tool, like a sponge or paper towel. But a blotted brush works very well. And it’s the most practical way of lifting quickly before the paint dries!
6. Watercolor edge control
Edge control in watercolor painting is all about blending techniques. Edges are either soft or hard (or somewhere in between). Various methods, such as pulling out, charging-in, and lifting, allow the artist to control edge definition while they paint.
The more you practice blending techniques, the more control you will gain over your edges.
Remember that edges form at the boundary of wet shapes. So blending is mainly about controlling the amount of pigment in any particular place. You can push, pull, blot up, or charge in extra pigment during the painting process.
You just need to do this while the paint is still damp 🙂
FAQ – Tips for blending watercolors
Are watercolors easy to blend?
Watercolors have a reputation for being tricky to blend. Soft blended edges require some skill to produce. Blending mistakes are usually the result of too much or too little water. Too much moisture can cause unwanted textures like “cauliflowers” or back runs. Too little moisture can cause a streaky-looking wash where the brush marks are visible.
How to keep watercolor paint from blending
Wet-on-dry watercolor painting is the only way to produce hard crisp edges with this medium. Avoid wet-on-wet painting and painting on damp paper if you want hard edges that don’t blend.
Glazing is another perfect watercolor technique that can be used without blended edges. With this method, you wait for each layer of paint to dry before continuing. This avoids the diffusion of pigment across the paper.


Thank you. Your explanation is logical, clear, and easy to follow. I will spend some time doing some practice exercises.
My pleasure Claire 🙂
Thank you for providing examples of the blending that you mentioned. I found it a great help.
Happy to help Arline
Thank you so much for your clearly explained description of this technique. I need more practice, but I can already see a difference! After playing with my paint and blending edges, I plan to read about glazing next. I truly appreciate your ability to write clear instructions. Looking forward to your next newsletter.
Glad you enjoyed it Maureen 🙂
I actually just finished your course, where I learned a lot but not everything you offered. Sometimes I just got overwhelmed. I’m in my 70’s, so I need lots of repetition. I continue to learn and improve. Thank you for enabling my watercolor education.
Thanks Julie!
Thank you so much, I have been so frustrated, but your lesson really helps me understand that you have to control the moisture in watercolor. I have, like you, tried to figure it out on my own with variable techniques. However you are the only one that has explained it to where I understand!
Glad this helped Tracy 🙂
Thanks Anthony, your tips and tricks are greatly appreciated. I like to practice the techniques and then try to apply them in a small painting in my sketch pad.
Sounds like a great way to practice Andrea 🙂
Thank you so much Anthony,
your lessons are always very helpful to those who admire watercolor. It seems easy,but is a difficult technique,and you explain each detail the easy way.
congratulations,
Thanks Carolina 🙂
thanks for this – controlling the amount of wetness is major problem. You are a great help. Jean
Glad this was useful Jean and happy to help 🙂
This is what I have the most trouble with. I make all the errors described above. Thanks for the information.
Happy to help Kim!