
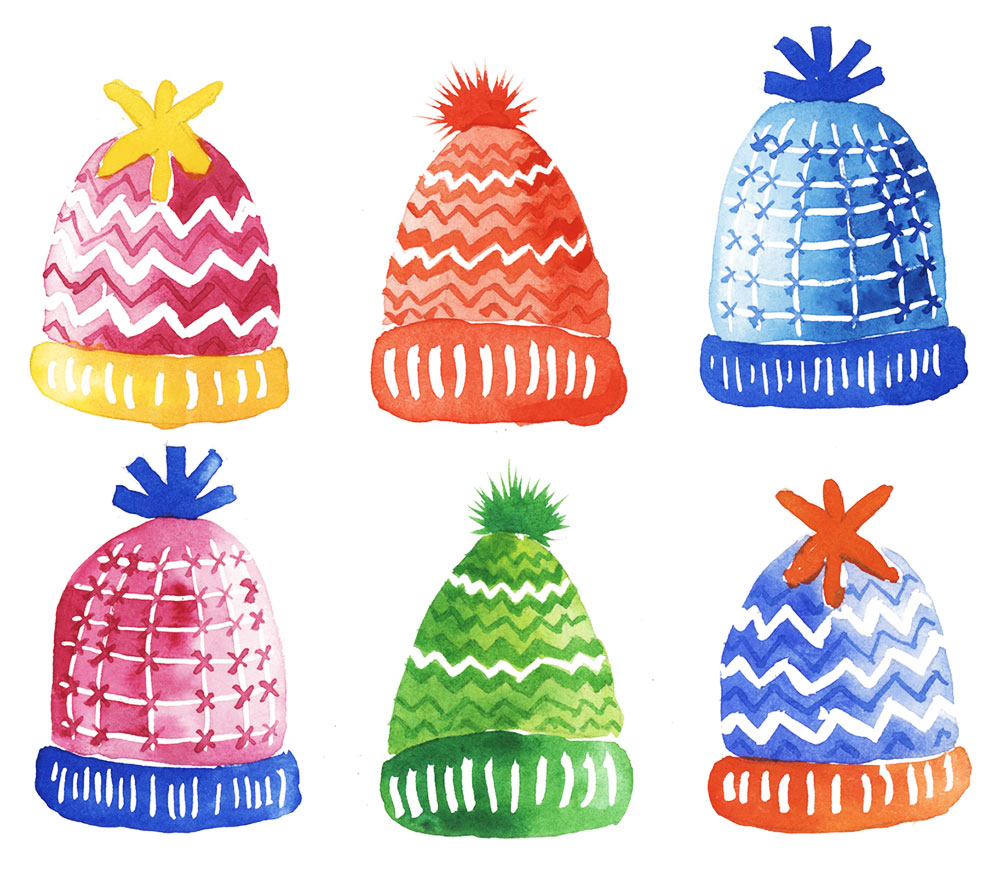
Watercolor Winter Wooly Hats! (Step by Step Tutorial)

In this lesson I’m going to show you how to paint these colorful winter wooly hats in watercolor!
(try saying that three times fast!)
This is a simple illustrative style of painting that anyone can paint in just a few minutes. But there are a few different techniques and tips that I’ll share with you during the painting process.
Follow along to find out how I painted these fun winter hats so you can try it yourself.
Painting Watercolor Wooly Hats- First Steps
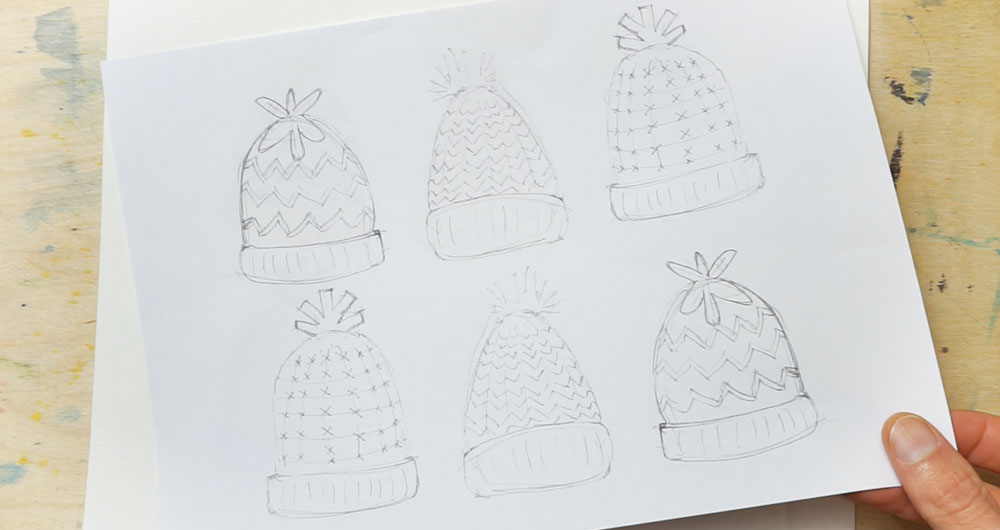
I started by sketching a few different ideas for the hats in pencil on an ordinary sheet of drawing paper. When I was happy I then traced them onto a sheet of watercolor paper using a light box.
I did this because the drawing process often involves numerous corrections, and repeated erasing on watercolor paper can damage the surface.
You can copy the design I did for this painting, or if you prefer you can download my sketch outline from my Patreon, where you’ll also find a bunch of bonus material…
For those of you who want to go further, you’ll also find the full length video, the outline sketch, and all the reference material for completing this painting on my Patreon : you’ll find my full library of ad-free video tutorials, plus other exclusive bonuses that I only share with members of my Patreon channel. Follow the link to find out more...
Tape down your watercolor paper onto a flat board, then use some masking fluid to mask the white parts on all of the hats. To do this I’m using a fine nylon brush that I dip first into soapy water, before picking up some liquid masking. This helps prevent the brush from getting clogged up with dried masking.
When you’ve painted all the details you want to leave white, let the masking fluid dry completely!
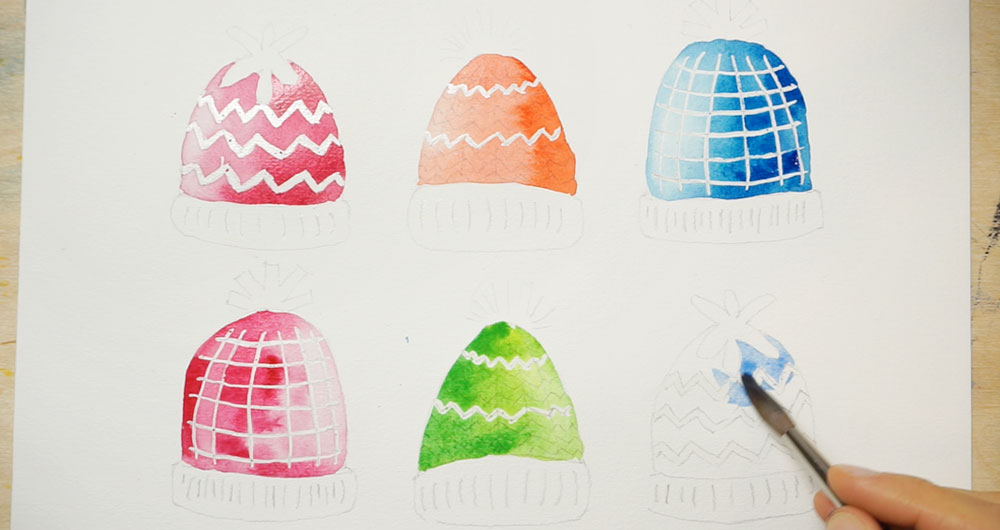
Begin by painting the main body of each hat one at a time, changing colors as you go. Feel free to copy the color scheme I’m using, or come up with your own ideas. However, notice that I’m painting these shapes with a gradient in strength from light to dark. This helps create a slight 3D effect, as if the hats were lit from the left hand side.
To do this, start with a diluted mixture of paint, then charge your brush with a more concentrated color as you progress. You can also lift some of the color off the paper while the paint is still damp using a rinsed and blotted brush.
I painted each of the hat shapes using the same method. But for the sake of creating a bit of diversity, I reversed the gradient for the bottom row of hats, making them lighter on the right and darker on the left 🙂
Normally, by the time you’ve painted the last watercolor hat the first one should be dry. If it is, you can keep painting, otherwise let it dry before moving on. This is because if you paint next to a damp wash you risk causing watermarks like backruns or blooms if new brush marks touch the damp paint.
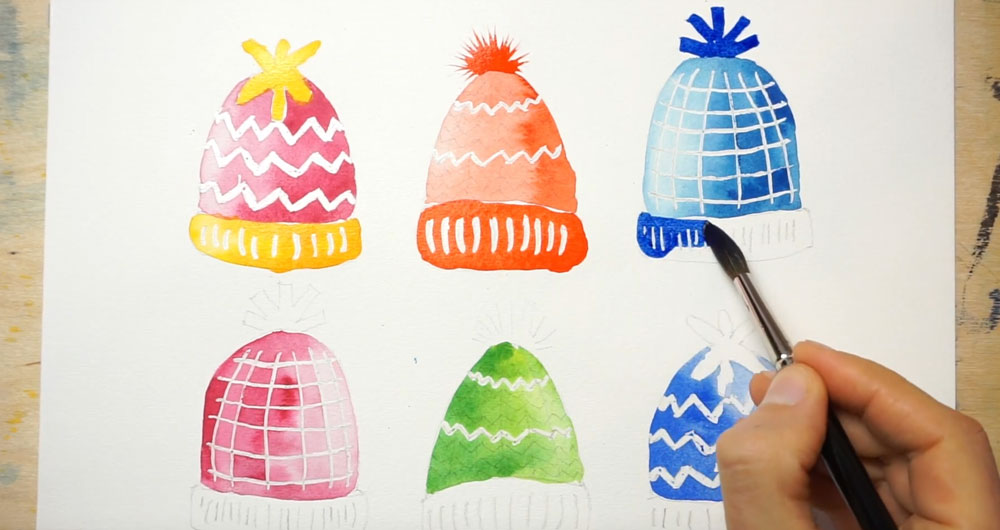
Now I’m painting the brims at the bottom and the bobbles at the crown of each hat. Again, you can follow my color scheme, or make up your own ideas. For some of the details, like the spikes on a couple of the bobbles, I switch brushes to a small round brush.
(In retrospect, when I’d finished painting the bobbles for the red and green wooly hats in the center, I wish I’d inverse the color of the bobbles – putting a green bobble on the red hat and vice-versa. I think this would have produced a better color contrast).

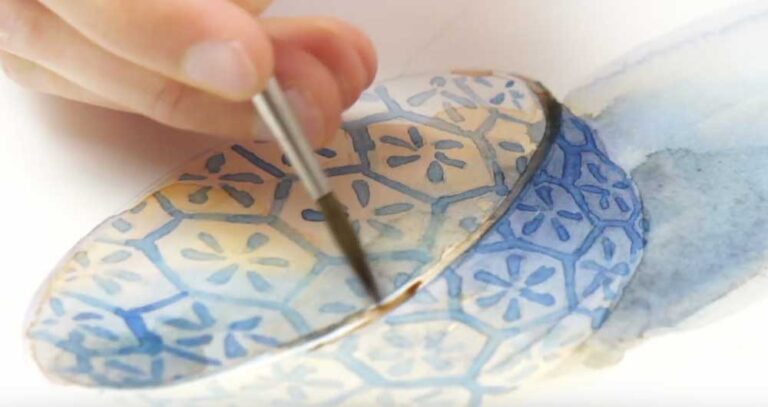
All that’s left is to paint the smaller details, but before moving on I removed the masking fluid using a rubber cement pickup tool. Just make sure the paint is completely dry when you do this or you’ll smudge the paint !
Again, I swapped over to a small fine brush for adding the final texture details. I’ll let you watch the rest of the painting process where you can see me adding zigzag lines and criss-cross details to the different types of hats.
Let me know how you get on in the comments below 🙂


I didn’t try the hats but like the colors.I’m very old and haven’t had any art when I was young. I have found I can draw and paint a little. My work is very stiff and my colors are very dark. I think I’m going lighter but they still are dark,such as leAves and flower. My colors are muddy, the more I write about it the more I Think it may be to late for me. I’ve done some whimsical animals that I love but want to try a tiger but not sure of going from light to dark. Hopeless?
Hi Gayle
It sounds like you simply need a bit more practice 🙂
If you’re struggling to get light mixtures, might I suggest you use a scrap of paper to swatch your brush marks before committing to the actual painting…
Like this you can adjust your mixtures properly before you paint.
You might also find this color mixing guide useful !
Keep having fun!
I teach art and crafts to homeschoolers, I really was getting tired of snowmen and the like . So this week we took your wooly hats and ran. We painted on round watercolor paper and painted a pair of mittens to match . We cut out the mittens and attached to a ribbon to hang down from the wood circle we mounted our wooly hat painting from. Thank you for the spark of a new idea!!!
Happy to help Teresa 🙂
Ah, winter wool hats in watercolour! This sounds like a charming and creative project. The article you linked provides a step-by-step tutorial on painting these cosy hats, so I can help you understand the process and offer some additional tips.
Your blog proved to be an absolute gem! It provided me with valuable insights and turned the seemingly complex into a breeze of understanding. Thanks for making learning so enjoyable and enlightening.
happy to help 🙂
Always something to learn from you! Thanks for all you do!
Thanks Lori
I’m glad I gave my email for these amazing tutorials. I’m a teen and I literally just started using watercolors this week. Thank you, I appreciate this a lot
Sincerely,
Raya
Glad to hear you’re getting into watercolors Raya!
Thank you for sending me all the beginners tutorials. I do appreciate them!
Sincerely,
Dory
Have fun Dory!