Discover the Truth About Watercolors
Whether you’re completely new or you’ve been practicing for a while “water control” is one of the biggest struggles for many watercolor artists!
Water control starts in the mixing palette, where the amount of water you use plays a crucial role. And because watercolors are transparent, the more water you use, the lighter and more translucent your brush strokes will be. This transparency is what contributes to the extraordinary beauty of this medium!
But the transparency of your brush strokes can vary significantly.
A brush with lots of pigment makes bold, colorful marks, while a brush with diluted paint creates lighter, delicate marks. This is all about adjusting the amount of water you mix with your paint, known as the “water-to-paint” ratio.
This may sound tricky, but it’s just about learning when to add more or less water to your paint.
Water to paint ratios
I’m going to teach you all about “water-to-paint ratios” for watercolor. This is how you produce different mixing strengths for this type of paint. Water is used to dilute the paint to make it lighter and more transparent. Controlling this is one of the first steps to successful painting with watercolors.
Watercolors are very accessible and extremely rewarding, so I’m excited that you decided to take the leap and begin painting in this wonderful art medium. I remember how difficult I found watercolors when I first started. I would try hard to get the paint to do what I wanted, and ended up pulling my hair out! I began to wonder why I couldn’t get the results I hoped for. At the time, the internet didn’t exist (yes… I know… old huh?). So it was through trial and error that I learned to improve. Nowadays it’s so much easier to find help.
I put together these essential guide in the hope that it’ll avoid you some of the same frustrations…
Water + Color
Watercolor is made up of two main components:
- water + color.
Err… I know that sounds pretty obvious, but when you start learning watercolors one of the mysterious parts is knowing exactly how to handle the paint. And the important thing to master is how much water should you use for a particular color appearance?
Water is what you use to dissolve your paints. Watercolor paints are composed of microscopic colored pigments mixed with some other ingredients.
“Just add water” and the magic begins!
When you add clear water, the colored pigments mix with the water to form a pool of liquid paint.
So how do you know how much water to use? The answer is pretty simple, but getting the hang of it can take a while (don’t worry, I have some tips and tricks for you so this doesn’t become over complicated).
Mixing strength
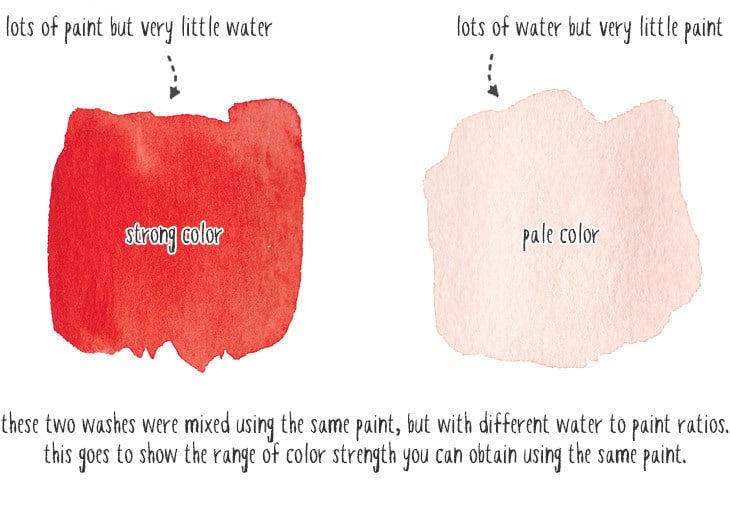
Once you’ve learned to control the mixing strength of your paint you’ll be better equipped to paint the way you want. The “mixing strength” simply means how much water you add to the raw paint. The basic rule is simple:
- When you add a small amount of water to paint, you get a strong, dark-toned appearance.
- When you mix watercolor paint with lots of water it results in a light-toned, pale color appearance.
It’s quite common to make the mistake of not adding enough water, or inversely, adding too much!
To progress with watercolors it’s useful to practice how to produce the color strength you need while you’re painting.
If your paint is too thin, the results can look pale and flat.
If your paint is too thick, you’ll never be able to paint light tones and highlights.
And in general, for a painting to look convincing you need a range of color intensities from light to dark.
Like anything in life, practice makes perfect!
So…
Water-to-Paint Ratio Practice Exercise
To get an idea of how to control your mixing strength you can try the following simple exercise.
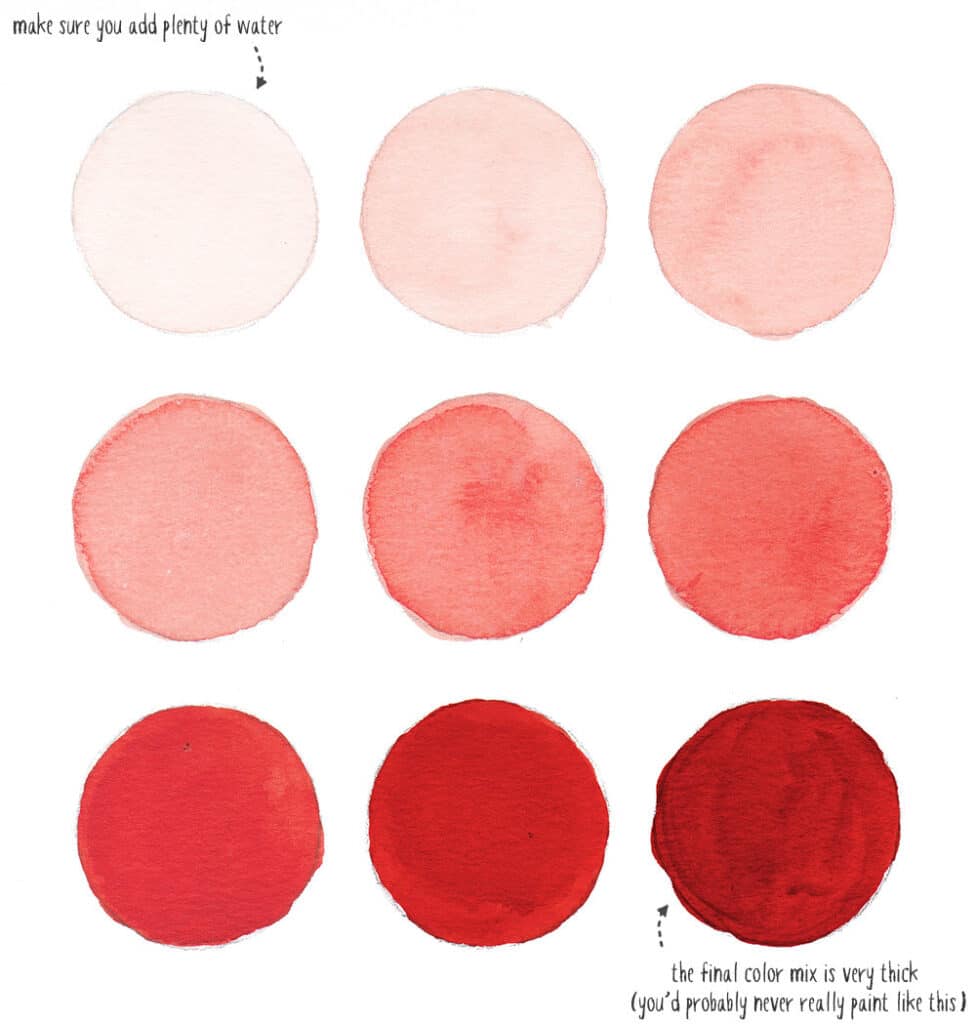
Draw a series of circles onto a sheet of watercolor paper. The aim is to paint a series of shapes with varying color intensity, ranging from very pale to very strong.
- Begin by putting a big puddle of clear water in the middle of your mixing palette.
- Using a damp brush, pick up a tiny amount of pigment from one of your colors and mix it into the puddle of water.
Tips & Tricks
Use a scrap sheet of paper to test the color appearance of your brushstroke before you apply the paint. I do this all the time because it’s a quick and effective way to see the results of your mixing.
Light tones are actually quite tricky to mix. You may THINK you’ve mixed a pale watery color, but when you test the color appearance it looks stronger than expected. If this is the case, pick up some more clear water with the brush and add it to your mixing puddle. I like to use a pipette to transfer a lot of clear water to the palette for making diluted mixtures. Test the strength of the mix each time.
- When you’re happy with the results, paint the first circle in a light transparent color.
More Tips
Watercolor paint always dries lighter in appearance compared to when it is wet. It’s much easier to paint light then progress to dark tones than the other way around!
- Now pick up some more paint using the tip of your brush and add it to the mixing puddle.
- Darken the intensity of the color in small stages until you reach the final circle.
- The last circle should be mostly paint and very little water. If you’re finding it difficult to mix a strong color you can reverse your mixing method – in other words start a new puddle using a wet brush to pick up pigment directly from the color well. Don’t add any more water.
At the end of the exercise you should have a series of colored blobs each one darker and more intense in color. The aim is to practice mixing colors which range from very pale to very intense. Getting a steady distribution of intensity from light to dark can be tricky!
Practicing this on some spare paper is useful for refining your mixing skills. When you mix colors in your palette you’ll find yourself constantly adjusting the intensity of the paint either by adding more pigment to your mixing puddle or adding more water.
Eventually it will become second nature, especially if you observe your painting carefully.
Although I have to admit – I still use a scrap piece of paper for testing !!
Congratulations !
Give yourself a pat on the back. You are now one step closer to greater success with your watercolor painting!
Summary
Ok… Just to recap. The water to paint ratio of watercolors is what produces the difference in color intensity and transparency for this art medium. Practice your mixing strength a few times and this is something that you’ll soon get the hang of.
Anthony
Do you have any other “water control” struggles? Tell me about them in the comments below and I’ll personally give you some guidance 🙂


This was very helpful thank you – I struggle with the overall balance of light, medium, dark in a sketch – I find myself being guided by the colour things are, but then find I’ve lost the light and focal point, and end up adding dark with a pen to get some contrast and deal with the flatness. 🙄
Hi Sharon
Yes… balancing light and dark in watercolor is a bit trickier than other mediums.
I usually find it’s best to work from light colors and gradually build up darker hues as you go 🙂
What a fantastic exercise! Even reading & watching your examples, I cant wait to try it! Thank you.
Have fun Steph 👍
Hi Anthony! Thank you. I used to practice 5 value steps before, and 9 seems like a great upgrade.
It seems to me that some hues have more range than others. For example, I can barely make 6 steps with a cool yellow, while ultramarine is no problem even for 9. Is that normal, or am I lacking skill?
Hi Vasilisa
Some pigments simply have a much narrower value range than others. Cool yellows are naturally very light, so even at full strength they don’t get very dark. Ultramarine, on the other hand, starts darker and can be pushed much further into the dark values, which makes more steps possible.
That’s actually a useful thing to notice.
So if you’re struggling to get clear value steps with a cool yellow, that means your eye is working well 🙂
As a desert rat, the biggest challenge I have is working while the paint is still wet. Here, in the AZ desert, water dries in an instant. I need to learn some strategies for keeping my paint from drying so fast that I get blooms rather than the soft blend from adding the darker values.
Hi Cindy
Sounds like a challenge!
One thing that can really help is actually slowing down a bit and working with a nicely loaded, wetter brush than you might think. Keep dipping back into your mixture so you’re constantly feeding that little bead of moisture at the edge of your brushstrokes. As long as that last stroke is still damp, you can keep pulling the bead along and building your darker values without getting blooms.
It can feel counter-intuitive, but using more water often makes the whole process easier. A wetter stroke keeps the surface open just long enough for you to work back into it.
because I have to do things the hard way, my first investment into watercolor paint was a dry palette – I guess childhood conditioning didn’t let me consider tubes, that and I wanted something more portable.
I have a decent dry palette of assorted paints, and have worked my way through the blending exercise and the Macaron, and I’m gaining water control skills (releasing my acrylic habits and control for this…).
Question:
To add paint a bit at a time, to the water, how would you approach this with dry paints? I find myself spraying my paints when I first start, and counting brush dabs (this is a two-dab level of paint…), but I’m curious if you ever work with the dry paints.
Thanks
Hi Diana
Using ready-made watercolor pans with dry paint is pretty much the same as using tubes and letting them dry in your palette 🙂
The key is re-wetting the pans or paint wells before your start to paint.
This lets you pick up some pigment with your brush, then mix it into the puddle of water for mixing.
To adjust the strength of the mix, test a little on a scrap of paper — then add more pigment if it looks too pale, or more water if it’s too strong.
Your “two-dab” system actually works! It’s all about finding that balance between pigment and water that gives you the consistency you want.
This may be a completely different lesson but it does have to do with water so here goes…when I am watching a tutorial and it calls for wet on wet I try to get my paper as wet as the instructor but it never fails mine is either too wet or I start to dry up before my blending is done. I use 140 lb 100% cotton paper. My “skies” or “water” never looks as nice as theirs. Any suggestions?
Hi Jennifer
That’s a really common struggle, so you’re not alone! The tricky part is that every paper, brush, and room condition (humidity, temperature, airflow) changes how long you have before the paper dries.
A couple of tips that might help:
– Watch the surface. Aim for that soft, even sheen on the paper — it should look glossy, but without puddles. That’s the sweet spot for wet-on-wet.
– Work from big to small. Lay down large areas of water quickly, then go in with your color so the paper doesn’t start drying in patches.
– Load your brush well. If the brush is only half-loaded, you’ll run out of moisture too soon.
– Test the timing. On a scrap, paint a patch of clear water and see how long it stays workable in your space. This helps you get a feel for when to add paint before it turns matte.
If your skies and water are still drying too fast, you can try:
– Switching to a softer, more absorbent brush.
– Pre-wetting twice (a light layer, let it soak in, then add a second).
With practice, you’ll get a sixth sense for that “just right” moment!
Dear Anthony, I really enjoyed this exercise and started repeating it with each primary color. It gives me beautiful, practical color cards.
I worked with a new brush today. My first high quality watercolor brush. I am very surprised at how much color it can hold and how good it feels to paint with.
Thank you for the lovely new lesson. Tomorrow I will practice with the secondary colors…..
Hi Bettina
Glad this was useful 🙂
Yes… it’s surprising what a difference a good brush can make!
May I ask, what brush did you use? 😊
Hi Ludde
I’m using a Rosemary & Co Kolinsky sable (series 22 size 8).
You can read more about brush recommendations HERE
I have trouble controlling the amount of water on my brush. I get blobs of color. What exercises can I do to learn to control this?
I like working with color so this exercise was fun. I will continue to practice it.
Hi Deb
I always keep a soft cloth nearby to blot my brush — it helps take off some of the extra paint and water so it doesn’t suddenly flood the paper.
You can also gently wipe your brush on the side of your palette to let a bit of paint drip back into the mix.
A great little exercise is to paint a few simple lines while paying attention to how much paint is on your brush and what kind of marks it leaves 🙂
thank you so much
what a pleasure to follow you
🙂
Thank you Anthony for sharing your knowledge. Watercolor is completely new to me . I have the paint but still have to buy the paper. I live in a small town and the stationary shop has to order for me. I am following your lessons and cannot wait to begin. Your explanations and examples are superp.
Have fun Tertia 🙂
I tried this with Vermilion red. Was a good practice.
Glad this was useful 🙂
This really helps me understand the water to paint ratio. I’m new to watercolor and information is extremely helpful. Thank you
Thank you. I’m excited to learn .
Thank you for the lesson and the circle exercise.
You’re welcome Toni 🙂
Thanks for these basics. I started looking for watercolor info because I have very detailed color pencils drawings for an animal fable. They don’t have backgrounds, so I thought watercolors might be the solution. I am fine with oils, acrylics and other media, but watercolors have so far not matched my expertise in drawing/painting the smallest detail like the hairs on an animal.
Idea from your last email. Covering the finished drawings with tape, paint the background (just hinting at it) so the critters don’t float in space…. Can normal masking tape do it or do I need the special kind you recommended?
Hi Susanne
I would recommend “low-tack” masking tape, because normal tape is too sticky and can rip the delicate paper surface of watercolor paper 🙂
I’ve been wanting this info from the beginning and boy has it clicked in my brain 🧠.
Thank u so much.
Happy to help Kas 🙂
I notice that after smoothing out the paint in a patch there is often a very hard edge. It too can be smoothed to the middle of the patch, brushing from outward in with a “just barely wet” brush. Any comments on the edge, the smoothing, in general the ideas behind controlling the uniformity of the patch?
Hi John
Yes you can get a hard edge if you continuously brush paint up to the edge of a shape.
Watercolor can be manipulated while the paint is still moist – you can push and pull the pigments around on the painted shape to change the distribution.
Using a blotted brush like you describe will soak up some of the pigments from the surface (a technique called lifting). This will lighten the effect of a very hard edge.
Hope that helps 🙂
As a complete beginner to watercolour painting, working out how much paint to add to the water has been very challenging. Thank you for this tutorial – hopefully practice will make perfect!
Every time you pick up a brush you’ll be making progress 🙂
I found the exercise routine you discussed will be valuable to controlling the intensity of the cor I want. I am redoing the cookie lesson and it was enlightening to learn that I need to do the exercise repeatedly because I don’t know what I thought I knew. Thanx!!
Happy to help Mary 🙂
A true light bulb minute! Starting with water on the pallette & adding water makes it easier to get light washes and add paint to achieve the color needed. Easier than starting with the more concentrated color & trying to lighten it. I have colors too light then too intense & kept adjusting water, only to have a pool of overworked paint. Thank you. Now to practice…
So glad this helped Darla 🙂
ThankYou so much for this tutorial. I’m a nubeee!!! I look forward to more teaching!!!
Have fun Donna!
I completed this suggested exercise. It’s my first time since elementary school to try watercolors! 😆 I enjoyed the process and look forward to more watercolor play.
Thank you
Have fun Sherry 🙂
excellent
🙂
Amazing your tips and tutorials are so helpful and the first to actually make me try and do it!! hugely grateful strapped for time with full time job but really trying to get some time in Mzrgaret
Happy to help Margaret 🙂
Enjoy your watercolors
I’m learning so much! Thanks for this lesson. Basics are the foundation to success.
And I also appreciate the “tips”
Happy to help Lori !