Paint THIS to Improve your Skills & Technique
This is a FREE sample of one of my painting lessons.
This might look a bit tricky if you’re a beginner, but I’d encourage you to give it a try 🙂 The step by step process will guide you through all the stages of the painting. You can download the sketch outline and reference photo below, as well as the complete worksheet for this painting project (normally reserved for my Patreon members).
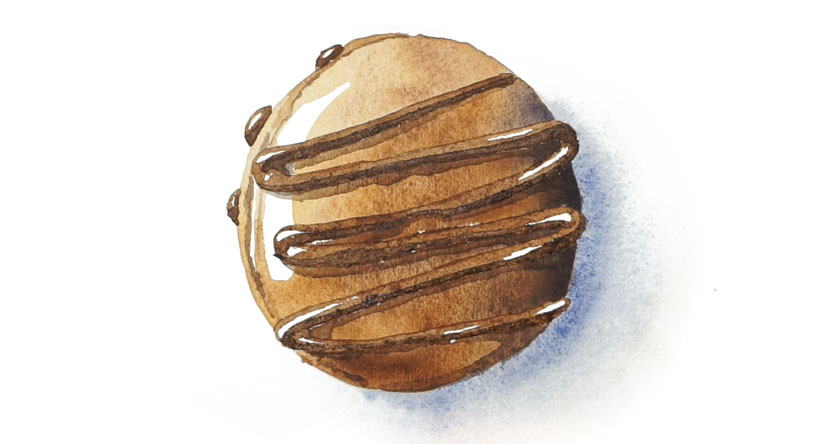
In this lesson I’m going to show you how you can paint this macaron in watercolor in just a few simple steps.
In all my tutorials I try to simplify the painting process into easy to follow stages so that anyone can try subjects like this for themselves.
And this is a perfect example of a very beginner friendly painting. It’s a really fun and satisfying watercolor, so I hope you’ll give it a try.
Grab your brushes to make your own “macaron masterpiece” in just a few easy steps.
Step 1 – Getting Started
Begin by sketching the outline of the macaron onto a sheet of watercolor paper.
When you’ve completed the sketch, tape the sheet onto a flat board with some low-tack masking tape. Before painting the first brush stroke you need to protect the wavy line that represents the icing using masking fluid.
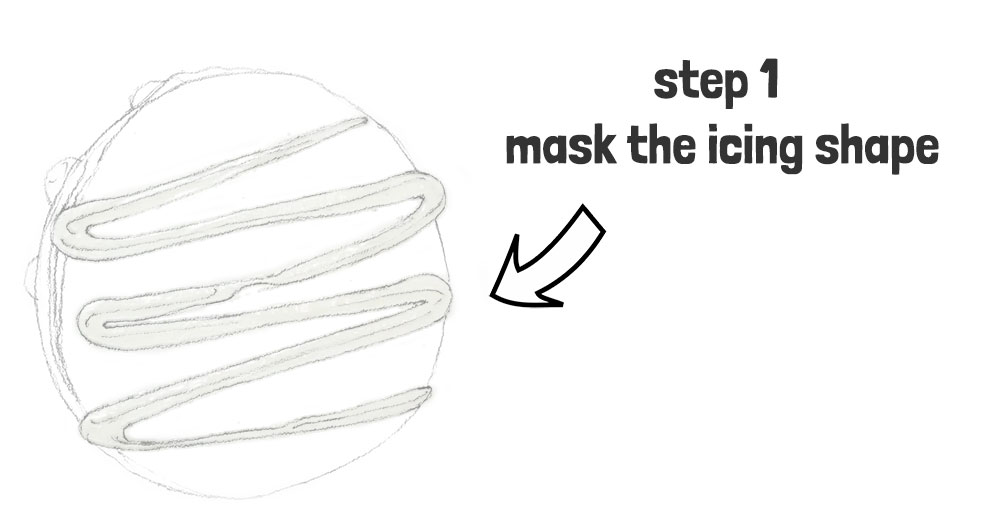
Doing this will make the painting process much easier, and it will let you paint the whole macaron shape with uninterrupted brush strokes, giving you a much smoother result.
I used a bamboo quill pen to apply the masking, and a hair dryer to speed up the drying process!
Step 2 – Foundation color (graduated wash)
Next we’re going to apply the foundation layer of paint, by painting the whole macaron shape in one go.
To do this I mixed up a puddle of brown paint using burnt umber. I then start to fill in the shape. But I’m being careful to leave a fairly big white highlight in the top left corner of the macaron.
Note that in the reference I’m using, the light is coming from the upper left – this will influence the way you shade and shadow the macaron.
My first brush strokes use a pretty diluted mix of brown. And as I progress from the upper left to the lower right hand portion of the shape, I’m adding more and more paint into the mixture, making a more intense color. In this way I’m suggesting the direction of the lighting, and making a more convincing three-dimensional effect.
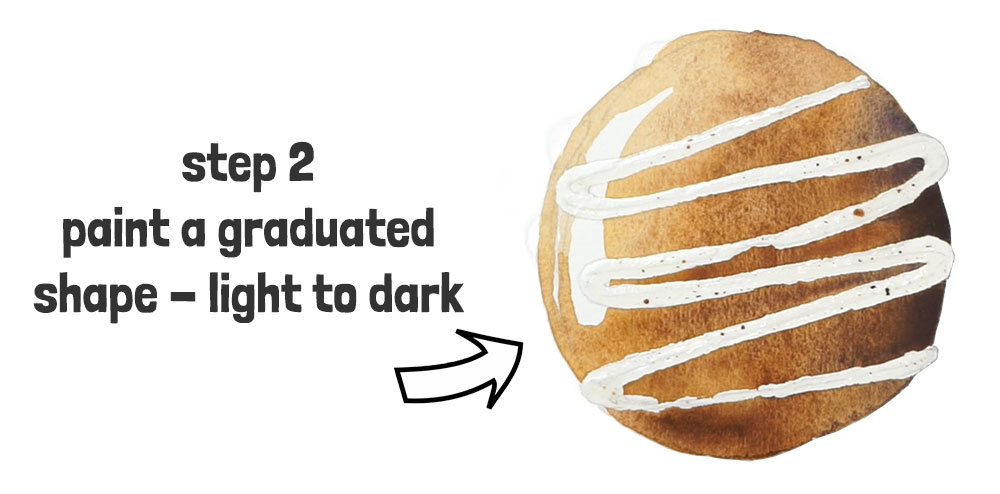
To make the shaded side of the macaron even darker, you can add some french ultramarine blue into the mixture.
Mixing with a complementary color like this is a good way to neutralize a color.
Step 3 – Shading & shadows
Leave the first layer to dry then in the next stage we’ll add some shading and shadows.
Begin by adding a cast shadow on the lower right of the macaron. I started with an extremely diluted puddle of Payne’s grey, which I blended out to almost nothing. After I had defined this shadow shape, I charged in a more intense mix of grey into the damp wash, adding a stronger color close to the edge of the macaron.
Leave the cast shadow to dry so you don’t smudge the paint while painting…
Next I used a mid-toned brown color to add a cast shadow to the curvy icing.
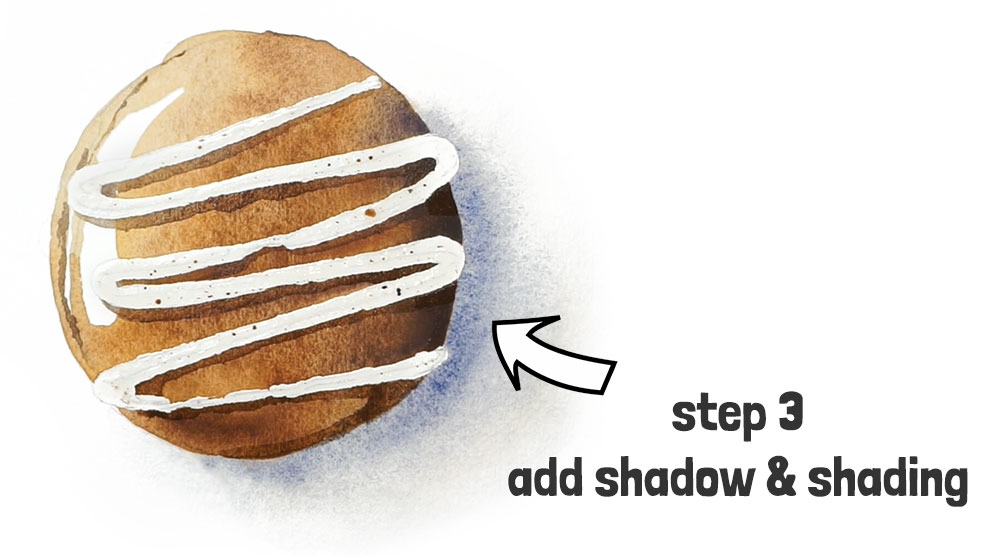
Do to this, think about the direction of the light and add brush strokes to the shadow side of icing all the way down to the bottom.
I’ll let you follow along in the video so you can see the brush marks I used to paint these shapes.
Finish off with a few lines of darker detail where the two sides of the macaron are sandwiched together.
Before continuing with the rest of the painting, it’s time to remove the masking fluid. You can use a rubber cement pickup tool like this or just an ordinary eraser.
Step 4 – Paint the “icing on the cake”
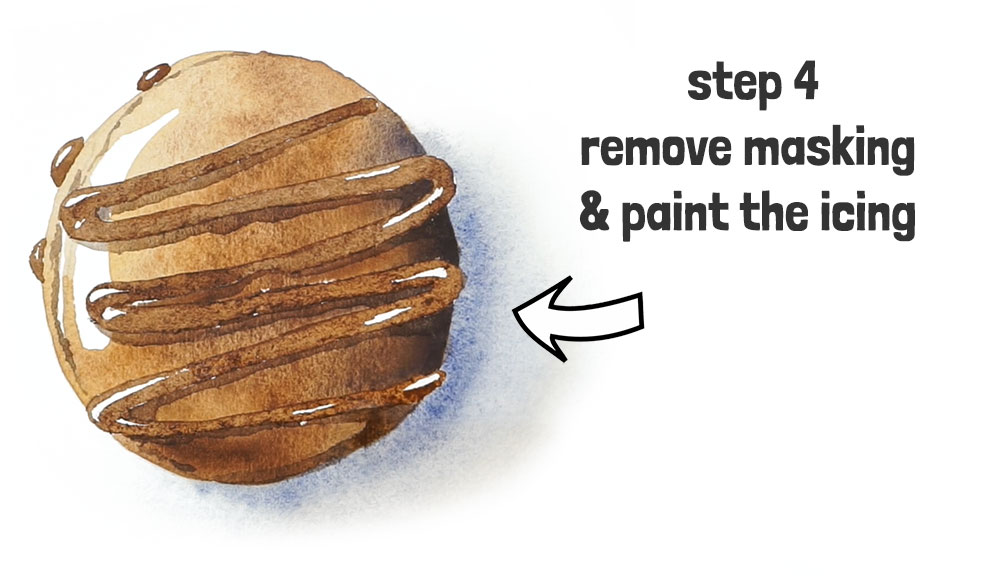
Now we can fill in the shapes of the icing. I’m using a mid-strength mixture of brown paint for this.
I began with the small blobs of icing protruding from the underside of the macaron. And since we’re now painting the details, I also swapped to a small pointed brush.
The icing shape itself is also quite shiny, so I’m being careful to leave some small white highlights on the parts of the icing shape that are turned towards the light.
Leaving those white highlights in a watercolor painting adds a level of interest and liveliness. It’s all about adding contrast – those bright spots make the colors around them pop!
This is quite a fiddly and intricate part of the painting process… (I have a video of this on my YouTube channel – just search for “watercoloraffair”).
Add a few more lines of color along the separation between the two parts of the macaron.
When the icing shape is complete, leave the paint to dry completely.
Step 5 – Final shadow details
To give a more three-dimensional feel to the icing I’m going to finish off by adding some shading to this wavy shape.
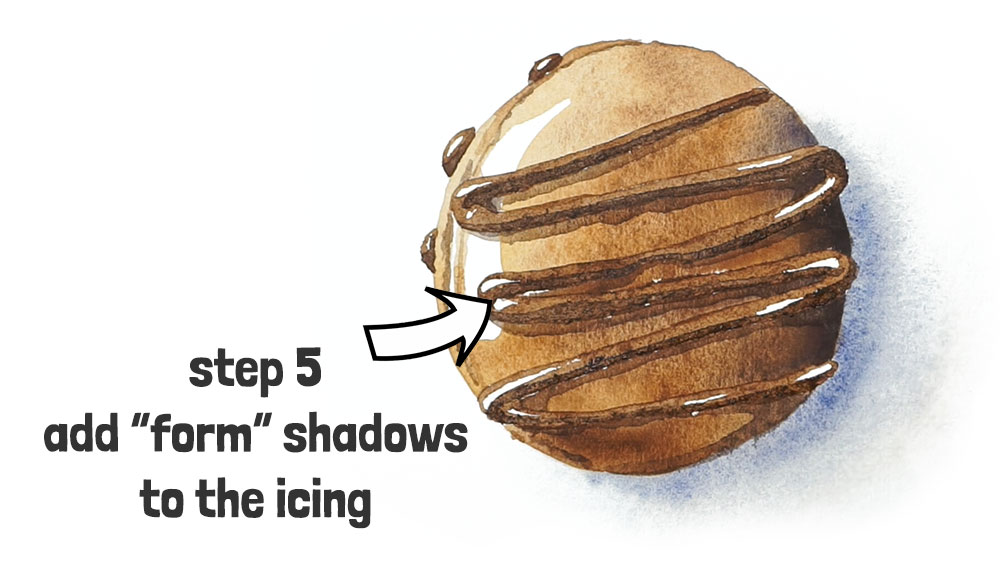
We already painted a cast shadow for the icing earlier on… but the icing itself looks slightly flat. To do this I added a few brush marks to the shaded underside of the icing. This “shading” is also called the “form shadow”, this is the part of a form that is not directly illuminated by light.
Adding this adds depth to your artwork and makes it seem less flat 🙂
Anthony
Tell me how you got on with this painting… Or you can tell me about your watercolor struggles or what’s holding you back in the comments below and I’ll personally give you some guidance 🙂


Hi Anthony, I followed your method which was adding more paint gradually to the mix to shift the light and shadow point of view, but what happened is it created some seperation. The colours didn’t blend as well together and the transition didn’t look that seamless blend but created some sharp edges. Would you have any tips on how to avoid/improve this?
Thanks
Hi Wiktoria
That usually happens when the first wash has started to dry a little before you add the next mix. When the surface is no longer evenly damp, the new paint tends to create those sharper edges instead of blending smoothly.
Maybe try working a little more quickly and keep the surface slightly damp while you work. Using a slightly larger brush can also help if you’re having trouble covering the surface quick enough.
Thanks for this tutorial
I’ve just started your course and have already learned so much.
For this painting did you use varying concentrations of burnt umber for the icing and shading or different browns
Hi Gea!
Yes I was varying the concentration of paint using burnt umber, but also added in some French ultramarine when I wanted to darken the mixture.
Have fun!
Hello Anthony
I am just 100% getting ahead of the watercolour journey… but a quick question, when I clicked on the masking fluid link it was in $ is there any particular UK brand?
Of note I only received some watercolour paints/paper/brushes for christmas… so am reading your lessons through before I do anything…maybe cowardly… at almost 70….
Thank you 🤭
Hi Jane
You can find the same product from Uk suppliers like Jackson’s HERE.
Totally normal to take your time and gather knowledge first 🙂
Have fun!
Thanks for this lesson, Anthony, it’s been a mini-hero’s journey just to get to the point where I could start it. Needed gum, needed the bamboo stylus, needed a board to tape it to… etc. etc.
Rolling along great, until I went to erase the gum (used a magic rub eraser). It tore a good section of the surface of my paper away with it. The gum was blue – which I actually liked, I could see it easier, but it didn’t come up easily. I’m wondering if I bought the wrong kind, or something. Amazon bargains, and such. IT’s called Pebeo drawing gum. Natural latex. Supposed to work for watercolor and airbrush.
Maybe I got too enthusiastic with putting it on, or erasing it? Any experience with this? I’m not sure how to proceed, I’m pretty sure that the roughened surface will be a challenge to flow paint onto, dang it.
Hi Diana
Ouch! Yes it can be very frustrating when that happens.
In my experience this is worse when you use certain kinds of student grade paper.
Student papers are made from cellulose wood pulp, which is not as strong as the cotton fibers in higher quality paper.
Another possibility is that the paper surface was slightly damp when you applied the latex gum… In that case the latex could seep deeper into the fibers making it rip the surface when you remove it.
The secret is to go very slowly and carefully when you remove latex masking 🙁
Hope that helps for future projects…
Thank you, Anthony. I will research a bit, and learn more about the papers. The pad says “watercolor” cold press, 140 lb, but yeah, how to know what grade it is? Who knows, I bought it years ago, but the price on it makes me suspect it’s student grade or lower. I’ll dig around on your site, I’m betting you have written something about the papers. None of my “watercolor” pads say anything about cotton. They’re definitely getting the side-eye, now… They may all get relegated to my “make other stuff” pile.
Hi again Diana
If you like I have a complete article about watercolor paper HERE
🙂
I love that you have this video available. It’s so clear and helpful.
Glad this was useful Mary 🙂
Hi Anthony,
I was trying to print out the reference photo onto 1page but my printer keeps printing it on 4 pages (cookie is in pieces on 4 different pages) any tips to fix this?
Thanks!
Mary Lou
Hi Mary Lou
The reference image is a high resolution image – so maybe you need to scale the printout to be 100% of your paper in the settings??
Will try! Thanks!
Question: the sable brushes that are linked to Blicks are not available. Any suggested alternatives?
Thanks!
Sure… You’ll find a list of my recommended supplies HERE
Hi Anthony, I have maybe a stoopid question. 🙂 I am wondering about the choice to add a form shadow rather than darkening the cast shadow. Could you please speak to that choice? I have always been darkening my cast shadows in my paintings if the form still feels flat. Sometimes it works and sometimes it doesn’t. I would love to understand this concept better. Thanks so much! Laura
Hi Laura
If you like, i have an article that goes into more depth about shadows in watercolor HERE…
Perfect! Thanks so much!
I just love the detail in your instruction as well as the steps needed to understand how everything comes together.
Thank you so much!
Thank you Rosy! I’m really glad it’s helping everything make sense
Anthony, this was so much fun; and it was a skill and confidence booster! I didnt have the masking fluid,but I had a Uniball white gel pen to do the reflections. I had to add extra layers of thicker paint to build the frosting, leave some gaps for the highlights, let it dry 110% and then gently dab the gel pen on. So cool!
Glad your enjoyed this Justin!
Keep on painting 🙂
Wonderful way to paint Anthony… Thank you for your kindness…
Happy to help Douglas
I haven’t tried the macaron yet but can’t wait! I’m learning so much from you! Thank you! Great to have understanding of color mixing and terms!!!!!
Happy to help Lindsi 🙂
I enjoyed watching that and having a go
Thank u
Glad you had fun Jo 🙂
Hi, my painting looks somewhat like yours, this was great practice for my first painting and a nice surprise. Thanks!
Glad you enjoyed it Joan 🙂
Dear Anthony, I have a general question I come across issues where if I don’t wet the paper or the section 1st like the little circles that you suggested to do things get too streaky doesn’t dry as evenly as if I had what is the section 1st so if you could tell me what you feel about getting a very smooth color graduation if wet wet is better than wet on dry? Tips you can give that makes one way better than the other for any particular techniques. Thank you so much, warmly Jeanette. Saccobellistudio.com
Hi Jeanette
Painting smooth blends and uniform shapes in watercolor is a common struggle at first.
It’s all part of the “water control” issue with this medium.
Wet-on-wet will generally create smoother washes than wet-on-dry. But with practice, wet-on-dry can also produce smooth results – you need to be sure the painted surface remains moist during painting, and don’t let the paint begin to dry. This is what causes streaky results, since the pigments are starting to settle into the paper.
I find that some beginners don’t use a wet enough brush when painting wet-on-dry – almost treating it the same way as more opaque mediums like acrylics…
Hope that helps 🙂
Hi Anthony,
I love this lesson and the video demo is very helpful. On the downloadable work sheet you show the palette you’re using to include Hansa Yellow Deep and Pyrrol Scarlet but then these aren’t mentioned in the text or video. So I’m wondering how they figure in? Also, and maybe related, how are you arriving at the variation in browns used to create the shadow caste by the icing and the icing itself?
Thanks!
Kathy
Hi Kathy
Yellow and red are two colors I regularly use to modify brown mixtures – they warm up or lighten the brown mix depending on the desired color.
In this painting I didn’t choose to add them, but they can be nice to play around with 🙂
The cast shadows for the icing are simply a medium-concentration of burnt umber – Layering the color on top of the previous washes gives a progressively darker appearance. This is thanks to the transparency of watercolors, and is known as a “glazing” technique.
Hope that helps 🙂
Thanks! I’ve found all your lessons so far very helpful.
Happy to help Kathy 🙂
I appreciate your attention to detailed instruction. I painted the macaron a second time and took more time to get the water to paint ratio “better”. The second attempt has more depth although still so much to learn and incorporate. Thanks!
Great news Debbie!
Keep on painting 🙂
This video has answered so many questions and concerns for me…Thank You so much for helping me move forward… I definitely want to take your MasterClass as soon as I am back home again…We are traveling right now and things are changing dailey, moment by moment… This looks like just what I have been looking and hoping for. I love your style of teaching and instructure…This gives me some confidence going forward. Best Wishes to you Anthony.
Thanks for your kind comments Kassandra!
Happy to hear this helped 🙂
I’m enjoying the course. I managed to do the macaron and felt very proud, thanks. I also enjoyed the peaceful music on the tutorial
Hi Liz
I’m happy to hear you’re enjoying the lessons! And well done on finishing the macaron — that’s great! You should definitely feel proud of yourself.
Keep it up!
This was a great first painting. I really enjoyed building up the colours. Adding a second colour to the darkest part is not something I would ever have thought to do. Thanks.
Glad to hear you enjoyed it Yasmin 🙂
I’m brand new to this and can’t wait to begin! As a beginner, I’m stuck on which sizes and how many brushes to start out with. What sizes did you use in the macaron example? The paints and papers that you recommend are in-hand, but the brushes escape me. Please advise. Thanks!
Hi Helen
I believe I’m using a kolinsky sable size 8 by Rosemary & co.
You can read more about brushes here: watercolor-supplies-beginners
I am having trouble with the gradient effect. Watching your video I see how you dab the colour to make it darker but my paint is almost to dry when I try to add the effect. If I add too much water my paper is buckling. I have now tried this cookie many times. Maybe I am stressing too much over detail.
Hi Marcie
This could also be something to do with your paper… Are you using 100% cotton paper?
This surface is usually much more forgiving and should give you more time to play with the paint.
Alternatively, you could try mixing you paint puddles before had so you can work more quickly 🙂
As for detail – try to see the bigger shapes and brush strokes without fussing over details. I know this is tricky, but maybe try thinking of the bigger shape you want to paint before putting brush to paper, and stick to that 🙂
Hope that helps
Turned out “real” ! I had send to everyone offering a macaroon and they said “ yummy” 😂👍🙏Thank you Anthony! I love your emails/lessons! Very generous of you! Sending lots of gratitude!🙏
Glad to hear it turned out well Larisa 🙂
Great! It makes me feel like biting it!
🙂
Have fun!