Day 1 Challenge : Layering Basics
Hello, and Welcome to Day 1 of my Watercolor Challenge!
In these challenges, we’re going to paint together — but I’m not just going to show you how to paint. I’m also going to help you understand why many beginners find watercolor tricky to learn.
(Why listen to me?)
But before we dive in, let me quickly introduce myself.
In case you don’t know me, my name’s Anthony. I’m a professional artist, and over the past 10 years I’ve been helping thousands of people learn to paint with watercolor through my website and YouTube channel, “Watercolor Affair”.
I taught myself how to paint through years of trial and error (and lots of cups of tea!). So I know how frustrating it can feel when watercolors aren’t working the way you imagine. That’s a big part of why I do what I do now – to share what I’ve learned and hopefully make that learning curve a bit less painful for you.
This challenge is really just about helping you build a bit of confidence, understand why things work the way they do, and – dare I say – enjoy the process along the way 🙂
So let me begin by helping you understand a couple of watercolor’s most important traits
Water + transparency
Watercolor has two unique characteristics:
- it’s water-based
- and transparent
Which sounds simple enough – until the paint starts doing its own thing! Those very qualities can often catch people off guard…
But watercolor isn’t just paint.
It’s water with pigment.
And unlike other paints, it’s transparent, not opaque – so it works in a completely different way.

And I think that’s where most beginners get stuck:
They expect watercolor to behave like other paints…
but it doesn’t.
Water + Light Effect
Because watercolor flows and blends, because of how water moves… and sometimes it surprises us with unexpected blotchy textures (hello, blooms!)
And since it’s transparent, the brush marks you make underneath continue to show through, creating beautiful layers of color — (if, of course, you know how to control it).
So the real secret to watercolor is about learning how water and transparency behave together on the page.
That’s exactly what this challenge is going to help you with.
Over the next few days, I’ll guide you through some exercises that give you a feel for how water and pigments flow, how transparency works, and how to improve your paintings – even if you’re brand new to watercolor.
Ready? Let’s get started!
Transparent layering…
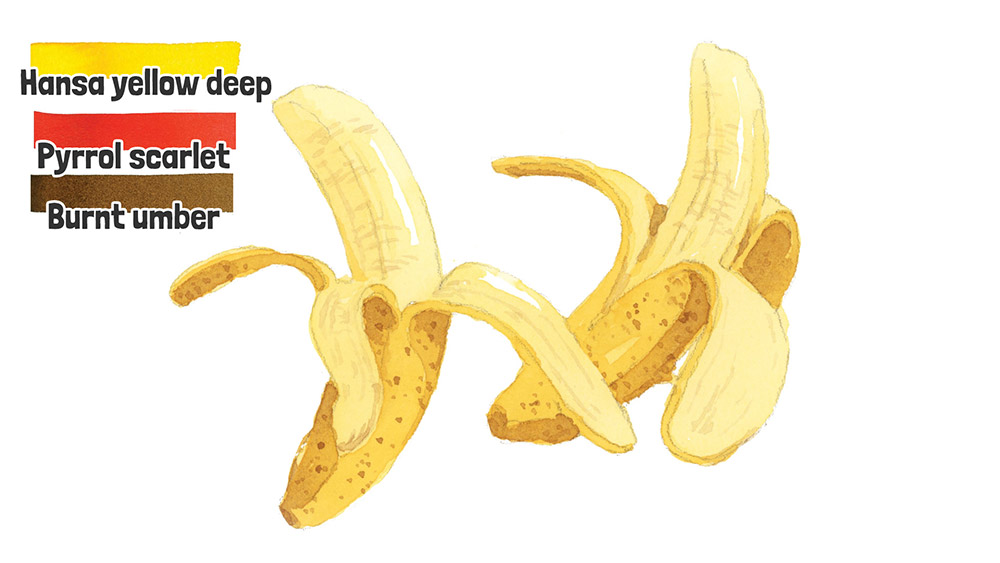
For this first lesson in the challenge we’re going to paint these bananas! I used only three colors to paint this:
- A warm yellow (Hansa yellow deep)
- A warm red (Pyrrol scarlet)
- A dark brown (Burnt umber)
Start by downloading all of the reference images you need for this project (see below)… then the first step is to sketch the outline of the bananas onto a sheet of watercolor paper (I’m using a light board to make this quick and easy).
So… One of the big challenges beginners face is not knowing how to use watercolor’s transparency to their advantage. Unlike opaque paints, watercolor is see-through — so each layer leaves the ones underneath still visible.
That’s why watercolor artists often paint in layers using a method called a “glazing technique”.
But glazing isn’t just “one layer on top of another.” There are a few basic rules you need to know to make it work well:
- Always let your first layer dry completely before adding another, otherwise you can end up with unwanted watermarks or blotchy stains
- Paintings should be built up progressively, one layer on top of the other (using glazing).
- A good approach is to work from light to dark.
- It also helps to start with larger, softer shapes and move toward smaller, more sharp-edged details as you go.
Let’s have a closer look at how to do this…
Now it’s your turn — here’s how to practice layering…
You can download all the references you need for this painting exercise here:
Layer 1
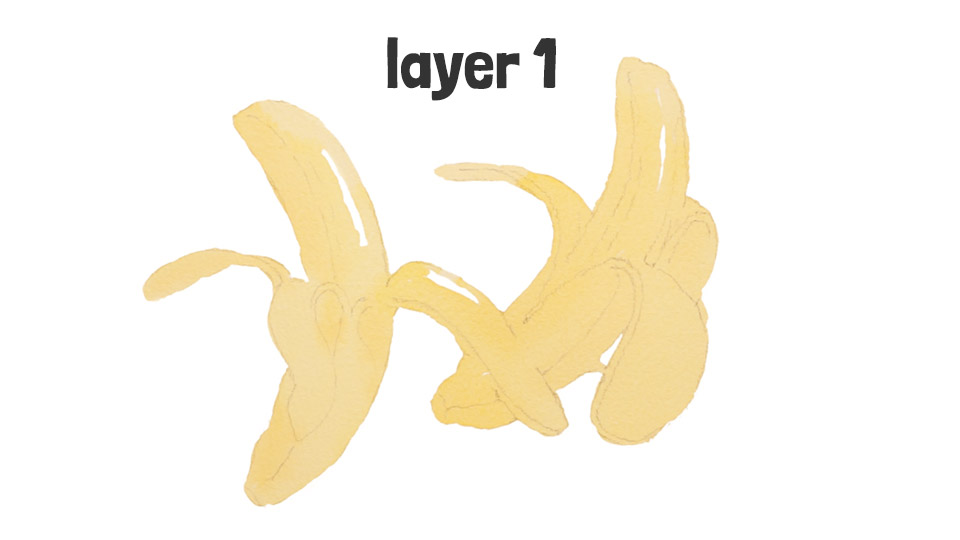
Mix up a very diluted yellow, and start painting the banana with a uniform wash of color.
A quick tip here – you can use a scrap of paper to test your brush marks before putting brush to paper – this gives you a much better idea of the final color appearance than what you can see in the mixing palette.
Notice that I’ve left a couple of white shapes to represent the highlights. Otherwise, paint the whole of the banana as one continuous shape… Once this first banana is done, notice I added a few dabs of stronger color here and there, therefore adding a touch more depth and helping to suggest the rounded form of the banana — even if this is just the first transparent layer.
Then move on to the second banana and do the same thing – paint the whole shape, leaving a small white highlight, and finish by dabbing in a bit more color in the shaded areas.
Don’t worry too much about getting it perfect – just aim to keep the wash smooth, and watch how the water carries the pigment.
Now that the first “glaze”, or layer of the painting is finished, leave the paint to dry completely before moving on.
Layer 2
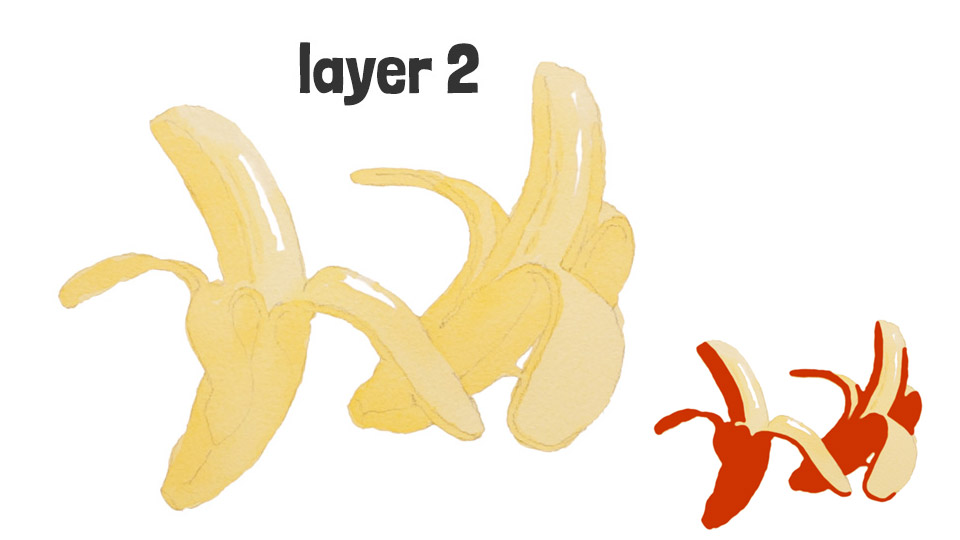
Moving on to layer two – still using a fairly diluted mixture of yellow – start adding a new layer of color, but only in the places where the banana needs a bit more depth. In other words, you’re no longer painting the whole shape, but just the next level of shading – building up the colors gradually. You can follow this example to get a rough idea of where to place this second shape, while still leaving some of that first layer untouched.
This is where a bit of forward thinking really helps – and it’s why watercolor is typically built up from light to dark, and from larger shapes to smaller ones.
Each new layer sits on top of the last slowly building up the illusion of three-dimensions.
Layer 3
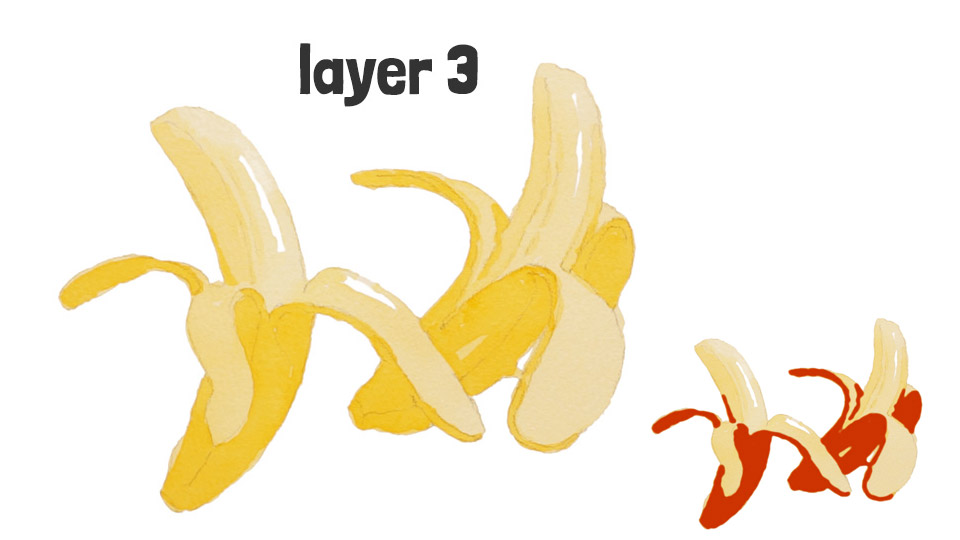
Leave everything to dry again, then start painting layer three.
This time, we’re focusing mostly on the outer skin of the banana – this area is generally deeper and more saturated in color than the inner part of the fruit.
Use a slightly stronger mix of yellow and paint a fairly even layer, leaving the lighter inner part untouched. (The diagram shows you a rough example of how I painted).
By now, you’ll notice how each layer you add gets a bit smaller and more focused — this is exactly how layering in watercolor creates a sense of depth and dimension – by building up translucent color step by step.
Take your time, and enjoy watching it come to life!
Layer 4
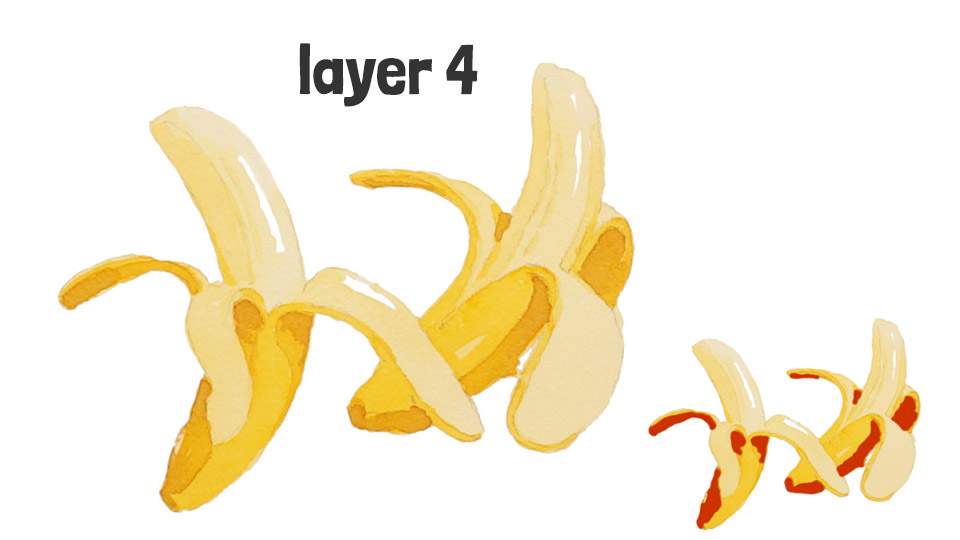
Now on to layer four – and this is really where things start to come together.
At this stage, I started adding more defined shadow shapes to help the bananas look more three-dimensional. The paint mix I’m using is mostly yellow, with just a touch of red and brown – and also quite diluted. This produces a slightly neutral color and helps the shadows feel softer and more natural.
This new layer helps reinforce the direction of the light, making the banana look more rounded, rather than flat.
After painting the shadow shapes, I also dabbed in a little bit of a darker brown in the deepest shadow areas.
As you’ll see, we’re not doing anything fancy here – just slowly layering up transparent color, one step at a time.
I think it’s this gentle, gradual approach that gives watercolor its depth and visual appeal.
Layer 5
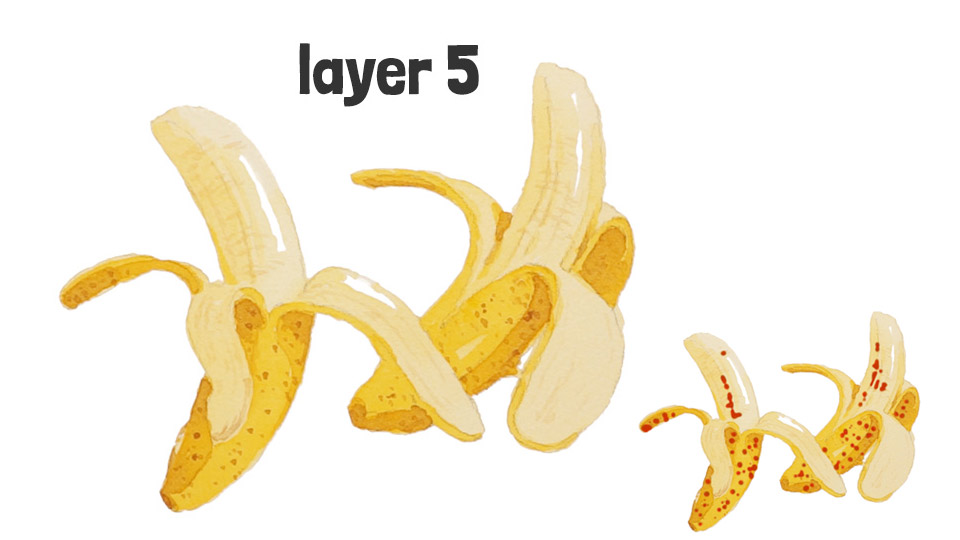
Leave the paint to dry completely before moving on to the final layer.
At this stage, it’s all about adding the finishing touches – for example, adding the speckled texture on the outer skin, and a few faint lines to suggest the textured surface of the banana fruit itself.
These details don’t need to be perfect — just a few well-placed brush marks can go a long way to bring the painting to life. 🙂
And there you go! I hope you enjoyed painting along. This first exercise was all about showing how layering transparent color creates form and depth in watercolors.
Key Takeaway
So… here’s the main thing to remember:
- Watercolor has two unique characteristics: it’s water-based and transparent.
These two quirky little characteristics are behind many of the struggles faced by beginners.
In the next challenge…
But here’s the thing…
Everything we’ve looked at so far is just one way of working in watercolor.
What if I told you, instead of painting the subject directly… it’s sometimes better to paint around it?
This might sound a bit strange at first – but once you see the next lesson, it opens up a whole new way to approach your watercolors.
I’ll see you in the next lesson 🙂
Want to Learn More about Watercolors?
If you’re enjoying this and want to dive a bit deeper, I’ve got more step-by-step courses designed to help you grow your watercolor skills:
- The Watercolor Masterclass for Beginners – A flexible, self-paced course that helps you paint beautiful watercolors – without wasting years on trial and error.
- Successful Color Mixing – the guide to effortless color mixing with watercolors.
- Secrets to Water Control – Struggling with water control? There’s a method behind the magic!

Hi Anthony,
I had a go at painting the banana’s and overall was happy with the result. I didn’t leave enough “white” paper for hi lights, so went over them with white Gouache, not quite as effective. Thank you for your clear and helpful easy to follow instructions. Was unable to find where to post my results to show.
Glad to hear you had fun with this exercise Maureen !
If you’d like to send me your results you can simple email me at [email protected]
Anthony,
Thank you so much for the first lesson with the bananas. I also had too dark pencil lines and a few blooms I had to get rid of, but they did come out looking like bananas!!
I was having a little problem with knowing when to add or use the other 2 colors.
I didn’t have the exact same colors as listed but did my best in matching yours.
My banana fruit came out more yellow than a light yellow/beige. I think it might be helpful if you could write in the directions when we use the other 2 colors (names) besides the yellow. Thank you again.
Hi
In my own version I used a lot of pure yellow at first, then only in the final stages I started adding a small amount of red to make an orange-yellow – and the final details are a mix of yellow with a tiny bit of brown to tone it down.
So it’s mostly yellow with very small amounts of red or brown to warm up or tone down the colors.
Hope that helps 🙂
Hi Anthony first of all I can understand your voice perfect.Really you have a very good pronunciation.That make me relax and enjoy my first class with the bananas. Start understanding the sutil way of work.many thanks and tomorrow will start with rhe second..See you
Have fun Marcelo 🙂
Hi Anthony,
I’ve been leary to return to watercolor as I haven’t painted anything in 2 years. This is just the kick I needed to get myself back into it.
Fyi, I believe it was you who, a few winters back, put up the 10 Days of Christmas challenge. I had great time with it and made a Shutterfly book of the song with the paintings and sent a copy the next Christmas to my great grandkids. They loved it and I bought a copy for myself. Perhaps I can share a few photos if you’d like. I hope it was your teaching….can’t recall.
I appreciate all you do and am happy to be in touch with you!
Take care! Looking forward to next week.
Blessings,
Suzanne Duncan ❤️
Hi Suzanne
Lovely to hear from you 🙂
Yes… the 10 days of Christmas challenge was fun!
And I’m so glad to hear this new challenge has got you painting again…
I’d love to see your paintings – by all means send me a quick email.
Take care
Thanks for this lesson. I had taken a “beginner” watercolor class years ago, was left thoroughly frustrated, the instructor never mentioned layering paints to build up a picture. This will help so much.
Happy to help Ruth 🙂
I just started today, a little late but here I am. The first mistake I made was doing the drawing with the first pencil I grabbed, a black pencil crayon. I liked the exercise. It really stressed the layering and shadowing.
Hi Lynn
Glad you jumped in — better late than never!
I love this. I am still working thru your master watercolor class. I need to make more time and these types of lessons will help me get there! Thank you!
Hi Lynn
Yes, these shorter lessons can be a great way to ease back in!
Hello Anthony!
You have helped me tremendously!
I have just been diving in and hoping for the best result. This step by step process makes it more clear to me.
Funny enough, I teach a paintingo class for seniors. I am a volunteer and spend hours each week on you-tube to find tutorials that the folks can manage. They are usually loose and abstract landscapes and images. I do it myself first so I know how to explain it to them. So I’ve been learning as I go.
Thank you for helping me to find my next class and to know better what I am doing.
I will participate!
Hi Alicyn
That’s wonderful to hear — and what a lovely thing you’re doing for your group!
I’m glad the step-by-step approach is helping.
Well presented to get mine looking better i need to practice, practice, practice.
Hi Norma
Exactly — Practice is the key! Glad you’re on board.
Hi Anthony, I’ve just done your banana exercise and while it’s not perfect I’m happy with the getting used to working in layers and patience:-). Another excellent tutorial and I’m looking forward to lesson 2, and continuing on with your course. Thanks Fiona:-))
Hi Fiona
Glad to hear you’re getting to grips with layering 🙂
Have fun with your paints!
Hi Anthony,
This is a wonderful lesson giving a gentle introduction – just what I needed. One thing I’ve learned is that my pencil guide-lines must be made a lot fainter as they cannot be erased from beneath watercolour layers.
Thank you for doing this.
Hi Peter
(thanks – fixed it!)
So glad it was helpful.
A quick tip: I use a kneaded eraser to gently dab the surface and lighten the lines before painting.
Works a treat!
Thank you Anthony. This helped me to understand that I am on the correct pathway to my watercolour goal. Well presented and easy to follow!
Hi Amanda – sounds like you’re right on track!
You’re such a great teacher Anthony. I really appreciate the work you put into your lessons, you make it easy to follow. Thank you for sharing your knowledge and expertise.
You’re welcome Anne 🙂
I liked the way you showed where to add the next layer in red on the side picture.
My result even looked a bit like a banana!
Hi Carlene
Glad it worked out… And a banana that actually looks like a banana — nice one!
Thanks a lot!!
I love your teaching style. So concise and easy to understand.
Thanks Sheryl!
Thank you Anthony!
I usually use watercolor with a heavy hand and doing this lesson the way watercolor should be used was interesting and fun!
I enjoy joy your lessons on line!
Thanks so much Anita!
Thank you for taking the time and patience to guide and direct our passion again.
This is wonderful, although I know for years it is what I did in my watercolor painting, we got away from the steps. Love your technique and now can get back to painting.
That’s great to hear Patricia — sometimes going back to basics is just what we need 🙂
Thank you so much, Anthony! That was a great tutorial, especially for beginners like me. I can’t wait for your next lesson in this challenge! I will try to put principles learned from this one into practice until then.
Thanks Dianne – see you in the next lesson!
Thank you, Anthony:
This looks like fun . . . and I’m looking forward to the rest of the lessons.
Thanks Mary! There’s lots more good stuff coming.
Thanks for this unexpected and much appreciated lesson on painting these bananas. I’m still struggling to learn to paint with watercolor. I did your Macron lesson a while back. I have to say it was a success and I enjoyed it. I’m going to try the bananas. Just wanted to say I appreciate your email and sharing your knowledge.
Lisa
That’s lovely to hear, Lisa — I’m really glad the macaron lesson was a win! Hope you enjoy the bananas just as much.
Thank you! . . . this looks like so much fun!
You’re so welcome — hope you have a blast!
You are really good and effective in your texts!
Thanks Laura 🙂
Very helpful. Thank you so much, Anthony!
Joyce
Happy to help Joyce
Thanks Anyhony. Much informative. Looking forward to the next.
Have fun Rita!
I’m not a beginner, but I’m still learning, and your lessons are chock full of good stuff to learn! Thanks!
Thanks Judith!
I’m off to try the bananas!
It would be great if you could make these lesson webpages available as .pdf files,
so I could save them in a notebook for easy reference, along with the sketches and ref photos.
I’m hoping a future lesson will focus on values and contrast.
That’s been a big challenge for me.
Thanks for the suggestion Joseph – You might find this article useful for values and epth 🙂
This great! Learned lots and it was fun!
🙂
A friend just turned me on to your site. Love the easy way you explain everything and each step. Did some watercolor several years back. Several actually turned out nice, but I never really understood the process. I’ve been thinking about digging out my paints again. This will definitely remind me of what little I did know and the extra tips about the things I don’t. Thanks!
That’s brilliant to hear — sounds like perfect timing! Hope it gets you back into painting soon.
I cannot wait to dig out my watercolors and get started again. I purchased your master class and it was fabulous – at least the lessons I actually started! I travel half of the year and always have an excuse why my watercolor supplies stay packed! Thanks, Anthony – this is exactly what I need! Cathy
So glad to hear that, Cathy! Hope this gets you painting again – even on the road!
Thank you for sharing the tips and process of watercolor painting.