Welcome to the Watercolor Challenge !
So… you’ve taken the plunge and joined my watercolor challenge. Now you’re probably wondering what on earth you’ve got yourself into! 🙂
Whether you’re totally new to watercolors or picking up your brushes again after a break – you’re in the right place. This challenge is here to help build your confidence, and get you painting without feeling overwhelmed.
Because this isn’t about painting the next Mona Lisa!
It’s about falling in love with water, pigment… and a bit of controlled chaos…
Now before we get going I wanted to share something that might save you a lot of time and overthinking.
I’ve seen so many students get stuck researching supplies.
They fall down the rabbit hole of trying to find the “perfect” paints or the “best” brushes…
But honestly? You don’t need any of that to get started. And all that research only slows you down.
You just need a few basics:
- Watercolor paper (any cold press paper will do)
- A small selection of paints (primary colors are perfect)
- A brush or two
- Water, (and your sense of curiosity)
That’s all you need. No fancy kit or ultra-expensive brushes!
Just a few tools, and a willingness to get stuck in.
Even if it gets a bit messy along the way 🙂
Basic Watercolor Supplies
I’m a bit of a nut when it comes to watercolors so I tend not to count when it comes to paints, paper, etc ! But watercolor supplies can get pricey, and when you’re just starting out (or getting back into it), that can lead to hesitation and fear of “wasting” things.
I don’t want that for you. The whole point of this challenge is to help you actually get painting – no more waiting around for the “perfect” tools. Just use the closest thing you’ve got.
That being said, here’s a simple guide to help you get started with the essentials for this watercolor challenge:
1 or 2 Brushes will Suffice
You don’t need to spend a huge amount on watercolor brushes. You can easily do any type of watercolor painting techniques with a minimum of two or three brushes. For example:
- A large round brush is your go-to tool for the majority of paint applications.
- A small round brush with a pointed tip will allow you to paint fine details.
A “round” brush is absolutely the most versatile type of brush you can own. It allows for a multitude of techniques and can handle everything from broad strokes to fine details. If your choice is limited to just one brush, go for a large to medium-sized round 🙂
When I say “large”, for me this means a brush about 3/4″ of an inch to 1″ inch long:
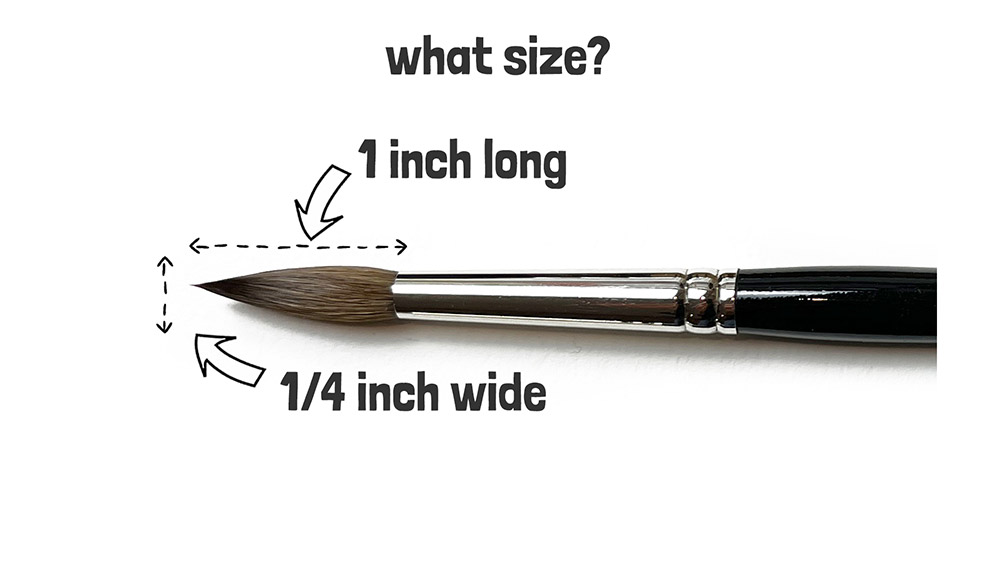
The “best” watercolor brushes are made from natural hair… They have a superior water-holding capacity making it easy to produce long flowing brush strokes. However, these are also the most expensive! Today, synthetic brushes mimic the handling properties of natural hair brushes pretty well.
Go with whatever you have available. But if you’re looking for a low-priced option to get going, personally I like the following:
Large round brush options
Some of the better synthetic watercolor brushes I have tested are the Rosemary & Co Red Dot range, or The Princeton Aqua Elite range:
This category of synthetics is quite springy, which helps with brush control when you’re a beginner.
Small round brush
The same recommendations apply as for the larger round brush. Here are the sizes I suggest:
Paint Choices
I suggested choosing just six paints that include a warm and cool version of each primary color.
This type of color palette is known as the “split primary” palette (because each primary is split into two). It’s one of the easiest ways to start understanding how colors mix.
- You only need 6 paints
- You can mix a large variety of colors
So it’s a win-win 🙂
For reference, these are MY go-to warm and cool primary paint colors:
- Hansa Yellow Deep – Pigment number: PY65
- Lemon yellow – Pigment number: PY175
- Phthalo blue GS – Pigment number: PB15:3
- French ultramarine – Pigment number: PB29
- Quinacridone rose – Pigment number: PV19
- Pyrrol scarlet – Pigment number: PR255
A LOT of people get confused about warm and cool paints – so you’re not alone!
Here’s the simple reason we use both:
A warm and a cool version of each primary lets you mix a wider range of colors, more accurately. If you only use one red, yellow, and blue, you’ll often end up with dull or muddy mixes. Having both warm and cool gives you way more control—and the results can be surprisingly different!
Try to pick out warm and cool versions of each primary from the paints you already have.
Not sure which of your paints are warm or cool?
Here’s a quick visual guide to help.
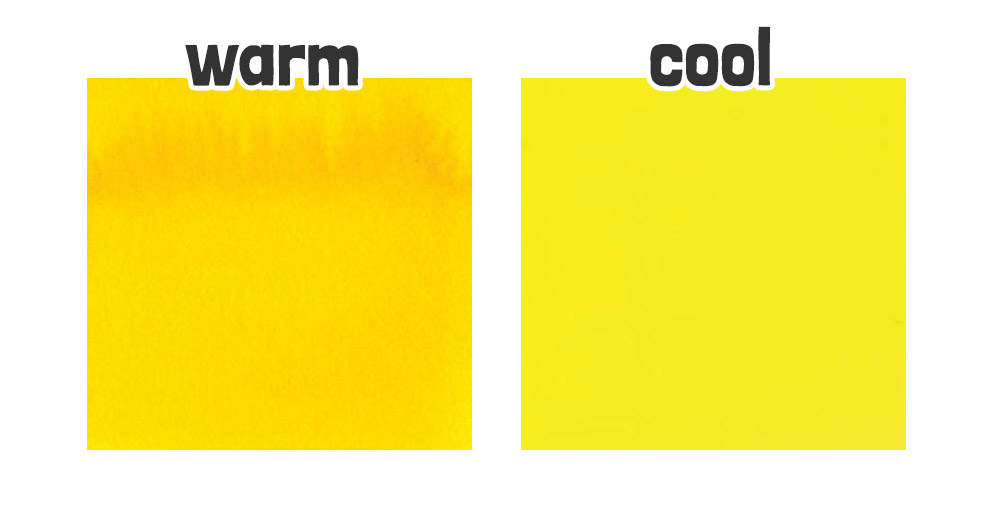
- Yellows: A cool yellow leans slightly green (like lemon), while a warm yellow leans more towards orange (like golden or sunflower yellow).
- Reds: A cool red looks more pink or magenta (like rose or crimson), while a warm red is deeper and leans towards orange (like scarlet or vermilion).

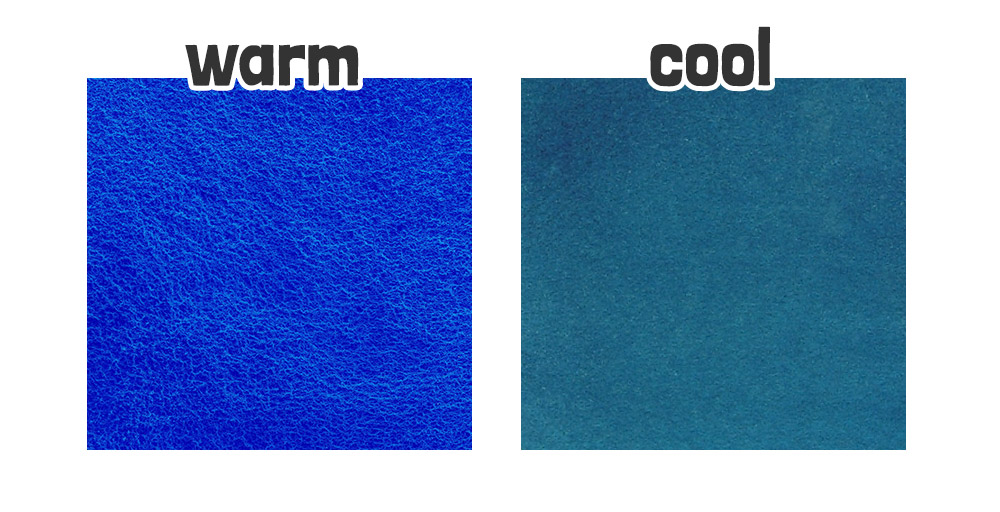
- Blues: A cool blue has a hint of green (like turquoise or phthalo blue), and a warm blue leans more towards purple (like ultramarine).
And if you’re not sure — honestly, it’s no big deal. Just start with what you’ve got and see how the colors mix.
What paper should you use?
Use whatever watercolor paper you have to hand – just make sure it’s actually made for watercolors and thick enough to handle watery paint without falling apart 🙂
“Artist grade” 100% cotton paper performs best because it handles wet-on-wet painting techniques so well. Wet-on-wet techniques are easier when using artist grade paper.
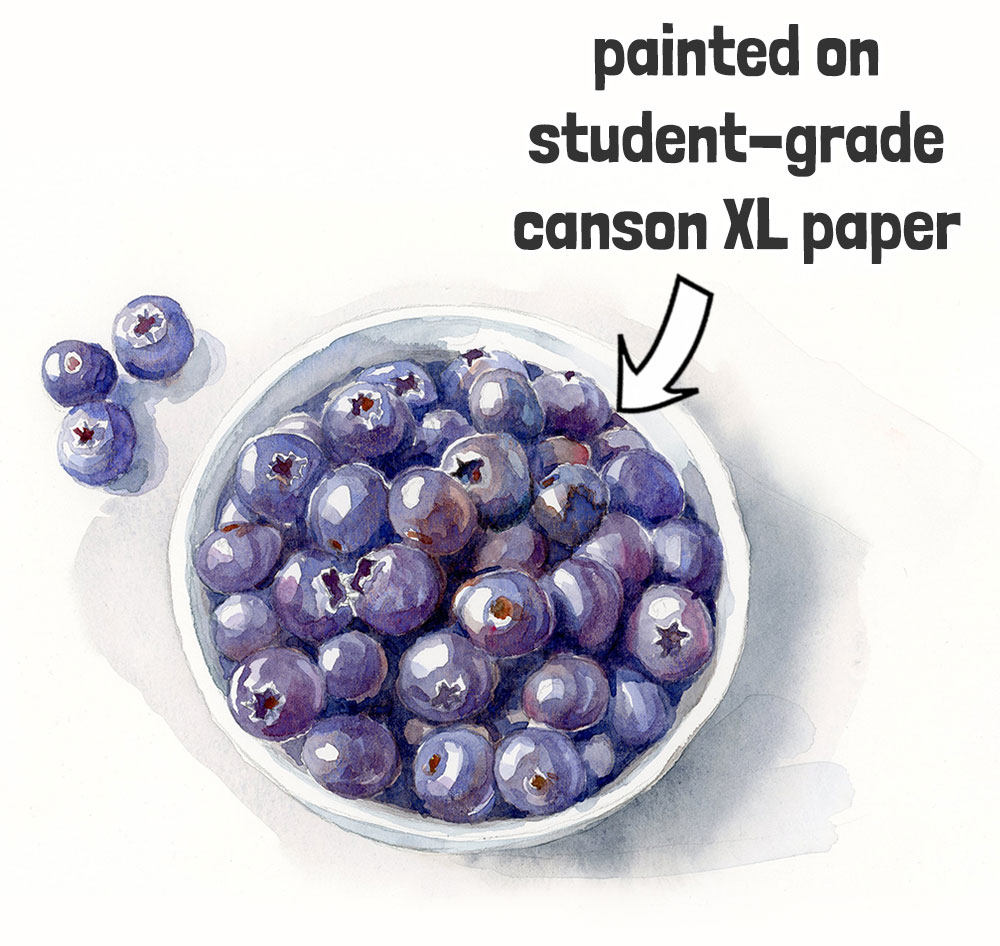
The more economic version of watercolor paper is referred to as “student grade”. You may not need perfect paper handling each time you paint. For example, wet-on-dry techniques such as “glazing” work very well on student grade papers.
So my advice is this – on a general basis don’t hesitate to use student grade paper for playing around. And when you want the best wet-on-wet handling, opt for artist grade paper. But… You should experience BOTH types to realize for yourself the difference in handling.
The artist grade watercolor paper I use is Arches 100% cotton cold press 140lb / 300 gsm. And Canson XL 140lb / 300 gsm is a good student grade paper. I’ve had pretty good results painting on this paper in the past…
Meeden watercolor paper: is a solution for learning on cotton paper without paying the premium price. I’ve been using this a lot recently and I find the dispersion of pigments with wet-on-wet is pretty good! (Amazon link)
Other stuff
There are a few other useful things you’ll see me use during this challenge. These include:
- Phthalo Green BS – Pigment number: PG7
- Burnt umber – Pigment number: PBr7
- Paynes gray – Pigment number: Pb29/PBk9
You CAN mix, browns, greens, and grays with the six split primary colors. The ready-to-go colors like the ones above are known as “convenience colors because… well… they make life more convenient 🙂
- Water containers for rinsing brushes and picking up water
- A flat board to fix down the paper
- Some masking tape – Low-tack tape is best, as it holds the edges without tearing the paper when you remove it.
- Masking fluid – Extremely handy stuff! I recommend using an odorless version like this, especially if you’re sensitive to strong smells.
- Soft absorbent cloth
- Water containers for rinsing brushes and picking up water
- A flat board to fix down the paper
A final word
There is no such thing as wasted paper… every project you paint is a step towards progress and improving your skills in watercolor 🙂 (regardless of what you think of the results)
Happy painting!
