Watercolor Donut Tutorial (Just for Fun!)
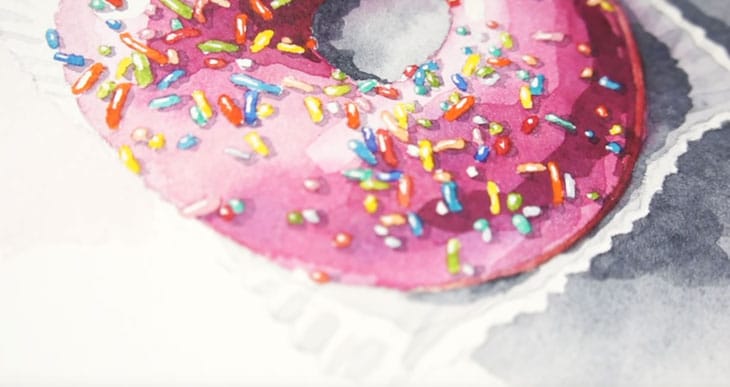
I came across this image of a donut the other day and I thought it would make a great subject for a watercolor painting. It’s bright, colorful, and fun!
So this lesson doesn’t have any particular underlying theme about watercolors…
It’s just for fun!
Also, I think this is a great subject for practicing your painting techniques, whatever your level of skill with watercolors.
I’ll explain all the techniques I used to paint this watercolor donut composition so you can easily reproduce the same painting, and if you’d like to follow along, as usual, you’ll find a link below to download a worksheet with a traceable template and all the reference material you need.
So with that being said, let’s have some fun!
Watercolor Donut Simple Step by Step Tutorial

The first step of course is to transfer the drawing to a sheet of watercolor paper then tape it down around all the sides.
Before starting to paint the donut itself, you’ll need to mask all of those colored sprinkles using some masking fluid like this.
If you don’t do this, it makes life pretty difficult if you have to paint around all those tiny shapes. Needless to say, I don’t fancy doing that!
I also used the masking fluid to hide the two main highlights. The glazing on the donut is very shiny, and if you want to get a result with sharp highlights and a good range of depth, I think it’s important to preserve these bright spots.
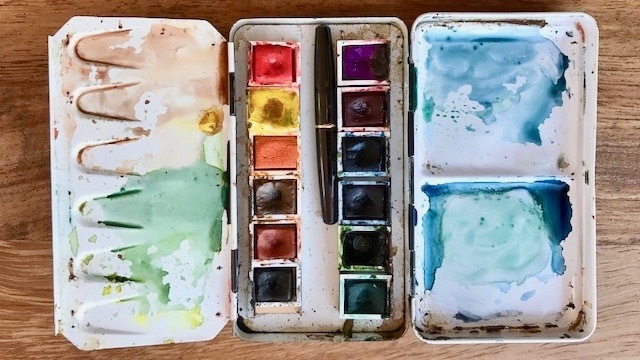
I used just four paint colors for the main parts of this painting:
- Quinacridone rose – Pigment number: PV19
- French ultramarine – Pigment number: PB29
- Raw Sienna – Pigment number: PBr7
- Paynes gray – Pigment number: Pb29/PBk9
Try this painting for yourself ! Click the button below to download the worksheet for this painting.
After the masking fluid has had time to dry, start painting the main shape of the donut using a very diluted mix of pink. Cover the hole of the shape with this diluted paint and make sure everything stays nice and wet. This is because you’re going to “charge-in” some extra color while the surface is still damp.
This wet-on-wet technique lets you establish the underlying color of the donut, and also start to build up the tonal range so you can get a more convincing three-dimensional form.
You can use the reference photo from the worksheet as a guide, but notice how I’m dabbing stronger color on the shaded parts of the donut, and leaving the parts that are turned towards the light untouched so that the diluted pink color shows through. For the most intense shading I’m using quinacridone rose mixed with a bit of french ultramarine.
Leave this layer to dry before moving on.
Now you can add some color to the underside of the donut. I’m using raw sienna mixed with a small amount of quinacridone rose to achieve a pastry color in harmony with the pink icing.

Notice how the first layer of paint has a lighter appearance now that it’s dry. This is typical of watercolor paints. So now I’m going to repeat the same process again by painting the donut with a weak, diluted mix of pink, and then charging in color for the darker shaded parts.
Around the two main highlights I’m leaving the first layer untouched, so that the lightest valued pink color shows through. This will make the color values more progressive from light to dark on the finished painting.
With the new layer of diluted paint complete, and while the surface is still damp, I take advantage to blend in some darker toned paint, again trying to follow the differences in value that I can see on the reference photo. I’m using quite an intense mixture of pink for this new layer.
If you’ve followed the painting method I used so far, you’ll see that I’m using a mixture of techniques simultaneously. The first layer was left to dry completely before applying a new layer of paint. This is a wet-on-dry technique known as glazing. At the same time, each new layer uses a wet-on-wet technique of “charging-in” so that the colors blend and diffuse on the surface, without any hard brush strokes.
At this point I’m going to change methods and apply a glazing technique directly, without pre-wetting the surface. The new layers of paint will increase the tonal value but the shapes I paint will have hard, well-defined edges.
I’m using a dark crimson color to paint the shadow shapes on the inside of the donut ring and the bottom outer edge. This color is made with a mixture of quinacridone rose, ultramarine and raw sienna.
Leave this layer to dry, then mix up an even darker crimson color, and paint some smaller shapes to represent the strong shaded parts of the donut form.

To sum up, I’ve used four applications of paint ranging from very light to very dark valued colors to create an impression of three dimensions.
Now I’m going to start adding some shading using Payne’s gray. I started with a very diluted mix of gray to paint the background around the paper baking cup. Without this the edge of the white baking cup would be difficult to read.
Then I started adding shading to the inside of the baking cup, starting with a diluted gray color, and then charging-in a more intense mix of gray while the shape is still moist. I also added some quin rose to the payne’s gray to paint a shadow color close to the edge of the donut. This helps give an impression of reflected light.
Next I use the same method to paint the cast shadow, starting with a very diluted gray, and using a charging-in technique to adjust the intensity of the shadows close to the bottom edge of the baking cup.
This creates a more realistic impression of shadows, which are always darker the closer they get to the object.
Leave this layer of shadows to dry then use a glazing technique to paint some small dark shadow shapes close up to the cup, without blending out the edges.
Don’t forget to add some shading to the folds in the paper baking cup. Using a light gray paint mixture, alternate between a shaded fold and leave a gap for the folds that are turned towards the light.
At this point you can remove the masking fluid. Use a kneaded rubber, and make sure the paint is completely dry before you do this.
Add some gray shading to the inside of the donut ring using the same process as before, first with a diluted gray and a darker color charged on top. Then a small dark shape with sharp edges up close to the donut.
Now you can have some fun painting the colored sprinkles!
Use a variety of bright primary and secondary colors for this. You might also want to change your brush for a small pointed round brush which is better suited for painting details.
This is quite a long process, but keep in mind one thing when painting these sprinkle shapes… Try to leave a small white highlight which represents the direction of the light. You can begin to see this as I progress with the painting.
Keep on going until the last of the sprinkle shapes are colored in!
Now there’s only one final detail to add to the painting – add some cast shadows to the sprinkles themselves!

These might seem a bit tedious, but it will make the difference between the sprinkles looking flat, and making them seem to pop out of the surface of the paper.
I used a fairly diluted mixture of crimson for this, similar to the hue used for the shaded parts of the donut.
Don’t forget if you want to try this painting for yourself you can download the worksheet using the link above.

Thank you Anthony.
🙂
Love your detailed tutorial. Thanks!
Glad you enjoyed it Barb !